Phenomenon:
This phenomenon occurs if any language other than
the default setting was added to the menu display by OLYMPUS Master
2 ( or OLYMPUS Studio 2 ) before E-3/E-510 firmware update. After
updating to the latest firmware ( E-3: Ver 1.1 / E-510: Ver 1.3
),
the camera may reboot by pressing the IS button for image stabilization.
This can be resolved by downloading the desired language and add
to the camera menu.
Caution:
This phenomenon does not occur if no optional
language was added to the menu, or if OLYMPUS Master 2 / OLYMPUS
Studio 2 is used with Macintosh operating system. This troubleshooting
is not required.
This typical problem with Windows will be resolved by updating
OLYMPUS Master 2/OLYMPUS Studio 2 in the future.
This phenomenon occurs only in OLYMPUS Master 2.04 ( OLYMPUS Studio 2.11) or earlier version for Windows. If you use the latest version, this troubleshooting is not required. Before updating the firmware in your camera, it is recommended to update the OLYMPUS Master 2 or OLYMPUS Studio 2 to the latest version.
Troubleshooting:
Since an identical language cannot be downloaded
as an additional language, download any other language first,
and then download the desired language. The process is the same
with OLYMPUS Studio 2.
For the detailed
process, please see the followings:
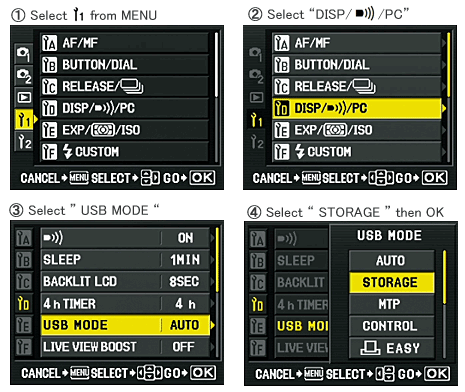
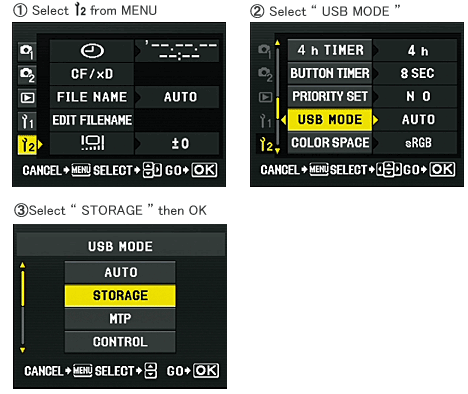
- Set the camera's USB MODE to "STORAGE"
if it is set to somewhere other than the "STORAGE"(
originally set at "AUTO" ). The following is setting
process.
- In case of E-3 : Select "STORAGE"
of the "USB MODE"

- In case of E-510 : Select "STORAGE"
of the "USB MODE"

- Launch OLYMPUS Master 2 without connecting
the camera.
After launcing the OLYMPUS Master 2, connect the camera to PC
using a USB Cable.
In case the camera's "USB MODE" is set to "AUTO",
camera monitor displays confirmation window. But the connect
mode was set to "STORAGE" in the previous step, no
confirmation window appears.
- Click on the "Camera" menu and
select [ Update Camera/Add display Language ].
* Follow the same process in the OLYMPUS
Studio 2.
- Click [ OK ] on the Update window.
- "Update Camera / Add Display Language"
window is displayed.
Click on [ Add Language ].
- In the "Add Display Language to Camera"
window, choose a language that is not added to the camera, and
click [ Add ].
(The languages already added to the camera are not displayed)
- The "Software License Agreement" will display.
Click [ Agree ].
- The chosen language will be downloaded and
transferred to the camera.
When the camera monitor displays "OK", as the
right side window of dialog box, the installation of the additional
language was completed. Click [ Next ] .
- Computer will indicate to disconnect the
camera. Disconnect the USB cable from the camera, and click
[ Close ] in the software. Turn the camera OFF.
- Again, add the desired language in the OLYMPUS
Master 2. Connect the USB cable to the camera, turn ON the
camera, and follow the process from the above No.2. And at the
above process No.6, to choose the desired language, select the
language used before the firmware updating and transfer to the
camera.
Disconnect the USB cable from the camera, and click [ Close
] in the software. Turn the camera OFF.
- The process is complete.
At the above process 1, "USB MODE" was changed. Restore
the USB Connection mode to "AUTO" ( or anothermode
) following the above process 1
All procedure is complete.
|


