 |
 |
|
|
Questions :
Question :
What differentiates the LED Light Guide LG-1 from the Flash Diffuser FD-1?
Answer:
The following table describes the differences:
| |

LED Light Guide LG-1 |

Flash Diffuser FD-1 |
| Compatible Cameras |
TG-4, TG-3, TG-2, TG-1 |
TG-4
(Firmware update is required) |
| Light Source |
Built-in LED light |
Built-in flash |
| Shooting Distance |
1 - 10 cm
* The distance from the lens front
|
2 - 30 cm
* The distance from the lens front
|
| Underwater Usage |
Not usable |
Usable |
| Light Control |
Not available |
Available
* 2 light volumes can be selected on the FD-1:
 (Normal) and (Normal) and  (Low) (Low)
|
LED Light Guide LG-1
The LED Light Guide LG-1 uses the LED on the front of the camera to illuminate your subject.
In addition to lighting your subject while the image is taken, the LG-1 also assists in composing your image, as the constant light source illuminates the subject. When using the LG-1 the camera's closest focusing distance is 1 cm, allowing the camera to lay flat on the subject and still focus.
Flash Diffuser FD-1
The Flash Diffuser FD-1 uses the in-camera flash to illuminate your subject.
The in-camera flash offers a significant increase in the amount of light. This increase in light allows for usage of lower ISO settings and faster shutter speeds, as well as an increased working distance. The FD-1 can also be utilized under water. The camera's closest focusing distance to the subject is 2cm.
When using the FD-1
- To use the Light Control, update the firmware of your TG-4 camera to version 2.0.
- You can attach the FD-1 to the TG-3, TG-2 and TG-1 camera, but results may vary because the firmware does not support these products.
Question :
How do I attach the FD-1 to the camera and what settings are required?
Answer:
To use the flash diffuser FD-1, please do the following procedure:
- Remove the lens ring from the TG-4
- Attach the flash diffuser
- Set up the camera settings
Note:
To use the flash diffuser FD-1, update the firmware of your TG-4 camera to version 2.0.
1. Remove the lens ring from the TG-4
To remove the lens ring from the TG-4 camera, rotate the lens ring anticlockwise, to the "Remove direction" as in the following illustration.

2. Attach the flash diffuser
Align the attachment mark (white circle) on the camera with the mark on the flash diffuser, and then insert the flash diffuser into the camera. Rotate the flash diffuser clockwise, to the "Attach direction" as in the following illustration, until you hear a click.

The following picture demonstrates what the camera looks like with the flash diffuser (FD-1) attached:

3. Set up the camera settings
Exposure control in Microscope mode is optimized for the FD-1 when the FD-1 in Accessory Settings is set to On. Flash compensation in Microscope mode is also possible.
Update the firmware of your TG-4 camera to version 2.0 to enable this setting.
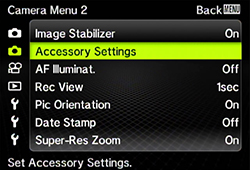
- Press the [MENU] button. Select Accessory Settings in Camera Menu 2, and press the [OK] button.

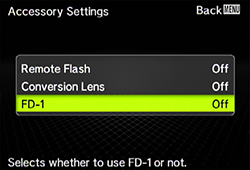
- Select FD-1, and press the [OK] button.

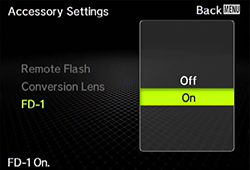
- Select On, and press the [OK] button. (Default setting: Off)

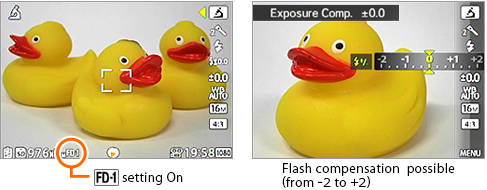
- When the setting is completed, the icon showing that the FD-1 is set to On is displayed on the monitor.
Flash compensation is possible in Microscope mode.

Note:
Set the FD-1 setting to Off in the following situations:
- when taking pictures in shooting mode other than Microscope mode
- when the FD-1 is not used
|
|


