|
 |
|
|
Questions:
Question:
Which shooting mode should I use? [Shooting mode, Scenes]
Answer:
|
"iAUTO (intelligent auto)" mode is recommended for regular photography.
In iAUTO mode, the camera automatically adjusts the settings.
This is a fully automatic mode that dynamically selects the shooting mode in response to changing shooting conditions. This allows you to take pictures using the shooting mode best suited for the scene by simply pressing the shutter button.
If you want to change settings such as white balance (WB) and ISO sensitivity, turn the mode dial to other modes (e.g. to "P").
The following shooting modes and scenes are available:
- iAUTO (Intelligent Auto)
By simply pointing the camera at the subject, the camera automatically sets the shooting mode best suited for the scene. As the shooting conditions change, the camera reevaluates the scene and dynamically selects a new shooting mode if appropriate. Available modes are Portrait, Macro, Sport, Night+Portrait, and Landscape.
[Camera Menu] settings such as white balance and ISO sensitivity cannot be changed.
- P (Program Auto)
The camera automatically sets the optimum aperture and shutter speed based on the lighting conditions.
Unlike "iAUTO" mode, [Camera Menu] settings such as white balance and ISO sensitivity can be changed.
- BEAUTY (Beauty mode)
This mode enables you to track your subject's face in a frame and smooth persons' complexion.
Both the original and retouched pictures will be saved.
Depending on the subject, the frame may not appear or take time to track your subjects' face.
Also, the editing may not produce the desired effect.
Image size for the retouched pictures are restricted to 2M or less.
- SCN (SCENE)
The camera offers 14 scene modes for shooting in various conditions.
 PORTRAIT PORTRAIT
For taking a portrait-style shot.
The camera automatically sets the optimal shooting conditions to produce natural skin tones.
 LANDSCAPE LANDSCAPE
This mode is suitable for taking pictures of landscapes.
It vividly reproduces blues and greens.
 NIGHT SCENE NIGHT SCENE
For shooting illuminated scenes in the evening or at night.
The camera sets a slower shutter speed than in normal shooting.
For the best results, use a tripod so your camera remains steady when shooting.
 NIGHT+ PORTRAIT NIGHT+ PORTRAIT
For shooting both a foreground subject and an illuminated background in the evening or at night.
The camera sets a slower shutter speed than in normal shooting.
 SPORT SPORT
Captures fast-moving action without blurring.
 INDOOR INDOOR
For shooting both main subject and background indoors (e.g. at a party).
The background is reproduced clearly.
 CANDLE CANDLE
This mode is ideal for shooting under candlelight.
Warm colors are reproduced.
Image quality is restricted to [3M] (2048x1536) or less.
 SELF PORTRAIT SELF PORTRAIT
Lets you take a picture of yourself while holding the camera.
 SUNSET SUNSET
For shooting the setting or rising sun. Vividly reproduces reds and yellows.
 FIREWORKS FIREWORKS
Suitable for shooting fireworks at night.
The camera sets a slower shutter speed than is used in normal shooting.
For the best results, use a tripod so your camera remains steady when shooting.
 CUISINE CUISINE
For still life photography.
Vividly reproduces colors of fruit, vegetables and flowers.
 DOCUMENTS DOCUMENTS
For shooting paper documents.
Increases contrast between letters and background.
 BEACH & SNOW BEACH & SNOW
This mode is ideal for shooting white sand on the seaside or snow-capped mountains.
The colors of the sky, greenery and people are reproduced clearly.
 PRE-CAPTURE MOVIE PRE-CAPTURE MOVIE
This mode is useful for recording a short movie even before the moments you want to capture.
The camera captures a 7-second movie, including the 2 seconds before the shutter is fully depressed.
Image size can be selected from VGA (640x480) or QVGA (320x240).
Frame rate can be selected from 30fps or 15fps.
- MOVIE
The camera records video with sound.
|
Question
How do I take close-up pictures of small subjects? [Macro mode and Super Macro mode]
Answer:
Question
The colors in my pictures look different from the actual colors of my subject. What can I do? [White Balance (WB)]
Answer:
| |
Select a white balance (WB) setting that is more appropriate for the lighting conditions.
In the default white balance mode, WB is set to AUTO so you can take pictures with natural colors
in most lighting conditions.
The colors in pictures may differ from the subject's actual colors under the following lighting conditions:
- When the subject is in the shade on a sunny day
- When the subject is illuminated by both natural light and indoor lighting (e.g. near a window)
- When the light from the camera's flash does not reach a subject lit by indoor lighting
In cases like these, select the WB setting that is designed to capture accurate colors in the specific lighting conditions.
To select WB settings, the mode dial must be set to any shooting mode except iAUTO.
You can also select the appropriate setting by comparing the effects of each WB setting.
To enable this function, set the mode dial to GUIDE. In "Shoot with effects preview", select "Color effects."
The following table describes the available WB settings:
|
Question
In which shooting situations should I change the ISO sensitivity?
Answer:
| |
By default, the ISO sensitivity is automatically set, ranging from ISO 64 to ISO 1600.
Adjusting ISO sensitivity enables you to take crisp and clear pictures in different shooting situations.
With high ISO sensitivity and faster shutter speeds, you can capture sharp, blur-free images
in low-light situations and when the camera or your subject is moving.
You may see more noise or grain in your pictures when you use high ISO sensitivity.
If you use a lower ISO sensitivity, you can reduce the noise but the shutter speed will also become slower.
It is advised that you use a tripod so your camera remains steady when shooting.
ISO sensitivity can be changed as shown below:
| AUTO |
The camera automatically adjusts the ISO sensitivity for the best image quality. (ISO 64 to 1600) |
| HIGH ISO AUTO |
The camera selects a higher sensitivity than AUTO to minimize the blur caused when the subject or the camera moves. |
| ISO fixed |
The ISO sensitivity is fixed by selecting manually ISO 64, 100, 200, 400, 800 or 1600. |
|
|
Question
Can I cancel or change the volume of the operation sounds? [Sound setting, Silent mode]
Answer:
| |
Yes, you can set the operation sounds (shutter, alarm, etc.) to OFF or change their volume.
Press the [MENU] button, and then select SETUP.
In the SOUND SETTINGS menu, select the appropriate setting.
Sub
menu |
Sound & Volume Selection |
Operation |
| BEEP |
SOUND TYPE |
1 / 2 |
Lets you select the operation sounds and volume of the camera buttons ( except the shutter button ) . |
| VOLUME |
OFF( No sound ) / LOW / HIGH |
| SHUTTER SOUND |
SOUND
TYPE |
1 / 2 / 3 |
Lets you select the operation sound and volume of the shutter button. |
| VOLUME |
OFF( No sound ) / LOW / HIGH |
ALARM SOUND
 |
OFF ( No sound ) / LOW / HIGH |
Lets you adjust the volume of the alarm sound. |
VOLUME
 |
OFF ( No sound ) / LOW / HIGH |
Lets you adjust the playback sound volume. |
|
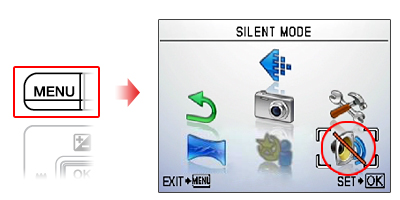
Silent Mode
In Silent Mode, all sounds (start up/operation/shutter/playback) are turned off.
This mode enables you to use the camera in places where you need to be quiet.
Press the [MENU] button, and then select SILENT MODE.
| OFF |
This mode activates custom settings of Sound Settings. |
| ON |
Electronicx sounds ( operation sounds, shutter sound and warning sound ) and playback sound are muted. |
|
|
Question
Can I cancel the information on the monitor or display a grid to check the composition of the picture? [Display Information]
Answer:
| |
Yes, during shooting and playback modes, you can change the display information on the monitor by pressing the DISP. button.
Press the button repeatedly to cycle through the available information display options. The arrows in the illustrations below indicate the order in which the display options occur.
When Taking Pictures
During Playback Mode
What is the histogram?
| |
The histogram shows the distribution of the light and dark tones in an image.
For example, when you use the camera in bright sunlight, it may be difficult to view the LCD monitor.
In such a situation, this function enables you to check the exposure of the image.
For more information about how to use the histogram, refer to the following Web site:
How to take great pictures: "A histogram is handy for shooting in bright places"
|
|
|
Question
What kinds of in-camera editing functions are available for this camera?
Answer:
| |
The following in-camera editing functions are available for still images:
-PERFECT FIX (Apply Shadow Adjustment and/or redeye reduction technology.)
- BEAUTY FIX (Retouch the subject's skin and eyes.) BEAUTY FIX (Retouch the subject's skin and eyes.)
- (Resize) (Resize)
- (Crop) (Crop)
-COLOR EDIT
-CARENDAR
Index functions are available for movies.The Index function extracts nine frames from a movie and saves them as a new composite still image.
Editiing Still Images
| PERFECT FIX |
ALL |
[SHADOW ADJ] and [REDEYE FIX] are applied together. |
SHADOW
ADJ |
This function brightens areas darkened by backlight and dim lighting. |
REDEYE
FIX |
Corrects redeye caused when a subject's eyes appear red in flash photography. |
BEAUTY
FIX |
ALL |
[CLEAR SKIN], [SPARKLE EYE] and [DRAMATIC EYE] are applied together. |
| CLEAR SKIN |
Smooth a person's complexion. You can select the desired effect from 3 levels: SOFT, AVG and HARD. |
| SPARKLE EYE |
This enhances the contrast of the subject's eyes. |
| DRAMATIC EYE |
Slightly emphasizes the eyes. |
RESIZE
|
[ VGA ]
640X480 |
This saves a separate, smaller copy of the image for e-mail attachment, etc. |
| [ QVGA ] 320X240 |
CROPPING
|
This is to crop a part of the image. The edited image is saved as a new still image. |
COLOR
EDIT |
Black & White |
This changes the picture color to black & white. |
| Sepia |
This lets you create sepia-tone photographs. |
| Saturation (hard) |
This increases the color saturation of the image. |
| Saturation (soft) |
This slightly increases the color saturation of the image. |
| CALENDAR |
This lets you add a calendar to an image. |
|
Editing Movies
| Index |
This function extracts nine frames from a movie and saves them as a new composite still image. |
|
Note:
| - |
"In-camera editing functions are available only for images and movies taken with the camera.
|
| - |
The edited images will be saved as new files. Before editing images or movies, be sure that there is enough storage space on the card or internal memory.
|
| - |
Depending on the image, an editing function may not produce the desired effect.
|
| - |
Editing may lower image resolution, which may produce grainy photos. |
|
|
Question
Which type of memory card can I use? [ xD-Picture Card, microSD Card ]
Answer:
| |
You can use xD-Picture Card™ media or microSD™ / microSDHC media
(hereafter referred to as "microSD cards").
To use microSD cards, a microSD adapter (packaged with the camera) is required.
The following xD-Picture Card media can be used:
Card Capacity: 16MB to 2GB
Card Type: TypeH, TypeM, TypeM+, Standard
To see all compatible microSD cards, click here:
" Compatible microSD card Tables "
|
Question
Will the bundled microSD™ adapter let me use any microSD or microSDHC card in my camera?
Answer:
| |
Click here to view a list of microSD and microSDHC cards that can be used with the MASD-1 card adapter. This page will be updated as additional cards are evaluated.
" Compatible microSD card Tables "
The art editing features of the xD Pack plug-in for OLYMPUS Master 2 do not support images recorded to microSD/SDHC cards. To use these features, use Olympus brand xD-Picture Card™ media.
|
Question
Will the microSD adapter allow me to use microSD and microSDHC media in other Olympus cameras?
Answer:
| |
MicroSD and microSDHC cards can be used only with cameras that are compatible with the MASD-1 microSD adapter. For a list of compatible cameras, click here.
The adapter is different from xD-Picture Card media in form. It will not fit in the card slots of other cameras that are compatible with xD-Picture Card media. Forcing the MASD-1 into an incompatible camera or other device may damage it or cause the equipment to malfunction. The data on the memory card may be destroyed.
|
Question
How do I install OLYMPUS Master 2 packaged with the camera? I would like to transfer pictures to my computer.
Answer:
Question
How many images can the μ-9000 hold?
Answer:
| |
The chart below shows the approximate number of images at each available quality mode that the μ-9000 can store in its internal memory and on a variety of optional media. The camera can store images and movies in any combination of quality modes. All figures are approximate.
| Number of storable images |
| IMAGE SIZE |
COMPRE
SSION |
Internal Memory |
xD-Picture Card media |
| 1GB |
2GB |
| 12M |
3968 x 2976 |
FINE |
7 |
174 |
347 |
| NORM |
15 |
343 |
687 |
| 5M |
2560 x 1920 |
FINE |
18 |
410 |
820 |
| NORM |
37 |
841 |
1683 |
| 3M |
2048 x 1536 |
FINE |
27 |
627 |
1254 |
| NORM |
57 |
1305 |
2559 |
| 2M |
1600 x 1200 |
FINE |
47 |
1066 |
2132 |
| NORM |
92 |
2063 |
3998 |
| 1M |
1280 x 960 |
FINE |
73 |
1640 |
3198 |
| NORM |
142 |
3198 |
6397 |
| VGA |
640 x 480 |
FINE |
268 |
5815 |
10662 |
| NORM |
490 |
10661 |
21325 |
16:9
(S) |
1920 x 1080 |
FINE |
43 |
984 |
1938 |
| NORM |
86 |
1938 |
3763 |
|
Capacity will be slightly less than shown if sound is recorded with still images. All figures are approximate.
|
Question
How much movie recording time does the μ-9000 have?
Answer:
| |
The chart below shows the maximum continuous movie recording time available in each quality mode when using the camera's internal memory or xD-Picture Card media. The chart assumes that the medium has been freshly formatted. All figures are approximate.
Recording times are calculated based on storage capacity and are not a guarantee of battery life.
| IMAGE SIZE |
FRAME RATE |
Recording length (h:mm:ss) with sound* |
| Internal Memory |
xD-Picture Card media |
| 1GB |
2GB |
| VGA |
640
x
480
|
30fps** |
0:00:24 |
0:09:21 |
0:18:42 |
| 15fps |
0:00:49 |
0:18:37 |
0:37:14 |
| QVGA |
320
x
240
|
30fps |
0:00:58 |
0:22:03 |
0:44:06 |
| 15fps |
0:01:56 |
0:43:37 |
1:27:15 |
|
*Each movie file is limited to 2 GB max.
**Up to 10 sec. available for each movie in 640 x 480 / 30 fps mode when using a xD-Picture Card other than Type H/M+ or when using internal memory. The Class 2 microSD/microSDHC card may not allow sequential movie recording.
|
Question
How do I charge the lithium-battery? And How long will it take to recharge my battery?
Answer:
| |
Load the LI-50B battery into the LI-50C Lithium-ion Battery Charger bundled with the camera. Be sure to align the arrow on the battery with the arrow on the charger, as shown below.
When the battery is properly inserted into the charger, the red charge indicator light will be lit.
The light will turn off when the battery is fully charged. The approximate charging time is five hours.
|
|
|
|