|
 |
|
|
Questions:
Question:
Which shooting mode should I use? [ Shooting mode, Scenes ]
Answer:
|
" iAUTO ( Intelligent Auto ) " mode is recommended for regular photography.
In iAUTO mode, the camera automatically adjusts the settings.
This is a fully automatic mode that dynamically selects the shooting mode in response to changing shooting conditions. This allows you to take pictures using the shooting mode best suited for the scene by simply pressing the shutter button.
If you want to change settings such as white balance ( WB ) and ISO sensitivity, turn the mode dial to other modes ( e.g. to [ P ] ).
The following shooting modes and scenes are available:
- iAUTO ( Intelligent Auto )
By simply pointing the camera at the subject, the camera automatically sets the shooting mode best suited for the scene. As the shooting conditions change, the camera reevaluates the scene and dynamically selects a new shooting mode if appropriate.
Available modes are Portrait, Macro, Sport, Night+Portrait and Landscape.
[Camera Menu] settings such as white balance and ISO sensitivity cannot be changed.
- P ( Program Auto )
The camera automatically sets the optimum aperture and shutter speed based on the lighting conditions.
Unlike "iAUTO" mode, [Camera Menu] settings such as white balance and ISO sensitivity can be changed.
- BEAUTY ( Beauty mode )
This mode enables you to track your subject's face in a frame and smooth persons' complexion.
Both the original and retouched pictures will be saved.
Depending on the subject, the frame may not appear or take time to track your subjects' face.
Also, the editing may not produce the desired effect.
Image size for the retouched pictures are restricted to 2M or less.
- SCN ( Scene )
The camera offers 19 scene modes for shooting in various conditions.
 PORTRAIT PORTRAIT
For taking a portrait-style shot.
The camera automatically sets the optimal shooting conditions to produce natural skin tones.
 LANDSCAPE LANDSCAPE
This mode is suitable for taking pictures of landscapes.
It vividly reproduces blues and greens.
 NIGHT SCENE NIGHT SCENE
For shooting illuminated scenes in the evening or at night.
The camera sets a slower shutter speed than in normal shooting.
For the best results, use a tripod so your camera remains steady when shooting.
 NIGHT+ PORTRAIT NIGHT+ PORTRAIT
For shooting both a foreground subject and an illuminated background in the evening or at night.
The camera sets a slower shutter speed than in normal shooting.
For the best results, use a tripod so your camera remains steady when shooting.
 SPORT SPORT
Captures fast-moving action without blurring.
 INDOOR INDOOR
For shooting both main subject and background indoors (e.g. at a party).
The background is reproduced clearly.
 CANDLE CANDLE
This mode is ideal for shooting under candlelight.
Warm colors are reproduced.
Image quality is restricted to 3M (2048x1536) or less.
 SELF PORTRAIT SELF PORTRAIT
Lets you take a picture of yourself while holding the camera.
 SUNSET SUNSET
For shooting the setting or rising sun. Vividly reproduces reds and yellows.
 FIREWORKS FIREWORKS
Suitable for shooting fireworks at night.
The camera sets a slower shutter speed than is used in normal shooting.
For the best results, use a tripod so your camera remains steady when shooting.
 CUISINE CUISINE
For still life photography.
Vividly reproduces colors of fruit, vegetables and flowers.
 DOCUMENTS DOCUMENTS
For shooting paper documents.
Increases contrast between letters and background.
 BEACH & SNOW BEACH & SNOW
This mode is ideal for shooting white sand on the seaside or snow-capped mountains.
The colors of the sky, greenery and people are reproduced clearly.
 UNDERWATER SNAPSHOT* UNDERWATER SNAPSHOT*
This mode is ideal for taking pictures of people swimming in the ocean or in the pool.
The camera can be used up to a depth of three meters.
 UNDERWATER WIDE 1* UNDERWATER WIDE 1*
This mode is ideal for taking pictures of underwater scenery.
 UNDERWATER WIDE 2* UNDERWATER WIDE 2*
This mode is ideal for taking pictures of underwater scenery.
The focus is fixed, reducing the shutter release lag time.
 UNDERWATER MACRO* UNDERWATER MACRO*
This mode is ideal for taking close-up pictures of small subjects underwater.
 PRE-CAPTURE MOVIE PRE-CAPTURE MOVIE
This mode is useful for recording a short movie even before the moments you want to capture.
The camera captures a 7-second movie, including the 2 seconds before the shutter is fully depressed.
Image size can be selected from VGA (640x480) or QVGA (320x240).
Frame rate can be selected from 30fps or 15fps.
 SNOW SNOW
This is ideal for shooting snow-capped mountains.
The colors of the sky, snow and people are reproduced clearly.
You can also operate the camera in this mode by tapping the camera body.
- MOVIE
The camera records video with sound.
You can use the Zoom if you enable the DIGITAL ZOOM before recording.
| * |
Requires underwater housing (sold separately) for using the camera more than a depth of three meters. |
|
|
Question
How do I take close-up pictures of small subjects? [ Macro, Super Macro and S-macro LED mode ]
Answer:
Question
The colors in my pictures look different from the actual colors of my subject. What can I do? [ White Balance ( WB ) ]
Answer:
| |
Select a white balance ( WB ) setting that is more appropriate for the lighting conditions.
In the default white balance mode, WB is set to AUTO so you can take pictures with natural colors
in most lighting conditions.
The colors in pictures may differ from the subject's actual colors under the following lighting conditions:
- When the subject is in the shade on a sunny day
- When the subject is illuminated by both natural light and indoor lighting (e.g. near a window)
- When the light from the camera's flash does not reach a subject lit by indoor lighting
In cases like these, select the white balance setting that is designed to capture accurate colors in the specific lighting conditions.
To select white balance settings, the mode dial must be set to any shooting mode except iAUTO.
The following table describes the available white balance settings:
Related links
To learn how to set the WB or see some pictures to compare the effects of different WB settings, click on the following links:
How to Take Great Pictures
|
|
Question
In which shooting situations should I change the ISO sensitivity?
Answer:
| |
By default, the ISO sensitivity is automatically set, ranging from ISO 64 to ISO 1600.
Adjusting ISO sensitivity enables you to take crisp and clear pictures in different shooting situations.
With high ISO sensitivity and faster shutter speeds, you can capture sharp, blur-free images in low-light situations and when the camera or your subject is moving.
You may see more noise or grain in your pictures when you use high ISO sensitivity.
If you use a lower ISO sensitivity, you can reduce the noise but the shutter speed will also become slower.
It is advised that you use a tripod so your camera remains steady when shooting.
ISO sensitivity can be changed as shown below:
| AUTO |
The camera automatically adjusts the ISO sensitivity for the best image quality. ( ISO 64 to ISO 1600 ) |
| HIGH ISO AUTO |
The camera selects a higher sensitivity than AUTO to minimize the blur caused when the subject or the camera moves. |
| ISO fixed |
The ISO sensitivity is fixed by selecting manually ISO 64, 100, 200, 400, 800 or 1600. |
|
|
Question
Can I cancel or change the volume of the operation sounds? [ Sound setting, Silent mode ]
Answer:
| |
Yes, you can set the operation sounds ( shutter, alarm, etc. ) to OFF or change their volume.
Press the [ MENU ] button, and then select SETUP.
In the SOUND SETTINGS menu, select the appropriate setting.
Sub
menu |
Sound & Volume Selection |
Operation |
| BEEP |
SOUND TYPE |
1 / 2 |
Lets you select the operation sounds and volume of the camera buttons ( except the shutter button ) . |
| VOLUME |
OFF( No sound ) / LOW / HIGH |
| SHUTTER SOUND |
SOUND
TYPE |
1 / 2 / 3 |
Lets you select the operation sound and volume of the shutter button. |
| VOLUME |
OFF( No sound ) / LOW / HIGH |
ALARM SOUND
 |
OFF ( No sound ) / LOW / HIGH |
Lets you adjust the volume of the alarm sound. |
VOLUME
 |
OFF ( No sound ) / LOW / HIGH |
Lets you adjust the playback sound volume. |
|
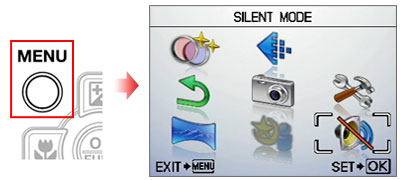
Silent Mode
In Silent Mode, all sounds ( start up / operation / shutter / playback ) are turned off.
This mode enables you to use the camera in places where you need to be quiet.
Press the [ MENU ] button, and then select SILENT MODE.
| OFF |
This mode activates the settings in the SOUND SETTINGS menu. |
| ON |
Electronic sounds ( operation sounds, shutter sound and warning sound ) and playback sound are muted. |
|
|
Question
Can I cancel the information on the monitor or display a grid to check the composition of the picture? [ Display Information ]
Answer:
| |
Yes, during shooting and playback modes, you can change the display information on the monitor by pressing the DISP button.
Press the button repeatedly to cycle through the available information display options. The arrows in the illustrations below indicate the order in which the display options occur.
When Taking Pictures
During Playback Mode
What is the histogram?
| - |
The histogram shows the distribution of the light and dark tones in an image.
For example, when you use the camera in bright sunlight, it may be difficult to view the LCD monitor.
In such a situation, this function enables you to check the exposure of the image.
Related link
To see how to use the histogram, click here:
How to Take Great Pictures
|
|
|
Question
What kinds of in-camera editing functions are available for this camera?
Answer:
| |
The following in-camera editing functions are available for still images:
-PERFECT FIX (Apply Shadow Adjustment and/or redeye reduction technology.)
- BEAUTY FIX (Retouch the subject's skin and eyes) BEAUTY FIX (Retouch the subject's skin and eyes)
- (Resize) (Resize)
- (Crop) (Crop)
-COLOR EDIT
-CALENDAR
The INDEX function is available for movies.
This function extracts nine frames from a movie and saves them as a new composite still image.
Editiing Still Images
| PERFECT FIX |
ALL |
[SHADOW ADJ] and [REDEYE FIX] are applied together. |
| SHADOW ADJ |
This function brightens areas darkened by backlight and dim lighting. |
| REDEYE FIX |
Corrects redeye caused when a subject's eyes appear red in flash photography. |
BEAUTY FIX
|
ALL |
[CLEAR SKIN], [SPARKLE EYE] and [DRAMATIC EYE] are applied together. |
| CLEAR SKIN |
Smooth a person's complexion. You can select the desired effect from 3 levels: SOFT, AVG and HARD. |
SPARKLE
EYE |
This enhances the contrast of the subject's eyes. |
DRAMATIC
EYE |
Slightly emphasizes the eyes. |
RESIZE
|
[ VGA ]
640X480 |
This saves a separate, smaller copy of the image for e-mail attachment, etc. |
| [ QVGA ] 320X240 |
CROPPING
|
This is to crop a part of the image. The edited image is saved as a new still image. |
| COLOR EDIT |
BLACK & WHITE |
This changes the picture color to black & white. |
| SEPIA |
This lets you create sepia-tone photographs. |
| SATURATION (HARD) |
This increases the color saturation of the image. |
| SATURATION (SOFT) |
This slightly increases the color saturation of the image. |
| CALENDAR |
This lets you add a calendar to an image. |
|
EDITING MOVIES
| INDEX |
This function extracts nine frames from a movie and saves them as a new composite still image. |
|
Note:
| - |
In-camera editing functions are available only for images taken with the camera.
|
| - |
The edited images and movies will be saved as new files. Before editing images or movies, be sure that there is enough storage space on the card or internal memory.
|
| - |
Depending on the image, an editing function may not produce the desired effect.
|
| - |
Editing may lower image resolution, which may produce grainy photos. |
|
|
Question
Which type of memory card can I use? [ xD-Picture Card, microSD Card ]
Answer:
| |
You can use xD-Picture Card™ media or microSD™ / microSDHC media
( hereafter referred to as " microSD cards " ).
The following xD-Picture Card media can be used:
Card Capacity: 16MB to 2GB
Card Type: TypeH, TypeM, TypeM+, Standard
To see all compatible microSD cards, click here:
" Compatible microSD card Tables "
|
Question
How does Olympus define "shockproof?"
Answer:
| |
The anti-shock performance is confirmed by Olympus' testing conditions in accordance with MIL Standard. The μ TOUGH-6010 can withstand a 1.5 m/4.9 ft. drop.
Testing Conditions
| - |
Drop the camera from a height of 1.5 m/4.9 ft. onto plywood (2 cm/0.8 in.).
|
| - |
Test 26 different directions. |
| - |
One drop per each direction.
According to the products' quality standards, cosmetic damages and electric/mechanical performances are inspected.
|
| |
Five cameras should pass the test as above. |
|
|
Question
What is MIL Standard?
Answer:
| |
The MIL Standard is a product standard issued by the United States Department of Defense.
Because JIS (Japan Industrial Standards) doesn't have any equivalent standards for shockproof features,shockproof test is confirmed by Olympus' testing conditions in accordance with the MIL Standard (MIL Standard 810F Method 516.5 Selecting Procedure IV).
The shockproof feature does not unconditionally warrant all defective operations or cosmetic damages.
|
Question
Does the camera body, including the LCD monitor and lens, get scratched if dropped from a height of 1.5m?
Answer:
| |
Yes, the camera body can be scratched.
|
Question
How does Olympus define "dustproof?"
Answer:
| |
The camera is designed for complete protection against dust, sand and dirt. Therefore, it is suitable for using the camera on the beach.
*It is equivalent to JIS/IEC protection class 6 ( IP6X ).
JIS/IEC protection class 6 (IP6X): Guards against infiltration by dust and sand. ( The dustproof performance is confirmed by Olympus' testing conditions. )
|
Question
How does Olympus define "waterproof?"
Answer:
| |
The waterproof capability of the camera is equivalent to JIS class 8. ( The waterproof performance is confirmed by Olympus' testing conditions. )
Note:
| - |
The camera can be used at depth of up to three meters for up to one hour.
|
|
|
Question
Can I use the camera in hot springs?
Answer:
| |
No, you cannot use the camera in hot springs.
The sulfur component will deteriorate the waterproof packing material of the camera. ( Even if you wash the camera, the sulfur component will remain on it. )
|
Question
Does the camera get rusty if used in seawater?
Answer:
| |
Yes, the camera will get rusty if you leave it for a long time without care after using it in seawater.
After the camera is used under sea water:
1. Close the battery/card compartment covers firmly.
2. Immerse the camera in a bucket containing fresh water for about 10 minutes.
3. Dry the camera with a soft towel, and keep it in the shade with good ventilation.
|
Question
Can I use the camera in any liquid other than water? ( e.g. oil or chemical liquid )
Answer:
| |
No, it will damage the camera. Use the camera only in water.
|
Question
Can I turn on/off the camera underwater?
Answer:
Question
Does the camera float or sink in water?
Answer:
Question
Can I leave the camera underwater for hours?
Answer:
| |
No, do not leave the camera underwater for more than 60 minutes.
|
Question
What happens if I open the battery / card compartment cover underwater?
Answer:
| |
If you open the battery / card compartment cover underwater, the camera will be water damaged. Do not open the cover underwater.
|
Question
The μ TOUGH-6010 features " tap control. " What is it, and how does it work?
Answer:
| |
" Tap control " is a function to operate the camera just by tapping anywhere on the top, left, right or back ( LCD monitor ) of the camera.
This is especially useful for operating the camera while wearing gloves.
Using this function, you can adjust camera settings and play back images. In the SNOW scene mode, it is also possible to use tap control to take pictures.
To enable tap control, turn the mode dial to any mode other than [ ] ( Playback )
You can also adjust the tap strength and intervals to make the camera easy for you to use.
Note:
| - |
Tap the camera firmly using the pad of your finger.
|
| - |
When the camera is stabilized on a tripod, tap control might not work properly.
|
| - |
To prevent dropping the camera when using tap control, strap the camera around your wrist. |
|
The following operations are available when TAP CONTROL is set to ON:
Operation in shooting mode
| Operation |
Where to tap |
- Confirm the selected menu. (Operates similarly to the [  ] button.)
- Switch tap control to ON or OFF. ] button.)
- Switch tap control to ON or OFF. |
Camera's top: Tap twice |
| - Switch to playback mode. |
Camera's back: Tap once |
| - Take pictures (only in SNOW mode). |
Camera's back: Tap twice |
| - Set the flash mode. |
Camera's right side: Tap once |
| - Set the Macro mode. |
Camera's left side: Tap once |
|
Example: Setting the Flash Mode
- If you tap the right side of the camera body once, the flash mode selection screen will be displayed.
- Tap the right or left side of the camera body to select the appropriate flash mode.
- Tap the top of the camera body twice to set the function.

Operation during playback mode
| Operation |
Where to tap |
| - Display next image in playback mode. |
Camera's right side: Tap once |
| - Display previous image in playback mode. |
Camera's left side: Tap once |
- Start slideshow.
- Stop slideshow. |
Camera's top: Tap twice |
| - Display next image during the slideshow. |
Tilt the camera or tap the camera's right side once. |
| - Display previous image during the slideshow. |
Camera's left side: Tap once |
| - Switch to shooting mode. |
Camera's back: Tap once |
|
To adjust the tap control
Press the [ MENU ] button, and then select [ SETUP ]. In [ TAP CONTROL ], select [ CALIBRATE ] to adjust the tap strength and interval for each side. Check the operation by tapping the camera.
| Where to tap |
Strength |
Intervals |
| Top |
HARD / AVG / SOFT |
FAST / NORM / SLOW |
| Back |
| Right |
- |
| Left |
|
|
|
|
|