Question :
What additional items are packaged with the camera?
Answer:
The following items are packaged with the camera:
- - Lithium-ion battery BLX-1
- - USB cable CB-USB13 (Both connector ends of the cable are USB Type-C.)
- - Body cap *
- - Eyecup EP-15 *
- - Hot shoe cover *
- - Strap
- - Warranty card
- - Instruction manual (Basic)
The instruction manual packaged with the camera is a basic manual. The detailed instruction manual is available in PDF format on the following web page:
・
Manual download OM-3
* The body cap, eyecup and hot shoe cover is attached to the camera.
Note:
・ The battery charger is not packaged with the OM-3 camera. The battery can be charged in-camera by connecting the camera to the USB port on a computer or by using the USB-AC adapter F-7AC (sold separately).
・ A separately sold SD card is required for recording images. To see a list of compatible memory cards, click here:
- Compatibility table for SD Memory Cards
OM Workspace:
The OM Workspace software CD-ROM is not packaged with the OM-3 camera. The software is available via Internet as a free download. (The serial number of the camera is required.)
・ OM Workspace Software Download
Question :
What lenses are compatible with Pro Capture shooting?
Answer:
The following table shows the lenses compatible with Pro Capture Shooting (Pro Capture/ Pro Capture SH1 / Pro Capture SH2) in OM-3:
| |
Pro Capture |
Pro Capture SH1 |
Pro Capture SH2 |
OM Digital Solutions / Olympus
Micro Four Thirds lenses
(M.ZUIKO DIGITAL lenses) |
Compatible |
Compatible |
Compatible
(*1) |
Other brand
Micro Four Thirds lenses |
Not compatible |
Compatible |
Compatible
(*2) |
| Four Thirds lenses |
Not compatible |
Compatible |
Not compatible |
Lenses without electronic contacts such as OM adapters
(including BCL-1580 / BCL-0980 ) |
Compatible |
Compatible |
Not compatible |
(*1) Sequential shooting speed 50 fps is only compatible with specific lenses
(*2) Sequential shooting speed is limited to 25 fps
Note:
- Sequential shooting speed 50 fps in Pro Capture SH2 is only compatible with specific M.ZUIKO DIGITAL lenses.
- Focus accuracy decreases when the aperture is larger than F8 in C-AF / C-AF MF / C-AF+TR / C-AF+TR MF.
- In Pro Capture SH1, the AF operates only when the shutter button is pressed halfway. Focus is locked while the button is half-pressed (during Pro Capture) and while taking images.
- In Pro Capture SH1, the lower limit of the shutter speed is 1/15 sec.
- In Pro Capture SH2, the lower limit of the shutter speed is 1/640 sec. when Max fps under Sequential Shooting Settings is set to 50fps and 1/160 sec. when set to 25fps, 16.7fps or 12.5fps.
- Flash is disabled during Pro Capture shooting.
Question :
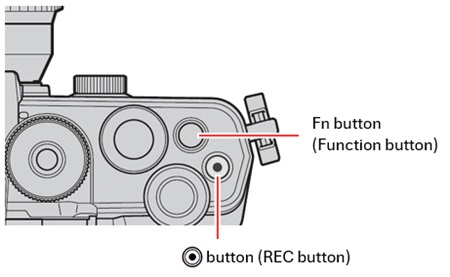
How do I change the functions assigned to the Fn button or REC button?
Answer:
You can assign frequently used functions to the  button (REC button) or Fn button (Function button) in Button Function setting, and use the assigned functions by simply pressing each button.
Note:
- - Different button settings (functions) can be assigned to the same button for
 still photography mode and still photography mode and  movie recording mode. movie recording mode.
- - The functions that can be assigned vary depending on the shooting mode and buttons. Refer to the PDF instruction manual, page 339, for the functions that can be assigned to each button.
Manual Download: OM-3 Instruction Manual
|
Assigning the Digital Tele-converter to the  button (REC button) in still photography mode
The following procedure explains how to assign a function to each button. In this procedure, the Digital Tele-converter is assigned to the button (REC button) in still photography mode.
1. Set the  dial to still photography mode.
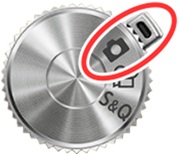
・For setting the button functions in movie recording mode, turn the dial to movie recording mode.
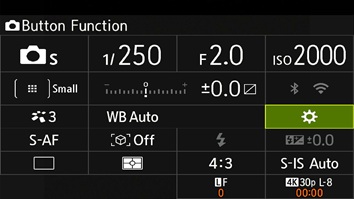
2. Display the super control panel by pressing the [OK] button. Select  on the right side of the super control panel and press the [OK] button.
3. Select a button where to assign a function using the arrow pad Up and Down button and press the arrow pad Right button.
The button is selected in this procedure.
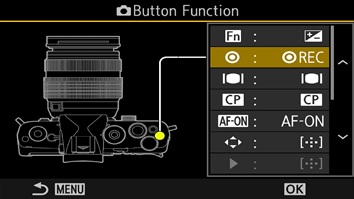
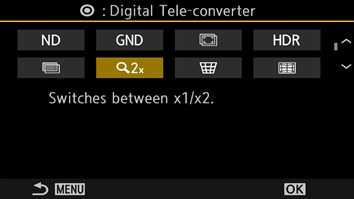
4. Select  (Digital Tele-converter) using the arrow pad button and press the [OK] button. (In movie recording mode, you can select Movie Tele-converter that enables you to choose the magnification position.)
5. Check that (Digital Tele-converter) is displayed next to the button.
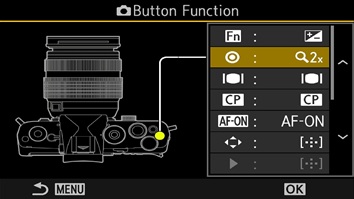
After setting, press the button on the shooting screen to turn on the Digital Tele-converter. The center of the image will be cropped, allowing you to shoot the image at approximately twice the original size. Press the button again to turn off the Digital Tele-converter.
Note:
- - When the Digital Tele-converter is On, the icon is displayed at the top of the monitor.
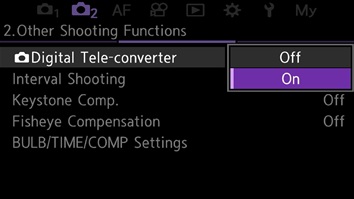
- - You can also turn the Digital Tele-converter on/off in the camera menu. Press the [MENU] button. In the
 tab, select 2.Other Shooting Functions and change the setting in Digital Tele-converter. tab, select 2.Other Shooting Functions and change the setting in Digital Tele-converter.
|
Note:
- In still photography mode, the Digital Tele-converter cannot be used in multiple exposure, keystone compensation and fish-eye correction shooting.
- In movie recording mode, you cannot zoom in on the display when the Digital Tele-converter is on.
- In
 mode, the Digital Tele-converter cannot be used when the shooting frame rate is set to 100fps or higher.
- A frame is displayed when you playback images taken in RAW mode, indicating the area cropped by the Digital Tele-converter.
Question :
I want to check the images on the monitor or viewfinder right after shooting. What should I do?
Answer:
In the Image Review setting, you can set the duration for reviewing images (Rec View) on the viewfinder and monitor immediately after shooting.
This function is convenient for quickly checking the images you have taken. While reviewing images, pressing the shutter button halfway will immediately return to shooting mode. By default, this function is set to Off, so the captured image is not displayed after shooting.
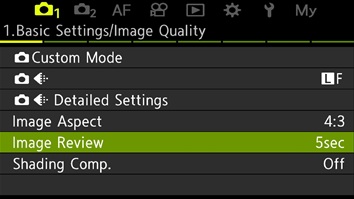
How to set Image Review
The following procedure explains how to change settings for Image Review:
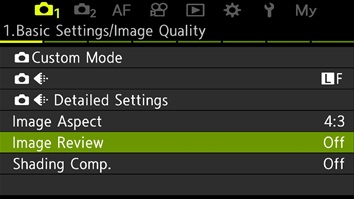
1. Press the [MENU] button. In the  tab, select 1.Basic Settings/Image Quality. Select Image Review and press the [OK] button.
2. Select the duration for reviewing images using the arrow pad button and press the [OK] button.
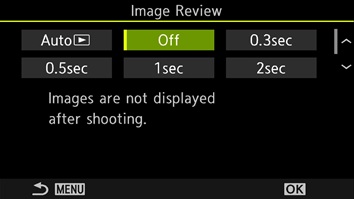
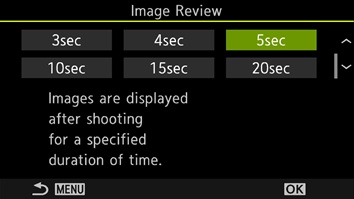
- 0.3sec to 20sec : Images are displayed for the selected duration after shooting.
- Auto
 : Images are displayed in playback mode after shooting.
- Off : Images are not displayed after shooting.
3. Check that the duration for Image Review has been changed. Press the
[MENU] button to close the menu.
Question :
How do I assign camera settings to the Custom Mode C1, C2, C3, C4 and C5 on the mode dial?
Answer:
What is Custom Mode?
You can save your current camera settings to the Custom Modes (C1, C2, C3, C4 and C5). When you set the mode dial to any of these Custom Modes, the pre-assigned camera settings are recalled, allowing you to shoot with the saved settings.
Different settings for still photography and video recording can be saved to the same Custom Mode (C1 to C5). You can also rename each Custom Mode to easily distinguish them.
Instructions:
・ Assigning camera settings to Custom Mode C1 to C5 for still photography
・ Assigning camera settings to Custom Mode C1 to C5 for  video recording
・ Renaming Custom Modes (Custom Mode Name)
・ Saving changes made while shooting in a Custom Mode
Note:
- Refer to the PDF instruction manual, page 486, for the functions that can be assigned to Custom Modes.
Manual Download: OM-3 Instruction Manual
- The settings assigned to each Custom Mode can be returned to the default settings. In Reset/Initialize Settings, select Initialize All Settings.
Assigning camera settings to Custom Mode C1 to C5 for still photography
The following procedure explains how to assign camera settings to Custom Mode C1 to C5.
【 still - 1 】
Set your camera to the settings you want to save in
Custom Mode C1 to C5.
【 still - 2 】
Press the
[MENU] button. In the
tab, select
1.Basic Settings/Image Quality. Select
Custom Mode and press the
[OK] button.

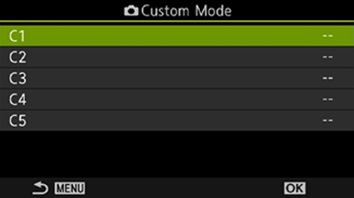
【 still - 3 】
Select a Custom Mode (C1, C2, C3, C4 or C5) where to save the settings and press the
[OK] button. C1 is selected in this procedure.
【 still - 4 】
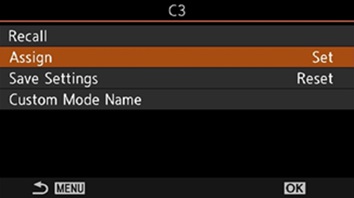
Select
Assign and press the
[OK] button.

【 still - 5 】
Select
Set and press the
[OK] button.
・If any settings are already saved to the selected Custom Mode, it will be overwritten.
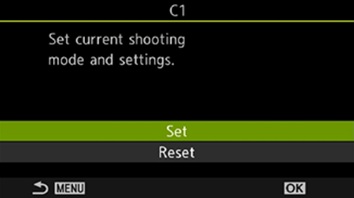
【 still - 6 】
The current shooting settings have been saved to Custom Mode C1.
Assigning camera settings to Custom Mode C1 to C5 for video recording
The following procedure explains how to assign camera settings to Custom Mode C1 to C5.
【 video - 1 】
Set your camera to the settings you want to save in
Custom Mode C1 to C5.
【 video - 2 】
Press the
[MENU] button. In the
tab, select
1.Basic Settings/Image Quality. Select
Custom Mode and press the
[OK] button.
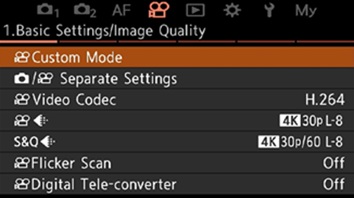
【 video - 3 】
Select a Custom Mode (C1, C2, C3, C4 or C5) where to save the settings and press the
[OK] button. C3 is selected in this procedure.
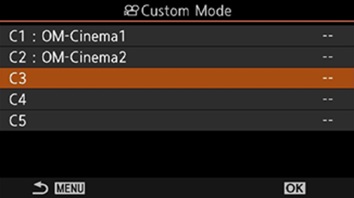
Default setting for Custom Mode C1 and C2:
In the default settings for Custom Mode, picture mode [OM-Cinema1] is saved in C1 and picture mode [OM-Cinema2] is saved in C2. You can overwrite them with your desired settings or custom mode name.
If you return the camera to the default settings, the settings and custom mode names will be reset to [OM-Cinema1] for C1 and [OM-Cinema2] for C2. |
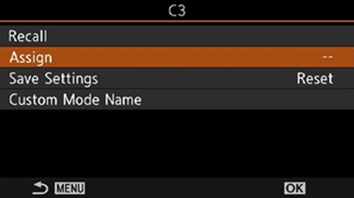
【 video - 4 】
Select
Assign and press the
[OK] button.
【 video - 5 】
Select
Set and press the
[OK] button.
・If any settings are already saved to the selected Custom Mode, it will be overwritten.
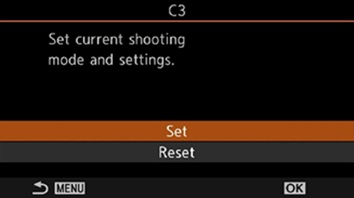
【 video - 6 】
The current shooting settings have been saved to Custom Mode C3.
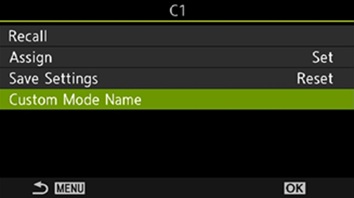
Renaming Custom Modes (Custom Mode Name)
Custom Modes (C1 to C5) can be renamed.
【 naming - 1 】
Press the
[MENU] button. In the
tab (or
tab), select
1.Basic Settings/Image Quality. Select
Custom Mode and press the
[OK] button.

【 naming - 2 】
Select a Custom Mode (C1, C2, C3, C4 or C5) that you want to rename and press the
[OK] button.
Custom Mode C1 is selected in this procedure.

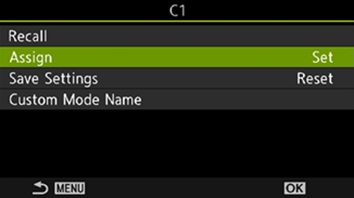
【 naming - 3 】
Select
Custom Mode Name and press the
[OK] button.
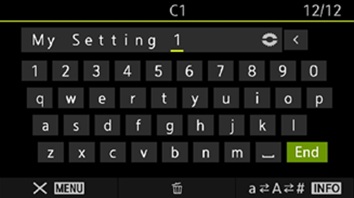
【 naming - 4 】
Enter the desired mode name.
Select the characters on the keyboard using the arrow pad button. When you press the
[OK] button, the selected character will be entered in the text input area. (Touch operation is also available.)

- Press the [INFO] button to switch the keyboard (uppercase / lowercase / symbols).
- You can move the cursor in the text input area using the front / rear dial.
- To delete a character in the text input area, move the cursor to select the character and press [
 ].
].
【 naming - 5 】
After entering the mode name, select
End and press the
[OK] button.
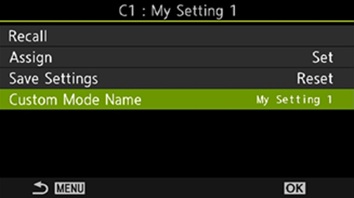
【 naming - 6 】
The mode name has been saved to Custom Mode C1.
If you want to return the Custom Mode Name to the default mode name, select Assign, then Reset, and press the [OK] button to display a screen asking whether to delete the Custom Mode name.
Select Delete to delete the current custom mode name and return it to its default mode name. Select Keep to retain the current custom mode name. |
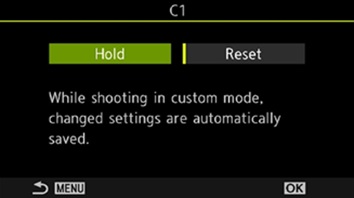
Saving changes made while shooting in a Custom Mode (C1 to C5)
In the default settings, the changes made while shooting in Custom Modes C1 to C5 will not be saved to those modes. If you turn the mode dial to other modes and then back to a Custom Mode, it will return to the previously saved settings. For example, if you change some settings while shooting in C1 and then turn the mode dial to P, the changes will not be retained.
If you want to keep the changes made while shooting in Custom Mode C1 to C5 for the next shooting, set the Save Settings to Hold. This way, the changes made while shooting in a Custom Mode will be retained even after switching to other shooting modes. (It can be used just like P / A / S / M / B mode.)
【saving - 1 】
Press the
[MENU] button. In the
tab (or
tab), select
1.Basic Settings/Image Quality. Select
Custom Mode and press the
[OK] button.

【saving - 2 】
Select a Custom Mode (C1, C2, C3, C4 or C5) and press the
[OK] button.
C1 is selected in this procedure.

【saving - 3 】
Select
Save Settings and press the
[OK] button.
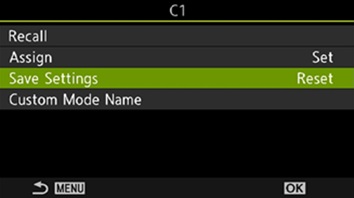
【saving - 4 】
Select
Hold and press the
[OK] button. The default setting is Reset.