OM SYSTEM
Digital Imaging(Cameras)
Consumer Top
Digital Imaging (Cameras) Top
spacer
Q&A
Q&A for OM-5 Mark II
Product Q&A
* Interchangeable Lens Cameras
* Compact Digital Cameras
Common Q&A
* Software
Questions :

Question :
What additional items are packaged with the camera?

Answer:
The following items are packaged with the camera:

  • - Lithium-ion battery BLS-50
  • - USB cable CB-USB14
    (USB Type-C connector on the camera side / USB Type-A connector on the computer side)
  • - Eyecup EP-15 *
  • - Body cap *
  • - Hot shoe cover *
  • - Strap
  • - Instruction manual (Basic)

    The instruction manual packaged with the camera is a basic manual. The detailed instruction manual is available in PDF format on the following web page:
     ・ Manual download OM-5 Mark II
  • - Warranty card

* The body cap, eyecup and hot shoe cover are attached to the camera.

Note:

  • The battery charger is not packaged with the OM-5 Mark II camera. The battery can be charged in-camera by connecting the camera to the USB port on a computer or by using the separately sold USB-AC adapter F-5AC.
  • A separately sold SD card is required for recording images. To see a list of compatible memory cards, click here:
    - Compatibility table for SD Memory Cards

OM Workspace:

The OM Workspace software CD-ROM is not packaged with the OM-5 Mark II camera. The software is available to OM Digital solutions/Olympus camera users via Internet as a free download. (The serial number of the camera is required.)
OM Workspace Software Download


Question :
What lenses are compatible with Focus Stacking mode?

Answer:
The following M.ZUIKO DIGITAL lenses are compatible with the Focus Stacking mode:

  • M.ZUIKO DIGITAL ED 8mm F1.8 Fisheye PRO
  • M.ZUIKO DIGITAL ED 30mm F3.5 Macro
  • M.ZUIKO DIGITAL ED 60mm F2.8 Macro
  • M.ZUIKO DIGITAL ED 90mm F3.5 Macro IS PRO  
    (Teleconverter MC-20 and MC-14 can be used.)
  • M.ZUIKO DIGITAL ED 300mm F4.0 IS PRO
    (Teleconverter MC-20 and MC-14 can be used.)
  • M.ZUIKO DIGITAL ED 7-14mm F2.8 PRO
  • M.ZUIKO DIGITAL ED 8-25mm F4.0 PRO
  • M.ZUIKO DIGITAL ED 12-40mm F2.8 PRO
  • M.ZUIKO DIGITAL ED 12-40mm F2.8 PRO II
  • M.ZUIKO DIGITAL ED 12-45mm F4.0 PRO
  • M.ZUIKO DIGITAL ED 12-100mm F4.0 IS PRO
  • M.ZUIKO DIGITAL ED 40-150mm F2.8 PRO  
    (Teleconverter MC-20 and MC-14 can be used.)
  • M.ZUIKO DIGITAL ED 40-150mm F4.0 PRO
  • M.ZUIKO DIGITAL ED 100-400mm F5.0-6.3 IS  
    (Teleconverter MC-20 and MC-14 can be used.)
  • M.ZUIKO DIGITAL ED 100-400mm F5.0-6.3 IS II
    (Teleconverter MC-20 and MC-14 can be used.)
  • M.ZUIKO DIGITAL ED 150-400mm F4.5 TC1.25x IS PRO  
    (Teleconverter MC-20 and MC-14 can be used.)
  • M.ZUIKO DIGITAL ED 150-600mm F5.0-6.3 IS  
    (Teleconverter MC-20 and MC-14 can be used.)
Note:

The images taken by focus stacking mode will have the periphery of the original image cut off by approximately 7% after the processing. The frame in the following image indicates the area with focus stacking effect that remains after the cut.
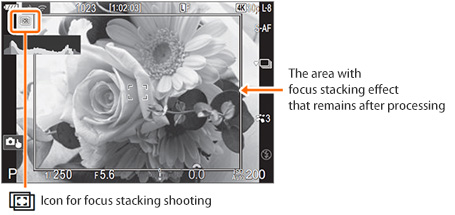
focus stacking


Question :
How can I use external power sources (USB devices such as USB-AC adapters and mobile batteries) effectively with the camera?

Answer:
Please keep in mind the following points when using external power sources (USB devices such as USB-AC adapters and mobile batteries) with the OM-5 Mark II camera:

  • When using an external power source, the battery must be inserted in the camera because the camera operates using both the battery and the external power source.
  • To charge the battery inserted in the camera, the camera must be turned off.

Refer to the following Q&As for information on using external power sources.

Q&As regarding external power source usage

1. What are the voltage and current requirements for external power sources (USB devices such as USB-AC adapters and mobile batteries) that can be used with the OM-5 Mark II?

External power sources must meet the following requirements:
Voltage / Current: 5V 1.5A (7.5W)

2. Does the OM-5 Mark II conform to the USB-PD standard?

No, the OM-5 Mark II does not conform to the USB-PD standard.

3. Can I use USB-AC adapters and mobile batteries that conform to the USB-PD standard as external power sources?

Yes, USB-AC adapters and mobile batteries that conform to the USB-PD standard can be used for power supply and charging.
Using them can help reduce battery consumption on the camera.

Because the OM-5 Mark II can only accept a small amount of power, it cannot operate in the same way as cameras that conform to the USB-PD standard. Even if the external power source that conforms to the USB-PD standard provides an output of 27W or more (e.g., 9V 3A, 15V 2A, or 15V 3A), the camera cannot shoot using USB power alone or charge its removable internal battery while shooting.

4. When the internal battery is running low, can the camera continue shooting if connected to an external power source (USB device such as an USB-AC adapter or a mobile battery)?

No, the camera cannot continue shooting when the removable internal battery runs out. The camera operates using both the removable internal battery and external power source. Therefore, if the internal battery level is already low, connecting an external power source may not significantly extend the recording time.

To reduce battery consumption and record for a longer time, connect the external power source while the battery level is still sufficient. By using both the battery and the external power source from the beginning, you can minimize battery drain during recording.

5. Does charging start automatically when the camera enters sleep mode while connected to an external power source (USB device such as an USB-AC adapter or a mobile battery)?

No, the battery inserted in the camera will not be charged while the camera is in sleep mode.
Charging starts when you turn the camera's power lever to OFF.

Also, charging will not start if the camera automatically powers off after being in sleep mode for a certain period.
In that case as well, turn the camera's power lever to OFF to start charging.

6. What should I do to shoot for a longer time while using an external power source (USB device such as a USB-AC adapter or a mobile battery)?

To enable longer shooting times, turn off the camera when you are not recording. This allows the removable internal battery to be charged when the camera is not in use. The recommended usage pattern is: shooting (power ON)charging (power OFF)shooting (power ON).

7. Can I keep shooting when the camera is powered by a USB-AC adapter?

No, you cannot keep shooting when powered only by a USB-AC adapter.

Even when the USB-AC adapter is connected, the camera operates using power from both the battery and the adapter. Since it cannot operate on USB-AC power alone, shooting will stop when the battery runs out.

While the USB-AC adapter alone cannot power the camera, using it in combination with the internal battery helps reduce battery consumption, allowing for longer recording times.

8. Can I charge the removable internal battery while shooting with an external power source (USB device such as a USB-AC adapter or mobile battery)?

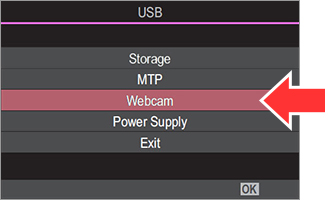
No, when the camera is turned on, the removable internal battery will not be charged even if an external power source is connected.
To charge the internal battery, you need to turn the camera off.


Question :
Can I use this camera as a webcam?

Answer:

Yes, you can use the OM-5 Mark II as a webcam for online meetings or live streaming once you connect the camera to your computer. Since no additional drivers or applications (such as OM Webcam Beta) are required, you can use this camera as a webcam simply by connecting it to your computer via USB.

How to use the OM-5 Mark II as a webcam

  1. Turn off the camera, then set the mode dial to (movie mode).
  2. Connect the camera to your computer with a USB cable.
  3. Turn on the camera.
    On the USB connection mode screen displayed on the camera monitor, use the arrow pad (Up/Down) buttons to select Webcam, and then press the [OK] button.
    • If the USB connection mode screen is not displayed, go to USB Settings > USB Mode, and set it to Select.
    • If the monitor stays blank after connecting the camera to the computer, the battery level may be too low. Use a battery with sufficient charge.
  4. The camera enters shooting standby mode. Adjust the brightness and focus on the camera side.
  5. Open the web meeting or streaming application on the computer. In the device settings, select the connected camera to start video and audio.
    • The video is streamed at 1280 x 720 resolution.
    • When Frame Rate for is set to 60p, 30p or 24p, video is streamed at 30p. When it is set to 50p or 25p, video is streamed at 25p.
    • ・If S&Q (slow and quick) mode is selected in , the setting will switch to the normal video quality mode.

Notes:

  • The camera can be used as a webcam even without an SD card inserted.
  • If an external microphone is connected, its audio will be streamed.
  • When Power Supply from USB is set to Yes, the camera receives power via USB from the computer while being used as a webcam. However, if the ambient temperature or the camera’s internal temperature is high, power may not be supplied via USB.
  • For instructions on how to use your web meeting or streaming application, refer to its manual or contact the service provider.

Notes on Using the Webcam Function:
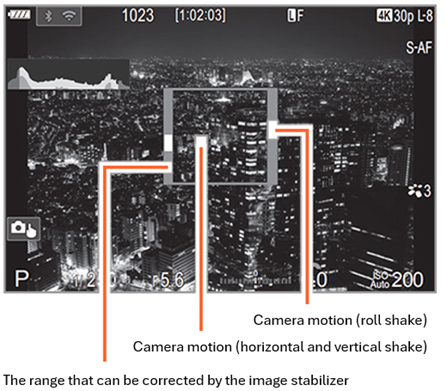
  • Video and audio cannot be streamed in the following situations:
    • – When the mode dial is set to a mode other than (Movie Mode)
    • – When the playback screen or menu is displayed
  • There are some restrictions while streaming video and audio to the computer:
    • cannot be changed
    • Picture mode is fixed to Same as
    • – Still image photography and video recording are not available
  • Camera settings such as exposure cannot be adjusted from the computer.


Question :
Why do I see a gray frame and a moving white dot when I press the shutter button halfway or during exposure? (Handheld Assist)

Answer:

When Handheld Assist is turned on, the camera displays white indicators on the monitor to show shake status when the shutter button is pressed halfway or during exposure. This feature helps reduce camera shake during handheld long-exposure photography.

The gray frame shows the area within which camera shake can be corrected. To minimize shake, hold the camera so that the outer indicators (representing roll shake, shown on the gray frame) stay near the center left/right, and the center indicator (representing horizontal and vertical shake, shown within the frame) stays near the center.

How to set Handheld Assist:

Press the [MENU] button. In   8. Image Stabilizer, select Handheld Assist. Select Off (default setting) or On
.

Notes:

  • Even if the camera shake indicator stays within the gray frame, it does not guarantee a blur-free image.
  • When shooting close to the subject, camera shake cannot be displayed accurately.
  • Handheld Assist is not displayed if Image Stabilizer is set to S-IS Off or if you are using third-party lenses with only the lens image stabilizer operating.
  • Handheld Assist cannot be enabled if Image Stabilizer is set to S-IS2 or S-IS3.
  • If Image Stabilizer is set to Off, Handheld Assist is displayed only during exposure.


 Top of this page
 
OM Digital Solutions
copyright