Questions :
Question :
How do I check the firmware version of my OLYMPUS OM-D / PEN camera?
Answer:
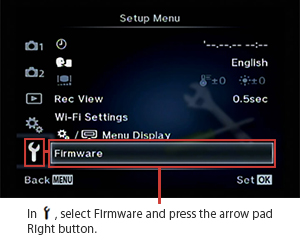
You can check the firmware version of your camera in the following procedure:
-
Press the [MENU] button.
In  (Setup Menu), select Firmware and press the arrow pad Right button. (Setup Menu), select Firmware and press the arrow pad Right button.
- * The menu display varies according to the camera model. (The display of E-M1 is used in the following procedure.)
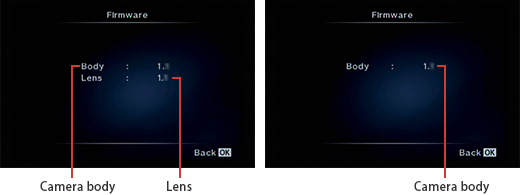
-
The LCD displays the firmware version for the camera body and the currently mounted lens.
(Only the version for the camera body is displayed if not a lens or accessory is attached.)
-
Press the [OK] button to display the menu.
Question :
What kinds of focusing modes are available?
Answer:
The following table describes the focusing modes:
| Focusing Modes |
Operation |
The Suited Subject for Shooting |
S-AF
(Single AF) |
The camera focuses once when the shutter button is pressed halfway.
When the focus is locked, you hear a beep sound and the AF confirmation mark and the AF target mark light up.
|
Still subjects
(e.g. Plants, Buildings, Landscapes)
|
S-AF+MF
(Simultaneous use of S-AF mode and MF mode) |
After pressing the shutter button halfway to focus in [S-AF] mode, you can turn the focus ring for fine adjustment. |
C-AF
(Continuous AF) * |
The camera repeats focusing while the shutter button is pressed halfway.
When the subject is in focus, the AF confirmation mark lights up on the monitor. You hear a beep sound when the focus is locked for the first time. (You may hear a second beep depending on the camera model.) |
Subjects with constantly shifting shooting range
(e.g. Cars, Sports, Cats and Dogs) |
C-AF+TR
(AF tracking) * |
Press the shutter button halfway to focus. The camera tracks and maintains focus on that subject while holding the shutter in the halfway position.
* The AF target is displayed in red if the camera can no longer track the subject. Release the shutter button and then frame the subject again and press the shutter button halfway. |
MF
(Manual focus) |
This mode allows you to manually focus on any position by operating the focus ring on the lens.
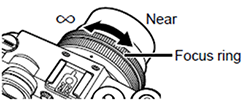 |
Subjects that are difficult to focus on,Shooting subjects in a desired focus |
* When using a Four Thirds system lens, the focusing mode changes to S-AF (with the exception of the E-M1 camera).
Note:
When RIs Priority S and RIs Priority C is set to On, the shutter can be released even when the camera is not in focus.
This option can be set separately for S-AF and C-AF modes.
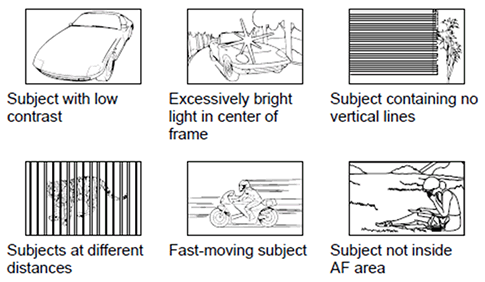
Subjects that are difficult to focus on
Even if the AF confirmation mark is on, it may be difficult to focus with autofocus in the following situations:
The subjects are not in focus when the AF confirmation mark is blinking.
Question :
What are the approximate pixel count for each image size?
Answer:
The following table shows the pixel count for each image size:
(Available image size varies according to the camera model.)
| Image Size |
Pixel Count (Pixel Size) |
| 16M |
Approx. 16 million pixels (4608 x 3456) |
| 14M |
Approx. 14 million pixels (4288 x 3216) |
| 12M |
Approx. 12 million pixels (3968 x 2976) |
| 10M |
Approx. 10 million pixels (3648 x 2736) |
| 8M |
Approx. 8 million pixels (3264 x 2448) |
| 5M |
Approx. 5 million pixels (2560 x 1920) |
| 3M |
Approx. 3 million pixels (2048 x 1536) |
| 2M |
Approx. 2 million pixels (1600 x 1200) |
| 1M |
Approx. 1.3 million pixels (1280 x 960) |
| VGA |
Approx. 0.3 million pixels (640 x 480) |
Tips:
The number of storable pictures varies depending on the selected image size. The number increases when shooting in smaller image sizes, and decreases when shooting in larger image sizes.
One advantage of using digital cameras is that you can select an image size appropriate for the application.
Question :
Which lenses are compatible with Four Thirds or Micro Four Thirds digital cameras?
Answer:
The following table shows the compatibility:
Not compatible ( - )
| |
Four Thirds System camera body |
Micro Four Thirds System camera body |
Lenses for
digital cameras |
Four Thirds System lens |
Compatible |
Compatible with adapter *1 |
| Micro Four Thirds System lens |
- |
Compatible |
| Lenses other than those listed above |
- |
- |
Lenses for
film cameras |
OM system lens |
Compatible with adapter *2 |
Compatible with adapter *2 |
| Lenses other than OM system lenses |
Compatible |
- |
Olympus Micro Four Thirds System cameras (as of January 2016):
PEN-F, E-P5, E-P3, E-P2, E-P1,
E-PL7, E-PL6, E-PL5, E-PL3, E-PL2, E-PL1s, E-PL1,
E-PM2, E-PM1
Olympus Four Thirds System cameras (as of February 2012):
E-5, E-3, E-1, E-30, E-620, E-520, E-420, E-510, E-410, E-500, E-330, E-300
Note:
You cannot use the Micro Four Thirds System lens on a Four Thirds System camera body.
Question :
Which lenses are compatible with the MMF-1, MMF-2 and MMF-3?
Answer:
You can use Four Thirds System lenses on Micro Four Thirds-compliant cameras by adding either the MMF-1, MMF-2 or MMF-3 lens adapter.
Note:
- Focal length and f-stop (aperture value) does not change.
- It is recommended to update the firmware in the lens to the latest version. Visit the following Web site for more information:
 Joint update service for OLYMPUS E-SYSTEM Joint update service for OLYMPUS E-SYSTEM
Please consider the following when shooting images with the MMF-1, MMF-2 or MMF-3 attached:
| Camera |
Description |
| E-M1 |
- When the AF mode is set to C-AF+TR (AF Tracking), the tracking range is narrower than that when a Micro Four Thirds lens is attached. When the AF target is displayed in red, the camera is still tracking the subject but no longer autofocusing it.
- The AF does not operate while shooting movies.
|
| E-M5 Mark II / E-M10 Mark II / E-M10 / PEN-F / E-PL7 |
- The C-AF and C-AF+TR mode are not selectable.
- The AF does not operate while shooting movies.
|
| E-M5 / E-P5 / E-P3 / E-P2 / E-P1 / E-PL6 / E-PL5 / E-PL3 / E-PL2 / E-PL1s / E-PL1 / E-PM2 / E-PM1 |
- Even if the AF mode is set to C-AF or C-AF+TR (AF tracking), the camera operates as in S-AF mode.
- The AF does not operate while shooting movies.
|
Camera and lens compatibility when using MMF-1, MMF-2 and MMF-3
The following table shows the Olympus camera and lens compatibility when using the MMF-1, MMF-2 and MMF-3.
Refer to the footnote below the table when you see a mark (*) in "Compatible or Not compatible" field.
| Brand |
Lenses |
Compatible (✔) or
Not compatible (-) |
| OLYMPUS |
ZUIKO DIGITAL ED 8mm F3.5 Fisheye |
✔ *1 |
| ZUIKO DIGITAL ED 7-14mm F4.0 |
✔ *1 |
| ZUIKO DIGITAL ED 9-18mm F4.0-5.6 |
✔ |
| ZUIKO DIGITAL 11-22mm F2.8-3.5 |
✔ *1 |
| ZUIKO DIGITAL ED 12-60mm F2.8-4.0 SWD |
✔ *1 |
| ZUIKO DIGITAL ED 14-42mm F3.5-5.6 |
✔ *2 |
| ZUIKO DIGITAL 14-54mm F2.8-3.5 |
✔ *1 |
| ZUIKO DIGITAL 14-54mm F2.8-3.5 II |
✔ |
| ZUIKO DIGITAL 14-45mm F3.5-5.6 |
✔ *1 |
| ZUIKO DIGITAL ED 18-180mm F3.5-6.3 |
✔ *1 |
| ZUIKO DIGITAL ED 14-35mm F2.0 SWD |
✔ *1 |
| ZUIKO DIGITAL 25mm F2.8 |
✔ |
| ZUIKO DIGITAL 35mm F3.5 Macro |
✔ *1 |
| ZUIKO DIGITAL ED 50mm F2.0 Macro |
✔ *1 |
| ZUIKO DIGITAL ED 150mm F2.0 |
✔ *1 |
| ZUIKO DIGITAL ED 35-100mm F2.0 |
✔ *1 |
| ZUIKO DIGITAL 40-150mm F3.5-4.5 |
✔ *1 |
| ZUIKO DIGITAL ED 40-150mm F4.0-5.6 |
✔ *2 |
| ZUIKO DIGITAL ED 50-200mm F2.8-3.5 |
✔ *1 |
| ZUIKO DIGITAL ED 50-200mm F2.8-3.5 SWD |
✔ *1 |
| ZUIKO DIGITAL ED 300mm F2.8 |
✔ *1 |
| ZUIKO DIGITAL ED 90-250mm F2.8 |
✔ *1 |
| ZUIKO DIGITAL ED 70-300mm F4.0-5.6 |
✔ *2 |
| Brand |
Lens Accessory |
Usable (✔) or
Not usable (-) |
| OLYMPUS |
Teleconverter EC-14 |
✔ |
| Teleconverter EC-20 |
✔ |
| Extension Tube EX-25 |
✔ |
| OM Adapter MF-1 |
✔ |
| Brand |
Lens |
Usable (✔) or
Not usable (-) |
| Panasonic |
LEICA D VARIO-ELMARIT 14-50mm F2.8-3.5 ASPH. |
✔ *1 |
| LEICA D VARIO-ELMAR 14-50mm/F3.8-5.6 ASPH./MEGA O.I.S. |
✔ |
| LEICA D VARIO-ELMAR 14-150mm/F3.5-5.6 ASPH./MEGA O.I.S. |
✔ |
| LEICA D SUMMILUX 25mm/F1.4 ASPH. |
✔ *2 |
| Brand |
Lens |
Usable (✔) or
Not usable (-) |
| SIGMA |
24mm F1.8 EX DG ASPHERICAL MACRO |
✔ *1 |
| 30mm F1.4 EX DC HSM |
✔ *1 |
| 50mm F1.4 EX DG HSM |
✔ *1 |
| MACRO 105mm F2.8 EX DG |
✔ *1 |
| APO MACRO 150mm F2.8 EX DG HSM |
✔ *1 |
| 10-20mm F4-5.6 EX DC HSM |
✔ *1 |
| 18-50mm F2.8 EX DC MACRO |
✔ *1 |
| 18-50mm F3.5-5.6 DC |
✔ *1 |
| 18-125mm F3.5-5.6 DC |
✔ *1 |
| APO 50-500mm F4-6.3 EX DG HSM |
✔ *1 |
| 55-200mm F4-5.6 DC |
✔ *1 |
| APO 70-200mm F2.8 II DG MACRO HSM |
✔ *1 |
| APO 135-400mm F4.5-5.6 DG |
✔ *1 |
| APO 300-800mm F5.6 EX DG HSM |
✔ *1 |
- *1 When it is difficult to focus on your subject using a lens that is not compatible with high-speed imager AF, shooting with "S-AF + MF" mode is recommended.
- *2 Some lenses that are compatible with high-speed imager AF require a firmware update to achieve compatibility. For this reason, it is recommended to update the firmware in the lens to the latest version.
Question :
I see the message, "The lens is locked. Please extend the lens." and cannot start shooting. What should I do?
Answer:
When a retractable lens is mounted on the camera, you may see the message, "The lens is locked. Please extend the lens." You cannot start the shooting because the lens is retracted.

Note:
If a retractable lens is mounted on the E-P1, the message you see on the monitor is "Please check the status of a lens."
If you see the message, extend the lens as in the following illustration:
[How to extend or store a retractable lens]
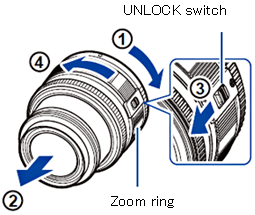
Turn the zoom ring in the direction of arrow (1) to extend the lens as in (2).
When you are mounting the M. ZUIKO DIGITAL ED 14-42 mm F3.5-5.6 lens to your camera, you can start shooting by setting the zoom range between 14 mm and 42 mm.
To store the lens after shooting, slide the UNLOCK switch forward as (3) and then turn the zoom ring in the direction of the arrow (4).
Note: The following lenses are retractable:
M.ZUIKO DIGITAL ED 14-42mm F3.5-5.6
M.ZUIKO DIGITAL 14-42mm F3.5-5.6 II
M.ZUIKO DIGITAL 14-42mm F3.5-5.6 II R
M.ZUIKO DIGITAL ED 9-18mm F4.0-5.6
Question :
I see the message, "Please check the status of a lens." and cannot start shooting. What should I do?
Answer:
When you see the message, "Please check the status of a lens." on the camera monitor, try the following troubleshooting tips:

Remove the lens from the camera and attach the lens again.
The lens may not have been attached properly to the camera. Remove the lens from the camera and attach it again to the camera.
Refer to the following webpage to see how to attach the lens to the camera:
After I attach a lens to the camera body, my camera seems unable to display the live view on the monitor. What should I do?
Check if this problem occurs with every lens or every combination of camera and lens.
This process is to check whether this problem occurs with a particular lens.
Check the operation of the camera and lens combination in question, by attaching a different lens to this camera body, and this lens to a different camera body.
If the message, "Please check the status of a lens." is displayed with only a particular lens, then this lens may be broken.
Question :
After I attach a lens to the camera body, my camera seems unable to display the live view on the monitor. What should I do?
Answer:
The lens may not have been attached properly to the camera. Follow the procedure below and try to attach the lens again.
Note:
Before attaching the lens to the camera, make sure the camera is turned off.
Do not touch any of the internal parts of the camera.
How to attach a lens to the camera
- * The following procedure explains how to attach a lens to the E-M1. You can attach a lens to other cameras using the same procedure.
-
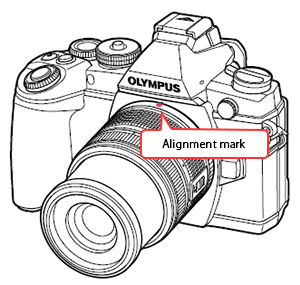
Align the lens attachment mark (red circle) on the camera with the alignment mark on the lens, and then push the lens onto the camera.
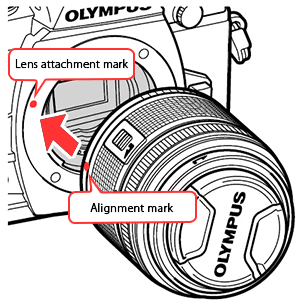
-
Turn the lens in the direction shown below until it clicks securely into place.
Do not press the lens release button while attaching the lens.

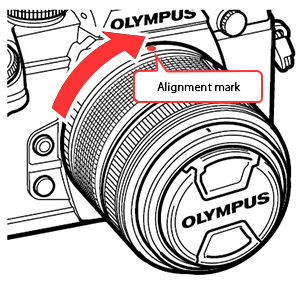
-
Make sure the alignment mark of the lens (red circle) finally comes on top of the lens as in the following illustration.
Question :
When I turn on the camera, I see the message "Write Protect" and cannot start shooting. What should I do?
Answer:
The SD/SDHC/SDXC card has a write protect switch. When you see the message "Write Protect", check the position of the write protect switch.
If the switch is set to the "LOCK" side, you will not be able to add or delete shooting data on the card, and the card cannot be formatted. Return the switch to the unlocked position to enable writing.

When the switch is set to the "LOCK" in playback mode, a write-protect icon ( or or  ) is displayed on the images. Editing or deleting of the images is not possible, and the card cannot be formatted. ) is displayed on the images. Editing or deleting of the images is not possible, and the card cannot be formatted.
Question :
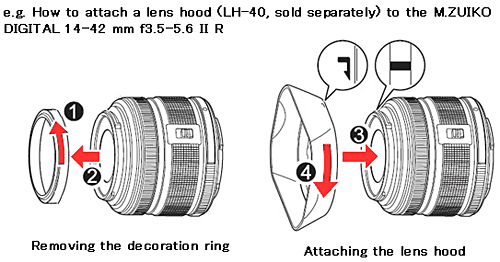
How do I attach a lens hood or converter lens to the M.ZUIKO DIGITAL 14-42mm F3.5-5.6 II R lens?
Answer:
To attach a lens hood (LH-40, sold separately) or converter lens (MCON-P01, WCON-P01, FCON-P01, each sold separately) to the M.ZUIKO DIGITAL 14-42mm F3.5-5.6 II R lens, please do the following:
- Gently twist the decoration ring in the direction shown in Step 1 of the example illustration.
- Remove the decoration ring.
- Align the mark on the lens hood or conversion lens with the bar on the lens and then
gently push the lens hood or conversion lens onto the lens as shown in Step 3.
- Turn the lens hood or conversion lens in the direction shown in Step 4 until it clicks securely into place.
Question :
How do I attach the shoulder strap to my digital camera?
Answer:
The following procedure explains how to attach the bundled shoulder strap (double-hung type) to the STYLUS 1 camera.
You can attach the shoulder straps bundled in other DSLR cameras and compact digital cameras using the same procedure.

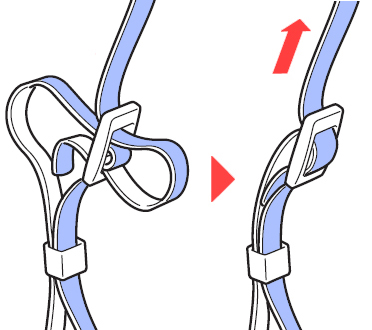
How to attach a shoulder strap
-
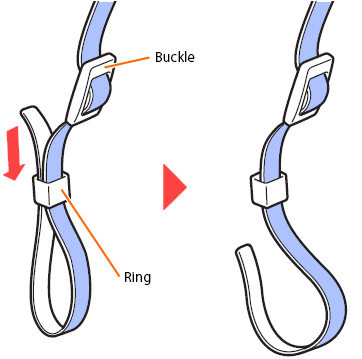
Pull the strap out from the ring as in the following illustration.
-
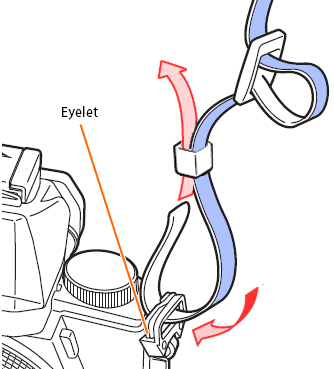
Thread the strap through the eyelet of the camera and then through the ring, placing the strap so that the strap end comes on the inside. Loosen the strap around the buckle as in the following illustration.
-
Thread the strap end through the upper hole of the buckle and then to the lower hole along the loosened strap.
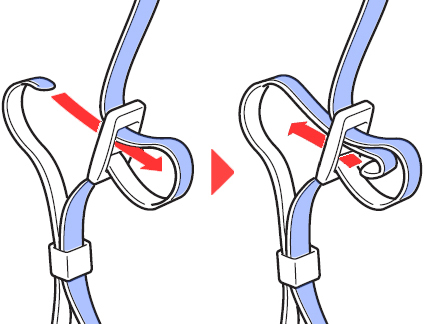
The following picture demonstrates what it looks like after step 3:
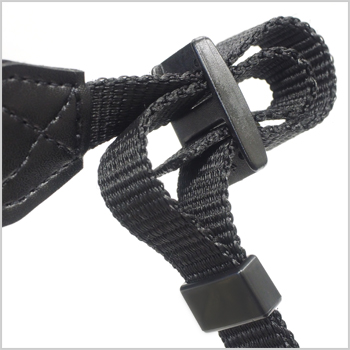
-
Adjust the strap to the desired length and then pull the loosened strap firmly to fasten it.
-
Attach the other side of the strap as described in step 1 to 4.
Firmly pull both ends of the strap to make sure that the strap is securely fastened.
Caution:
Be careful when having the camera strap around your neck to prevent accidents.
|