|
 |
|
|
Questions:
Question
How do I change the shooting functions back to default settings? [Reset Settings]
Answer:
Question
The colors in my pictures look different from the actual colors of my subject.
What can I do? [White Balance (WB)]
Answer:
Question
How do I take close-up pictures of small subjects? [Macro mode and Super Macro mode]
Answer:
Question:
Which shooting mode should I use? [Shooting mode, Scene]
Answer:
|
The [AUTO] mode is recommended for regular photography.
In [AUTO] mode, the camera automatically adjusts the settings.
If you want to change settings such as white balance and ISO sensitivity, turn the mode dial to other modes (e.g. to [ P ]).
The following shooting modes and scenes are available:
- AUTO
The camera determines the optimum settings for the shooting conditions automatically.
[Camera Menu] settings such as white balance and ISO sensitivity cannot be changed.
- P (Program Auto)
The camera automatically sets the optimum aperture and shutter speed based on the lighting conditions.
[Camera Menu] settings such as white balance and ISO sensitivity can be changed.
- A (Aperture priority shooting)
This mode enables you to take pictures with a softened background by setting the aperture manually. The camera sets the shutter speed automatically.
If a smaller aperture (F-number) is set, the focus range becomes narrower. You will get pictures of a subject with out-of-focus background.
If a larger aperture (F-number) is set, the focus range becomes wider. Both the subject and the background come into focus.
- S (Shutter priority shooting Auto)
In this mode, the shutter speed can be set manually. The aperture is set automatically. Set the shutter speed in accordance with the shooting situation. This mode is useful for capturing fast-moving action without blurring.
- M (Manual shooting)
Both the aperture and the shutter speed can be set manually. The exposure indicator on the LCD monitor enables you to check the difference between the current and the correct exposures. This mode allows you to take creative pictures.
- My mode shooting
In setting the shooting functions such as aperture and shutter speed, up to four modes can be registered. Because the settings will be retained in the camera even when the power is turned off, you can use the camera with the registered settings whenever you turn on the camera.
- MOVIE
The camera records video with or without sound.
- SCN (SCENE)
The camera offers a choice of 19 scene modes for shooting in various conditions.
 PORTRAIT PORTRAIT
This mode is suitable for shooting portraits.
The camera automatically sets the optimal shooting conditions to produce natural skin tones.
 LANDSCAPE LANDSCAPE
This mode is suitable for taking pictures of landscapes.
It vividly reproduces blues and greens.
 NIGHT SCENE NIGHT SCENE
For shooting illuminated scenes in the evening or at night.
The camera sets a slower shutter speed than in normal shooting.
For the best result, use a tripod so your camera remains steady when shooting.
 NIGHT+ PORTRAIT NIGHT+ PORTRAIT
For shooting both a foreground subject and an illuminated background in the evening or at night.
The camera sets a slower shutter speed than is used in normal shooting.
For the best result, use a tripod so your camera remains steady when shooting.
 SPORT SPORT
Captures fast- moving action without blurring.
 INDOOR INDOOR
For shooting both main subject and background indoors (e.g. at a party).
The background is reproduced clearly.
 CANDLE CANDLE
For shooting under candlelight.
Warm colors are reproduced.
Image quality is restricted to 5M (2560X1920) or less.
 SUNSET SUNSET
For shooting the setting or rising sun.
Vividly reproduces reds and yellows.
 FIREWORKS FIREWORKS
Suitable for shooting fireworks at night.
The camera sets a slower shutter speed than is used in normal shooting.
 MULTIPLE EXPOSURE MULTIPLE EXPOSURE
If you press the shutter button twice in succession, the two pictures will be combined into one picture.
 MULTI FIREWORKS MULTI FIREWORKS
This mode is for shooting fireworks at night with multi-exposure.
If you press the shutter button twice in succession, the two pictures will be combined into one picture.
Unlike MULTIPLE EXPOSURE, the shooting settings cannot be changed between shots.
 CUISINE CUISINE
For still life photography.
Vividly reproduces colors of fruit, vegetables and flowers.
 DOCUMENTS DOCUMENTS
For shooting paper documents.
Increases contrast between letters and background.
 BEACH & SNOW BEACH & SNOW
This mode is ideal for shooting white sand on the seaside or snow-capped mountains.
The colors of the sky, greenery and people are reproduced clearly.
 SMILE SHOT SMILE SHOT
The camera tracks your subject's face and automatically shoots three pictures sequentially when it detects a smile.
You can also take pictures manually by pressing the shutter button.
Focus is locked at the first frame.
 BIRD WATCHING BIRD WATCHING
This mode is suitable for photographing birds in the wild.
For the best results, use a conversion lens which is sold separately.
 SOFT BACKGROUND SHOT SOFT BACKGROUND SHOT
For shooting a foreground subject with a softened background.
You can select a frame from Face, Upper Body, Whole body or Circle.
 PRE-CAPTURE MOVIE PRE-CAPTURE MOVIE
This mode is useful for recording a short movie even before the moments you want to capture.
The camera captures a 7-second movie, including the 2 seconds before the shutter is fully depressed.
Image size can be selected from VGA (640x480) or QVGA (320x240).
Frame rate can be selected from 30fps or 15fps.
 QUICK SHUTTER QUICK SHUTTER
This mode takes pictures faster than normal, using Full-Time AF.
|
Question
What kinds of in-camera editing functions are available for this camera?
Answer:
| |
The following in-camera editing functions are available for still images:
-PERFECT FIX (Apply Shadow Adjustment and/or redeye reduction technology.)
-  BEAUTY FIX (Retouch the subject's skin and eyes.) BEAUTY FIX (Retouch the subject's skin and eyes.)
- (Resize) (Resize)
- (Crop) (Crop)
-COLOR EDIT
-CARENDAR
- FACE FOCUS
"INDEX", "EDIT" and "MOVIE INDEX" functions are available for movies.
The "INDEX" function automatically extracts nine frames from a movie and saves them as a new composite still image.
"EDIT" extracts a part of a movie and saves it as a new movie. Optionally, the function can be configured to overwrite the original movie.
"MOVIE INDEX" extracts a single selected frame from a movie file and saves it as a still image.
Editiing Still Images
| PERFECT FIX |
ALL |
[SHADOW ADJ] and [REDEYE FIX] are applied together. |
| SHADOW ADJ |
This function brightens areas darkened by backlight and dim lighting. |
| REDEYE FIX |
Corrects redeye caused when a subject's eyes appear red in flash photography. |
BEAUTY FIX |
ALL |
[CLEAR SKIN], [SPARKLE EYE] and [DRAMATIC EYE] are applied together. |
| CLEAR SKIN |
Smooth a person's complexion. You can select the desired effect from 3 levels: SOFT, AVG and HARD. |
| SPARKLE EYE |
This enhances the contrast of the subject's eyes. |
| DRAMATIC EYE |
Slightly emphasizes the eyes. |
RESIZE
|
[ VGA ] 640X480 |
This saves a separate, smaller copy of the image for e-mail attachment, etc. |
| [ QVGA ] 320X240 |
CROPPING
|
This is to crop a part of the image. The edited image is saved as a new still image. |
| COLOR EDIT |
Black & White |
This changes the picture color to black & white. |
| Sepia |
This lets you create sepia-tone photographs. |
| Saturation (hard) |
This increases the color saturation of the image. |
| Saturation (soft) |
This slightly increases the color saturation of the image. |
| CALENDAR |
This lets you add a calendar to an image. |
| FACE FOCUS |
This function focuses on a subject's face and slightly blurs the area around it in order to highlight the face. If multiple faces are detected, the one with the largest share of the viewing area will be affected. |
Editing Movies
| Index |
This function extracts nine frames from a movie and saves them as a new composite still image. |
| EDIT |
New File |
This extracts a part of a movie and saves it as a new movie. The original movie is left unchanged. |
| Overwrite |
This extracts a part of a movie and overwrites the original movie. |
| MOVIE INDEX |
This function extracts nine frames from a movie and saves them as a new composite still image. |
Note:
| - |
In-camera editing functions are available only for images taken with the camera.
|
| - |
The edited images will be saved as new files. Edited movies will be saved as new files except when the "Movie Edit" function's "OVERWRITE" option is selected.
Before editing images or movies, be sure that there is enough storage space on the card or internal memory.
|
| - |
Depending on the image, an editing function may not produce the desired effect.
|
| - |
Editing may lower image resolution, which may produce grainy photos. |
|
|
Question
I want to take still pictures in succession. How do I enable sequential shooting?
[Drive (Single shooting, High-Speed Sequential shooting, BKT)]
Answer:
| |
You can select the sequential shooting setting in the [DRIVE] menu.
In the sequential shooting mode, you can take several shots in rapid succession by depressing fully the shutter button.
It is ideal for capturing the exact moment you want.
Using the bracket (BKT) option, the camera automatically takes sequential pictures at different exposures.
This setting is useful when you are not sure what exposure value is appropriate.
There are two ways to set the DRIVE mode:
1. Selecting from the FUNC menu:
Press the [ ] button. ] button.
Choose  (drive mode), and then select the appropriate mode from (single-frame shooting), (drive mode), and then select the appropriate mode from (single-frame shooting),  (sequential shooting), (sequential shooting),  (high-speed sequential shooting 1), (high-speed sequential shooting 1),
 (high-speed sequential shooting 2), (high-speed sequential shooting 2),  (high-speed sequential shooting 2 with pre-capture), (high-speed sequential shooting 2 with pre-capture),  (AF sequential shooting) and BKT (bracket).* (AF sequential shooting) and BKT (bracket).*
To activate the setting, press the [] button again.
*The exposure interval and the number of shots for bracket shooting cannot be changed using in the FUNC menu. Change these settings using in CAMERA MENU.
2. Selecting from CAMERA MENU:
Press the [MENU] button, and then select CAMERA MENU.
In the DRIVE menu, select the appropriate mode from [] (single-frame shooting), [] (sequential shooting), [] (high-speed sequential shooting 1),
[] (high-speed sequential shooting 2), [] (AF sequential shooting) and BKT (bracket shooting).
*In , you can select PRE-CAPTURE OFF or PRE-CAPTURE ON.
* The exposure interval and the number of shots can be adjusted in BKT.
| Icon |
Submenu |
Submenu |
Operation |
 |
- |
- |
This lets you shoot one frame each time you press the shutter button fully. |
 |
This lets you shoot pictures sequentially while the shutter button is fully depressed.
- Focus and brightness (exposure) are locked at the first frame.
- You can shoot approximately 1 frames per second (5 frames max.) when image quality is set to 12M. |
 |
This lets you shoot faster than normal sequential shooting.
- Image quality is restricted to  (2560x1920) or less. (2560x1920) or less.
- You can shoot approximately 6 fps (30 frames max.) when image quality is set to . |
 |
PRE-CAPTURE OFF
PRE-CAPTURE ON |
- |
This lets you shoot faster than you can in .
- Image quality is restricted to  (2048x1536) or less. (2048x1536) or less.
- When set to [PRE-CAPTURE ON], the camera will begin saving images when the shutter button is pressed halfway down. The 10 frames shot before the shutter button is fully depressed will be written to the memory along with the images that are captured while the shutter button is fully depressed.
- You can shoot approximately 10 fps (25 frames max.) when image quality is set to . |
 |
- |
- |
This lets you shoot sequentially and adjusts the focus for each frame.
The camera uses a slower shooting speed than in the other sequential modes. |
| BKT |
±0.3 / ±0.7 / ±1.0
(Exposure compensation) |
x3 / x5
(Number of shots) |
- Focus and white balance are locked at the first frame.
- The camera automatically adjusts the exposure for each frame.
- The exposure interval and the number of shots can be selected. |
|
Question
In which shooting situations should I change the ISO sensitivity?
Answer:
| |
By default, the ISO sensitivity for the SP-590UZ is automatically set, ranging from ISO 64 to 6400.
This mode enables you to take crisp and clear pictures in different shooting situations.
With high ISO sensitivity and faster shutter speeds, you can capture sharp, blur-free images
in low-light situations and when the camera or your subject is moving.
You may see more noise or grain in your pictures when you use high ISO sensitivity.
If you use a lower ISO sensitivity, you can reduce the noise but the shutter speed will also become slower.
It is advised that you use a tripod so your camera remains steady when shooting.
ISO sensitivity can be changed as shown below:
| AUTO |
The camera automatically adjusts the ISO sensitivity for the best image quality. |
| High ISO AUTO |
The camera automatically adjusts the ISO sensitivity to reduce blurring effects. |
| ISO fixed |
ISO 64/100/200/400/800/1600/3200*/6400*
*If set to ISO 3200 or more, image size is restricted to [5M] (2560X1920) or less. |
|
Question
Can I cancel the information on the monitor or display a grid to check the composition of the picture? [Display Information]
Answer:
| |
Yes, during shooting and playback modes, you can change the display information on the monitor by pressing the DISP. button.
Press the button repeatedly to cycle through the available information display options. The arrows in the illustrations below indicate the order in which the display options occur.
When Taking Pictures
During Playback Mode
What is the histogram?
| |
The histogram shows the distribution of the light and dark tones in an image.
For example, when you use the camera in bright sunlight, it may be difficult to view the LCD monitor.
In such a situation, this function enables you to check the exposure of the image.
|
|
|
Question
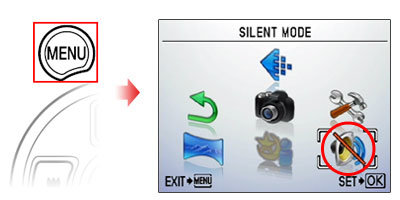
Can I cancel or change the volume of the operation sounds? [Sound setting, Silent mode]
Answer:
| |
Can I cancel or change the volume of the operation sounds? [Sound setting, Silent mode]
Yes, you can set the operation sounds (shutter, alarm, etc.) to OFF or change their volume.
Press the [MENU] button, and then select [SETUP]. In [Sound Settings], select the appropriate setting.
BEEP
(Operation Sound) |
SOUND TYPE |
1 / 2 |
Lets you select the operation sounds and volume of the camera buttons ( except the shutter button ) . |
| VOLUME |
OFF( No sound ) /
LOW / HIGH |
| SHUTTER SOUND |
SOUND TYPE |
1 / 2 / 3 |
Lets you select the operation sound and volume of the shutter button. |
| VOLUME |
OFF( No sound ) /
LOW / HIGH |
ALARM SOUND
 |
OFF ( No sound ) / LOW / HIGH |
Lets you adjust the volume of the alarm sound. |
VOLUME
 |
OFF (No sound)/ 1 / 2 / 3 / 4 / 5 |
Lets you adjust the playback sound volume. |
Silent Mode
In "Silent Mode," all sounds (start up/operation/shutter/playback) are turned off.
This mode enables you to use the camera in places where you need to be quiet.
Press the [ MENU ] button, and then select SILENT MODE.
| OFF |
This mode activates custom settings of [ Sound Settings ]. |
| ON |
Electronicx sounds ( operation sounds, shutter sound and warning sound ) and playback sound are muted. |
|
Question
Is the viewfinder optical or electronic?
Answer:
| |
The SP-590UZ uses the 230,000-pixel EVF (electronic LCD viewfinder). The field of view of the viewfinder and LCD monitor is 100%. You can check the effects of the focus or exposure using the viewfinder.
|
Question
What is Time-lapse shooting?
Answer:
| |
Time-lapse shooting enables you to capture a subject over a period of time by setting picture-taking intervals.
If you set the number of shots (from 2 to 99 shots) and interval (from 1 to 99 min.), the camera will automatically take pictures using these settings. This function is useful for taking photos of a flower blooming or the sun rising.
After the first frame is saved to the internal memory or memory card, the camera will automatically enter the SLEEP mode. The camera will resume operation seven seconds before the next shot. The camera will automatically turn off once the preset number of shots have been taken.
Note:
- Make sure your camera's battery is fully charged, or use the AC adapter.
- Time-lapse shooting will be interrupted and the camera will resume normal operation if any of the following operations are performed while the camera is in SLEEP mode:
- The battery cover or card cover is opened.
- The camera is connected to a computer.
- The shutter button or the arrow pad is pressed.
- Button operation, mode dial and zoom operation are deactivated while shooting, including during the period of seven seconds before shooting.
- If the internal memory, memory card or battery runs out during SLEEP mode, a warning will be displayed. The camera will cancel the time-lapse shooting and automatically turn off.
|
|
Question
Which type of memory card can I use? [ xD-Picture Card, microSD Card ]
Answer:
| |
You can use xD-Picture Card™ media or microSD™ / microSDHC media
(hereafter referred to as "microSD cards").
To use microSD cards, a microSD adapter (packaged with the camera) is required.
The following xD-Picture Card media can be used:
Card Capacity: 16MB to 2GB
Card Type: TypeH, TypeM, TypeM+, Standard
To see all compatible microSD cards, click here:
" Compatible microSD card Tables "
|
Question
Will the bundled microSD™ adapter let me use any microSD or microSDHC card in my camera?
Answer:
| |
Click here to view a list of microSD and microSDHC cards that can be used with the MASD-1 card adapter. This page will be updated as additional cards are evaluated.
The art editing features of the xD Pack plug-in for OLYMPUS Master 2 do not support images recorded to microSD/SDHC cards. To use these features, use Olympus brand xD-Picture Card™ media.
|
Question
Will the microSD adapter allow me to use microSD and microSDHC media in other Olympus cameras?
Answer:
| |
MicroSD and microSDHC cards can be used only with cameras that are compatible with the MASD-1 microSD adapter. For a list of compatible cameras, click here.
The adapter is different from xD-Picture Card media in form. It will not fit in the card slots of other cameras that are compatible with xD-Picture Card media. Forcing the MASD-1 into an incompatible camera or other device may damage it or cause the equipment to malfunction. The data on the memory card may be destroyed.
|
Question
How do I install OLYMPUS Master 2 packaged with the camera? I would like to transfer pictures to my computer.
Answer:
Question
How many images can the SP-590UZ hold?
Answer:
| |
The chart below shows the approximate number of images at each available quality mode that the SP-590UZ can store in its internal memory and on a variety of optional media. The camera can store images and movies in any combination of quality modes. All figures are approximate.
| Number of storable images |
| IMAGE SIZE |
COMPRE
SSION |
Internal Memory |
xD-Picture Card media |
| 1GB |
2GB |
| 12M |
3968 x 2976 |
FINE |
3 |
174 |
349 |
| NORM |
7 |
343 |
687 |
| 5M |
2560 x 1920 |
FINE |
9 |
410 |
820 |
| NORM |
17 |
789 |
1560 |
| 3M |
2048 x 1536 |
FINE |
14 |
627 |
1254 |
| NORM |
26 |
1184 |
2369 |
| 2M |
1600 x 1200 |
FINE |
22 |
984 |
1938 |
| NORM |
41 |
1827 |
3553 |
| 1M |
1280 x 960 |
FINE |
32 |
1453 |
2907 |
| NORM |
57 |
2558 |
4920 |
| VGA |
640 x 480 |
FINE |
130 |
5814 |
10661 |
| NORM |
239 |
10660 |
21323 |
| 16:9 [L] |
3968 x 2232 |
FINE |
5 |
231 |
463 |
| NORM |
10 |
453 |
901 |
| 16:9 [S] |
1920 x 1080 |
FINE |
20 |
927 |
1827 |
| NORM |
37 |
1683 |
3366 |
Capacity will be slightly less than shown if sound is recorded with still images. All figures are approximate.
|
Question
How much movie recording time does the SP-590UZ have?
Answer:
| |
The chart below shows the maximum continuous movie recording time available in each quality mode when using the camera's internal memory or xD-Picture Card media. The chart assumes that the medium has been freshly formatted. All figures are approximate.
Recording times are calculated based on storage capacity and are not a guarantee of battery life.
| IMAGE SIZE |
FRAME RATE |
Recording length (h:mm:ss) with sound* |
| Internal Memory |
xD-Picture Card media |
| 1GB |
2GB |
| VGA |
640
x
480
|
30fps** |
0:00:27 |
0:09:25 |
0:18:50 |
| 15fps |
0:00:54 |
0:18:44 |
0:37:28 |
| QVGA |
320
x
240
|
30fps |
0:01:13 |
0:25:26 |
0:50:52 |
| 15fps |
0:02:24 |
0:50:07 |
1:40:15 |
**Up to 40 sec. available for each movie in 640 x 480 / 30 fps mode when using a xD-Picture Card other than Type H/M+ or when using internal memory. The Class 2 microSD/microSDHC card may not allow sequential movie recording.
|
|
|
|