 |
 |
|
|

Questions :
What exciting new functions are in the E-P1? :
See the following Web page for general questions and answers for OLYMPUS OM-D and OLYMPUS PEN series cameras :
Question
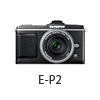
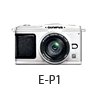
What differentiates the E-P1 from the E-P2?
Answer:
The following table describes the differences:
|
|
 |
 |
| Effective Pixels |
12.3 million pixels |
| Lens mount |
Micro Four Thirds Mount |
| Body color |
Black, Silver |
White, Silver |
| Memory |
SD Memory Card, SDHC Memory Card |
| Built-in flash |
Not available |
| Hot shoe |
Available |
| External electronic viewfinder |
VF-2 ( sold separately ) |
Not available |
| LCD display |
3.0 inches HyperCrystal LCD |
| Movie shooting |
Available |
| In-body image stabilization |
Approx. 4 EV steps ( in maximum effect ) |
| Sequential shooting |
Approx. 3 frames per sec. |
| Focus mode |
Single AF (S-AF),
Continuous AF (C-AF),
Manual Focus (MF),
S-AF + MF,
AF tracking (C-AF + TR) |
Single AF (S-AF),
Continuous AF (C-AF),
Manual Focus (MF),
S-AF + MF |
| Enlarge select AF |
Available |
Not available |
| Menu languages |
34 languages including Japanese and English |
Japanese and English
(Additional one language is possible to download using OLYMPUS Master 2. An internet connection is required) |
| Picture mode |
i-ENHANCE, VIVID, NATURAL, MUTED, PORTRAIT, MONOTONE, CUSTOM |
VIVID, NATURAL, MUTED, PORTRAIT, MONOTONE, CUSTOM |
| Art filter |
8 art filters:
POP ART, SOFT FOCUS, PALE&LIGHT COLOR, LIGHT TONE, GRAINY FILM, PIN HOLE, DIORAMA, CROSS PROCESS |
6 art filters:
POP ART, SOFT FOCUS, PALE&LIGHT COLOR, LIGHT TONE, GRAINY FILM, PIN HOLE |
| Multi exposure |
2 frames max. |
Underwater Housing
(sold separately) |
Not available |
| Accessory port |
Available
( Accommodates the VF-2 Electronic viewfinder or EMA-1 Microphone adapter ) |
Not available |
| HDMI output connector |
Available |
| Dimension |
120.5 mm (W) x 70.0 mm (H) x 35.0 mm (D) /
4.7" (W) x 2.8" (H) x 1.4" (D)
( excluding protrusions ) |
| Weight |
335 g ( body only ) |
| Release date |
December, 2009 |
July, 2009 |
|
Question
How long is the shutter-release lag-time?
Answer:
|
After the shutter button is pressed halfway, it takes about 0.07 second to release the shutter.
|
Question
Which types of memory cards can I use?
Answer:
|
SD and SDHC cards can be used in the E-P1.
xD-Picture Card™ and CompactFlash® media cannot be used.
|
Question
What are the compression rates and what size are the image files in each record mode?
Answer:
|
【 Still pictures 】
The following table shows the approximate values when shooting still pictures in the 4:3 aspect ratio. File size and the number of storable pictures vary depending on the image quality selected.
| Record mode |
Compression rate |
Number of pixels |
File format |
Number of storable pictures in a 1GB SD/SDHC card |
File size (approx.) |
| RAW |
Lossless compression |
4032x3024 |
ORF |
54 |
14MB |
| Large |
SF
(Super Fine) |
1/2.7 |
JPEG |
101 |
8.4MB |
F
(Fine) |
1/4 |
145 |
5.9MB |
N
(Normal) |
1/8 |
320 |
2.7MB |
B
(Basic) |
1/12 |
477 |
1.8MB |
| Middle |
SF
(Super Fine) |
1/2.7 |
3200x2400 |
JPEG |
154 |
5.8MB |
F
(Fine) |
1/4 |
255 |
3.4MB |
N
(Normal) |
1/8 |
504 |
1.7MB |
B
(Basic) |
1/12 |
747 |
1.2MB |
SF
(Super Fine) |
1/2.7 |
2560x1920 |
JPEG |
269 |
3.2MB |
F
(Fine) |
1/4 |
395 |
2.2MB |
N
(Normal) |
1/8 |
776 |
1.1MB |
B
(Basic) |
1/12 |
1143 |
0.8MB |
SF
(Super Fine) |
1/2.7 |
1600x1200 |
JPEG |
673 |
1.3MB |
F
(Fine) |
1/4 |
993 |
0.9MB |
N
(Normal) |
1/8 |
1893 |
0.5MB |
B
(Basic) |
1/12 |
2753 |
0.4MB |
| Record mode |
Compression rate |
Number of pixels |
File format |
Number of storable pictures in a 1GB SD/SDHC card |
File size (approx.) |
| Small |
SF
(Super Fine) |
1/2.7 |
1280x960 |
JPEG |
1044 |
0.9MB |
F
(Fine) |
1/4 |
1514 |
0.6MB |
N
(Normal) |
1/8 |
2884 |
0.3MB |
B
(Basic) |
1/12 |
4038 |
0.3MB |
SF
(Super Fine) |
1/2.7 |
1024x768 |
JPEG |
1594 |
0.6MB |
F
(Fine) |
1/4 |
2243 |
0.4MB |
N
(Normal) |
1/8 |
4038 |
0.3MB |
B
(Basic) |
1/12 |
5507 |
0.2MB |
SF
(Super Fine) |
1/2.7 |
640x480 |
JPEG |
3563 |
0.3MB |
F
(Fine) |
1/4 |
5048 |
0.2MB |
N
(Normal) |
1/8 |
8654 |
0.2MB |
B
(Basic) |
1/12 |
10096 |
0.1MB |
Note:
| - |
The number of storable pictures depends on the image quality and the type of memory card. |
|
【 Movies 】
| Record mode |
Image size |
Frame rate (frames per second) |
Recording time in a 2 GB SD/SDHC card (with sound) |
| HD |
1280×720(16:9) |
30 fps |
approx. 7 min. |
| SD |
640×480(4:3) |
30 fps |
approx. 14 min. |
Note:
| - |
The maximum file size of a movie is 2 GB. This is a limitation of the AVI file format. |
| - |
When shooting with an Art Filter, the frame rate varies based on the selected filter. |
| - |
In movie mode, IMAGE STABILIZER uses electronic stabilization. With this function, the recorded image is slightly enlarged. The IMAGE STABILIZER cannot correct excessive camera shake. |
| - |
A Speed Class 6 SD or SDHC card is recommended for movie recording.
|
|
|
Question
Can I use an external flash and the optional optical viewfinder VF-1 at the same time?
Answer:
|
No. In order to use either device with the E-P1, it must be attached to the camera's hot shoe.
Because the E-P1 has only one hot shoe, the VF-1 and an external flash cannot be used
simultaneously.
When shooting with an external flash, view your subject on the Live View LCD monitor.
|
|
Question
How can I turn off the LCD monitor of my camera while using the optical viewfinder VF-1?
Answer:
|
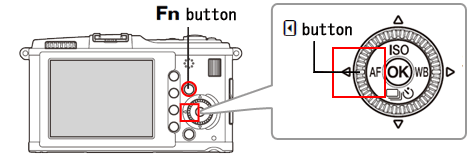
To turn off the LCD monitor of your camera, you must register the function to the Fn or  button. button.
Note:
| - |
You cannot register the function to the Fn or  button in the following modes: iAUTO, Scene and Movie. button in the following modes: iAUTO, Scene and Movie.
|
|
Register the function to the  button button
1. Press the [ MENU ] button, and then select  . In . In  MENU DISPLAY, select ON, and then press the [ OK ] button. MENU DISPLAY, select ON, and then press the [ OK ] button.

2. Press the [ MENU ] button, and then use the arrow pad to select  , ,  and then Fn FUNCTION. and then Fn FUNCTION.
Select BACKLIT LCD, and then press the [ OK ] button to register the setting.

After registering the setting, the LCD monitor of your camera will be turned ON or OFF each time you press the Fn button.
Register the function to the  button button
1. Press the [ MENU ] button, and then select  . In . In  MENU DISPLAY, select ON, and then press the [ OK ] button. MENU DISPLAY, select ON, and then press the [ OK ] button.

2. Press the [ MENU ] button, and then use the arrow pad to select  , ,  and then and then  FUNCTION. FUNCTION.
Select BACKLIGHT, and then press the [ OK ] button to register the setting.

After registering the setting, the LCD monitor of your camera will be turned ON or OFF each time you press the  button. button.
Note:
| - |
When you turn the LCD monitor OFF, the recorded pictures will not be displayed after shooting.
If you want to display the recorded pictures
Press the [ MENU ] button, and then select  . In REC VIEW , select AUTO . In REC VIEW , select AUTO  , and then press the [ OK ] button. , and then press the [ OK ] button.
|
|
|
Question
What are the differences between the image stabilizer modes? Can I turn off the image stabilizer?
Answer:
|
You can select from three image stabilizer modes: I.S.1, I.S.2 and I.S.3.
In the default setting, the image stabilizer is set to OFF.
| Mode |
|
| OFF |
Image stabilizer is OFF. |
| I.S.1 |
Image stabilizer is ON. |
| I.S.2 |
This allows you to track the subject by panning the camera horizontally.
The image stabilizer corrects only the vertical camera shake. |
| I.S.3 |
This allows you to track the subject by panning the camera vertically.
The image stabilizer corrects only the horizontal camera shake. |
Note:
| - |
The image stabilizer cannot correct excessive camera shake or camera shake that occurs when using an extremely slow shutter speed.
When attaching the camera to a lens with its own image stabilizer function, turn off the image stabilizer function of either the lens or the camera.
|
|
|
What exciting new functions are in the E-P1? :
Question
How can I shoot deep-focus pictures using a pancake lens without missing the moment I want to capture?
Answer:
|
Wide-angle pancake lenses such as the M. ZUIKO DIGITAL 17mm F2.8 enable you to shoot deep-focus pictures, making the best use of the depth of field.
Because the AF operation will be skipped, deep-focus shooting lets you shoot pictures without missing the moment you want to capture.
For the best results when shooting deep-focus pictures, you should fix the focus position and narrow the aperture.
The focus will be reset to the default setting, infinity, each time you turn off the power. To customize this setting, follow the instructions below.
1. Press the [ MENU ] button, and then select  . In the . In the  MENU DISPLAY, use the arrow pad to select ON. MENU DISPLAY, use the arrow pad to select ON.
2. Use the arrow pad to select  , ,  AF / MF and then RESET LENS. After selecting OFF, press the [ OK ] button. AF / MF and then RESET LENS. After selecting OFF, press the [ OK ] button.
For shooting deep-focus pictures
| - |
The recommended focus position is about 3 to 5 meters. Point the camera to your subject at the recommended distance, and then press down the shutter button halfway for focusing. |
| - |
Set the AF MODE to MF. The focus position will be locked unless you rotate the focus ring while the camera is ON. (Focus position will not change even if you rotate the focus ring while the camera is OFF.) |
| - |
Set the mode dial to A ( Aperture priority shooting ) and turn the main dial or sub dial to set the aperture value to F4 - F8.
The higher the number of the F stop, the wider the area in focus becomes. Because the camera sets a slower shutter speed than normal, it is recommended to use a tripod to reduce the blur caused by camera shake. |
|
Question
Can I apply an art filter effect to my pictures after I have shot them?
Answer:
|
If the pictures were taken in RAW, you can apply art filter effects later using the camera's ART function or the software ( OLYMPUS Master 2 / OLYMPUS Studio 2 ).
How to apply an art filter effect in the camera
When editing a RAW image in the camera, the camera settings that are active at the time of editing will be applied. To apply an art filter, follow the instructions below.
1. Set the mode dial to [ ART ]. Select the desired art filter, and then press the [ OK ] button.
2. Press the  button to switch to playback mode. button to switch to playback mode.
3. Select the picture you want to edit, and then press the [ OK ] button. When the MENU is displayed, select RAW DATA EDIT, and then press the [ OK ] button. Press the [ OK ] button again to start the editing.

4. After the effect is applied to the selected picture, it will be saved as a new JPEG file.
You can apply another art filter to the original RAW image because the RAW data is preserved unchanged.
How to apply an art filter effect using OLYMPUS Master 2
After transferring the pictures to your computer, you can apply an art filter by using the RAW development function in OLYMPUS Master 2.
To apply an art filter, follow the instructions below.
Note:
| - |
Use the same procedure in OLYMPUS Studio 2.
|
|
1. In OLYMPUS Master 2, select a RAW image you want to edit on the Browse window. Click Edit on the MENU bar, and then select Open Raw Development Window.
Note:
| - |
The Raw Development Window can also be opened if you click RAW on the toolbar. |
|
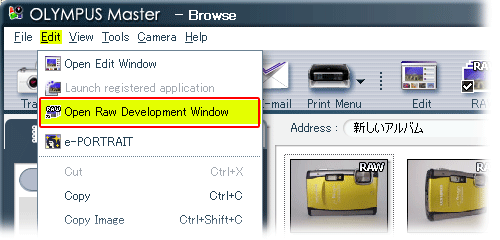
2. Click the Basic 2 tab on the right side of the Raw Development window. Click art filter, and then select a filter you want to apply.
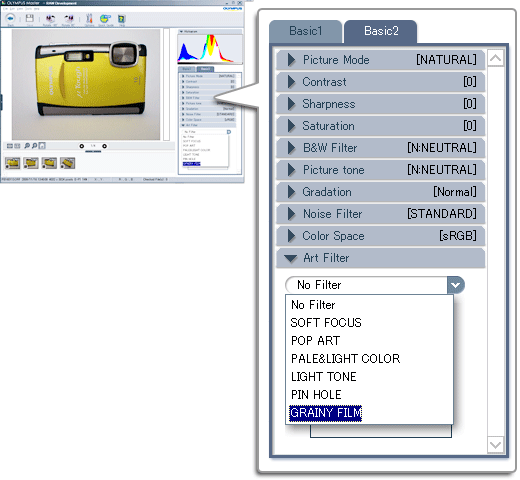
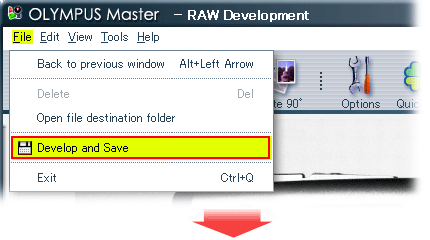
3. The image will be displayed with the selected effect. If you accept the effect, click File on the MENU bar, and then select Develop and Save to save the image as a new JPEG file.
Note:
| - |
The edited image can also be saved if you click Save on the toolbar. |
|
You can apply another art filter to the original RAW image because the RAW data is preserved unchanged.
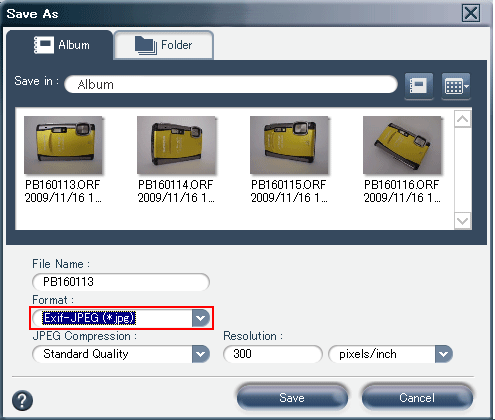
Note:
| - |
OLYMPUS Master 2.2 or later or OLYMPUS Studio 2.3 or later is required for developing an art filter. Update the software if you are using an earlier version.
Refer to the following Web page for more information:
Download Files: Software, Firmware, Drivers
|
|
|
| - |
Art filter effects cannot be applied to JPEG images and movies after they have been shot. You can apply a filter effect only if you set the art filter before you take a shot.
On the other hand, art filters cannot be applied to RAW images before shooting. Apply the effects after shooting.
|
|
|
Question
How can I set the AF target manually?
Answer:
|
In the default setting, the camera automatically selects an AF target from 11 AF target points.
To focus on a desired point, set the AF target manually.
1. Press the [ OK ] button to display the live control, and then use the arrow pad to select the AF AREA. ( The AF AREA can also be selected from the super control panel or AF / MF in the custom menu.)
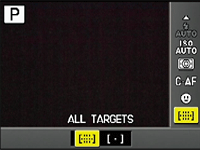
2.Select  SINGLE TARGET, and then press the [ OK ] button to display the 11 AF targets. The current-selected AF target is shown in a green frame. SINGLE TARGET, and then press the [ OK ] button to display the 11 AF targets. The current-selected AF target is shown in a green frame.
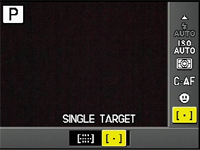
3.Use the arrow pad to change the AF target, and then press the [ OK ] button.
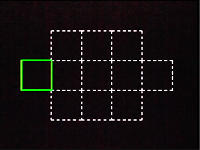
|
Question
How can I select the AF target position easily?
Answer:
|
You can easily select an AF target position from 11 AF target points by using the arrow pad.
1. Press the [ MENU ] button, and then select  . In the . In the  MENU DISPLAY, use the arrow pad to select ON. MENU DISPLAY, use the arrow pad to select ON.
2. Use the arrow pad to select  , ,  BUTTON / DIAL and BUTTON / DIAL and  FUNCTION, and then change the settings to FUNCTION, and then change the settings to  . .

3. Press the shutter button halfway, let go of the button and then use the arrow pad to change the AF target position.
Note:
| - |
ISO, AF, WB, Sequential Shooting and Self-Timer function, which are assigned to the arrow pad in the default settings, will be deactivated. You can reassign these functions by setting the  FUNCTION to ON. FUNCTION to ON. |
|
|
Question
How can I take pictures using an OM lens?
Answer:
|
OM system lenses for SLR film cameras can be mounted on the E-P1 with the MF-2 OM adapter.
When an OM lens is mounted on the camera, the Image Stabilizer function will be applied. Use MF for focusing.
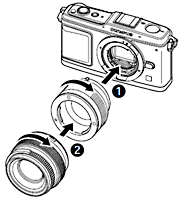
1. Attach the MF-2 OM adapter to the E-P1.
2. Attach an OM lens to the MF-2.
3. Set the focal length to enable the image stabilizer.
Press the [ OK ] button to display the live control. Use the arrow pad to select the image stabilizer, and then select an image stabilizer mode (e.g. I.S. 1).
Press the [  ] button to change the focal length with the sub dial or right and left arrow button. ] button to change the focal length with the sub dial or right and left arrow button.
If a 50 mm OM lens were attached to the camera, set the focal length to 50 mm, and then press the [ OK ] button.

4. Select the exposure mode.
In exposure modes except M and S, the aperture priority AE is used based on the lens aperture.
M mode allows you to set the exposure manually. Adjust the aperture on the lens and the shutter speed on the camera. You can check on the LCD monitor how much it differs from the appropriate exposure. S mode allows you the same settings as in M mode. The appropriate exposure will not be displayed on the LCD monitor.
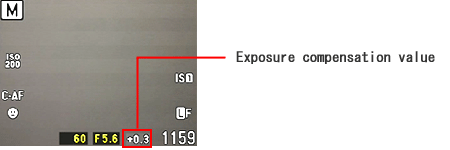
5. You can enlarge a selected area in the image to 7x or 10x in order to check the focus.
When Live View is enabled, press the [ INFO ] button repeatedly to display a green target area.
Use the arrow pad to move the target area, and then press the [ OK ] button.
The magnification can be changed to 7x or 10x by turning the sub dial.
The image will return to the normal size when you press the [ OK ] button.
|
Question
I prefer to use certain camera settings when shooting with MICRO Four Thirds lenses and different settings when using the OM adapter. How can I easily switch between the two sets of settings?
Answer:
|
You can easily switch the settings by registering separate usage profiles with the CUSTOM RESET function.
Register the basic settings for MICRO Four Thirds lenses.
1. Set up the camera with the settings you wish to have applied when a MICRO Four Thirds lens is attached to your camera.
2. Press the [ MENU ] button, and then select  . Use the arrow pad to select CUSTOM RESET. . Use the arrow pad to select CUSTOM RESET.
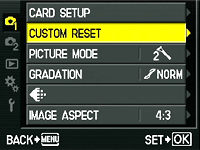
3. Using the arrow pad, select RESET 1 and then SET. Press the [ OK ] button to register the settings.

Register the basic settings for OM adapters.
1. Set up the camera with the settings you wish to have applied when using an OM adapter.
2. Press the [ MENU ] button, and then select  . Use the arrow pad to select CUSTOM RESET. . Use the arrow pad to select CUSTOM RESET.

3. Using the arrow pad, select RESET 2 and then SET. Press the [ OK ] button to register the settings.

Whenever you change the attached lens, you can easily start shooting with your own preferences by selecting RESET 1 or RESET 2.
Note:
| - |
The camera settings can also be registered to the MY MODE function, but some settings such as INFO SETTING and REC VIEW can be registered only in CUSTOM RESET. |
|
|
Question :
Can the Communication Unit OLYMPUS PENPAL PP-1 be used ?
Answer:
No, it cannot be used.
|
|
|


