Questions :
Question :
What additional items are packaged with the camera?
Answer:
The following items are packaged with the camera:
- - Body cap *
- - Eyecup EP-15 *
- - Hot shoe cover *
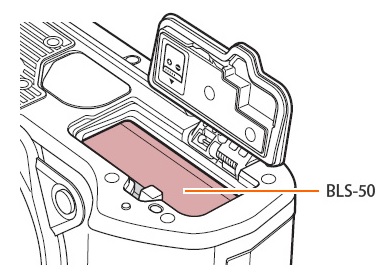
- - Lithium-ion battery BLS-50
- - USB-AC adapter F-5AC
- - USB cable CB-USB12 (Micro USB connector)
- - Strap
- - Instruction manual (Basic)
The instruction manual packaged with the camera is a basic manual. The detailed instruction manual is available in PDF format on the following web page:
Download Manuals : OM l OM-D / PEN series
- Warranty card
* The body cap, eyecup and hot shoe cover is attached to the camera.
OM Workspace:
The OM Workspace software CD-ROM is not packaged with the OM-5 camera. The software is available to Olympus/OM Digital solutions camera users via Internet as a free download. (The serial number of the camera is required.)
OM Workspace Software Download
Question :
How do I charge the battery while in camera using the bundled USB-AC adapter?
Answer:
The battery in OM-5 can be charged while in camera by using the bundled F-5AC USB-AC adapter and the USB cable. The battery can be charged only when the camera power is off. You are not able to shoot images and play the recordings with the camera when the USB-AC adapter is connected.
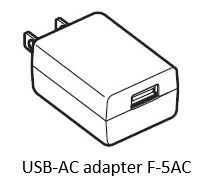
How to charge the battery with F-5AC USB-AC adapter
The following procedure explains how to charge the battery in the camera using the bundled F-5AC USB-AC adapter and USB cable.
- 1. Turn off the power of the camera.

- 2. Insert the battery (BLS-50) into the camera.
- 3. Connect the camera to the USB-AC adapter (F-5AC) using the USB cable that came with the camera. It takes about four hours to charge the battery.
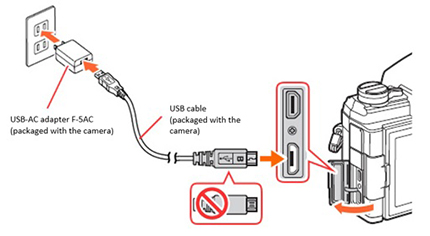
The CHARGE lamp lights up during charging.
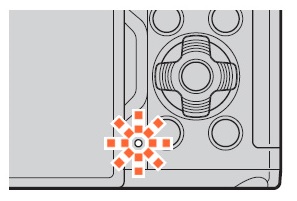
- 4. The CHARGE lamp turns off when the charging is complete. Charging stops when the camera is turned on.
Notes:
- The USB-AC adapter cannot be used to charge the battery when the camera is turned on.
- The CHARGE lamp blinks if there is an error in charging. Try to disconnect and reconnect the USB cable for recovery.
- USB charging can be used when the battery temperature is between 0 and 40 ℃.
- Even if the camera is turned off, the battery cannot be charged when images are uploaded to a smartphone via Wi-Fi by background auto upload.
Related link:
You can also remove the rechargeable battery from the camera body and charge it using the separately sold BCS-5 lithium-ion battery charger. It takes about 3.5 hours to charge the battery.
Question :
How far can I rotate the LCD monitor?
Answer:
The OM-5 has a 3.0 inches 2-axis movable monitor. The monitor can be set to high or low angles or rotated for self portraits. 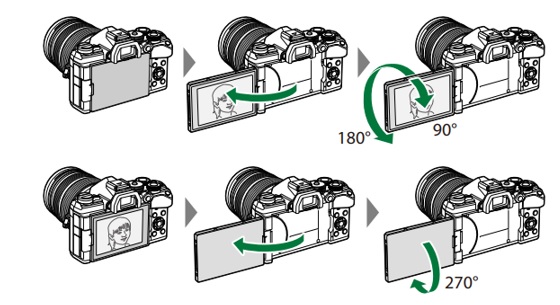
Note:
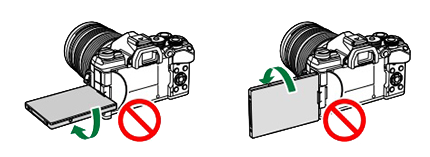
Gently rotate the monitor within its range of motion. Attempting to rotate the monitor beyond the limits as in the following illustration damage the connectors.
Question :
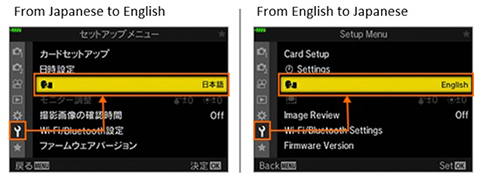
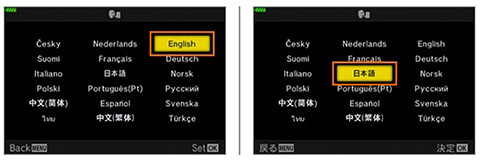
What types of languages can be displayed on the camera monitor?
Answer:
The following languages can be selected as the display language in the camera setting:
| Japanese |
English |
Chinese Simplified |
| Chinese Traditional |
French |
German |
| Spanish |
Portuguese |
Italian |
| Russian |
Czech |
Turkish |
| Polish |
Dutch |
Finnish |
| Swedish |
Norwegian |
Thai |
Question :
Approximately how many shots can be taken with a fully charged battery?
Answer:
The number of recordable shots with a fully charged battery are:
· Approx. 310 shots
* when using lithium-ion battery BLS-50 and KIOXIA KSDXU-A064G, IS set to On, without flash, based on CIPA standard
· Approx. 660 shots
* when power saving is enabled, based on CIPA standard
Question :
What is the approximate movie recording time with a fully charged battery?
Answer:
The approximate movie recording time with a fully charged battery are:
· Approx. 60 min
* according to JEITA
· Approx. 1 hr 50 min
* when zooming or other operations are not used
Note:
· When the video taken with a SDXC card exceeds 2 hours, the video is automatically divided and the rest is saved as a separate file. (Depending on the shooting conditions, the file may be divided in less than 2 hours.)
· When the video taken with a SD/SDHC card exceeds 4 GB, the video is automatically divided and the rest is saved as a separate file. (Depending on the shooting conditions, the file may be divided in less than 4 GB.)
Question :
Can I use the camera as a webcam?
Answer:
You can use the OM-5 as a webcam for online meetings or live streaming by connecting the camera to a computer. Additional drivers or applications (such as OM Webcam Beta) are not required. The camera can be used as a webcam just by connecting it to a computer via USB.
How to use the OM-5 as a webcam
1. Turn off the camera. Set the mode dial to  (movie mode). (movie mode).
2. Connect the camera to the computer.
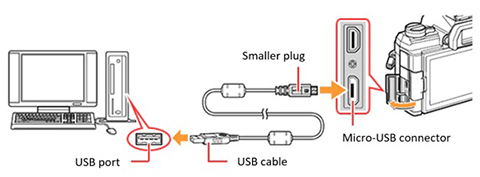
3. Turn on the camera.
The camera displays a selection menu on the LCD. Select Webcam using the arrow pad button and press the [OK] button.
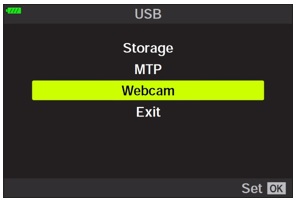
- If the selection menu for USB connection is not displayed, set the USB Mode in Custom Menu to Select.
- If the monitor remains blank after the camera is connected to the computer, the battery level may be severely low. Use a fully charged battery.
4. The camera is ready for recording. Adjust the brightness and focus on the camera side.
5. Open the application for online meeting or streaming on the computer. Select the model name of the connected camera in the application's device settings to start transmitting audio and video.
- The video is transmitted in HD (1280 x 720) movie size.
- The video is transmitted in 30p when Frame Rate in [
 ] is set to 60p / 30p / 24p and in 25p when set to 50p / 25p. ] is set to 60p / 30p / 24p and in 25p when set to 50p / 25p.
Note:
· Refer to the instruction manual for the application or contact the service provider for how to use the online meeting or streaming application.
Notes on the webcam function:
- Audio and video cannot be transmitted to the computer in the following cases:
- when the shooting mode is set to a mode other than (movie mode)
- when playback or camera menu is displayed
- You will have the following restriction while audio and video are transmitted to the computer:
- You cannot change the options selected for [ ].
- Picture Mode cannot be enabled even when it is set to On.
- Camera settings such as exposure cannot be changed on the computer.
Question :
How do I change the functions assigned to the ISO or AEL/AFL button?
Answer:
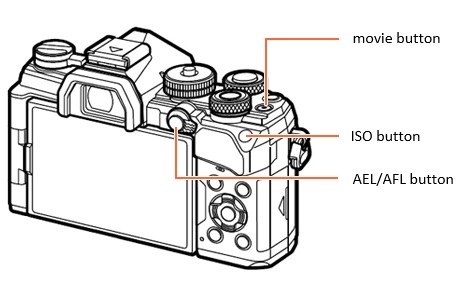
You can assign a frequently used function to the ISO, AEL/AFL or  (movie) button in Button Function and use the assigned function just by pressing each button. (movie) button in Button Function and use the assigned function just by pressing each button.
Different button settings can be assigned to the same button for still photography and movie mode.
Assigning Digital Tele-converter to the ISO button
The following procedure explains how to assign a function to each button.
Digital Tele-converter is assigned to the ISO button in this procedure.
Follow the same procedure to assign a function to other buttons such as the (movie) and the AEL/AFL button.
1. Press the [MENU] button to display the menus.
Assign button function for still photography mode:
In  Custom Menus, select Custom Menus, select  Button/Dial. In Button/Dial. In  Button Function, select ISO button and press the arrow pad Right button. Button Function, select ISO button and press the arrow pad Right button.
Assign button function for movie mode:
In Video Menu, select Button/Dial/Lever and then Button Function. Select ISO button and press the arrow pad Right button.
2. Select a function you want to assign to the ISO button using the arrow pad Up and Down button and press the [OK] button. Digital Tele-converter (  ) is selected in this procedure.(In movie shooting mode, you can select Movie ) is selected in this procedure.(In movie shooting mode, you can select Movie  that allows you to choose the zoom position.) that allows you to choose the zoom position.)
3. Make sure the Digital Tele-converter ( ) is assigned to the ISO button.
After setting, press the assigned button in shooting screen to turn on the Digital Tele-converter. The center of the image is cropped, enabling you to shoot the image in approximately twice the original size. Press the assigned button again to turn off the Digital Tele-converter.
- Digital Tele-converter cannot be used in SCN mode Panorama, multiple exposure, keystone compensation and fisheye correction.
- A frame is displayed when you playback the images taken in RAW mode, indicating the cropped area with the Digital Tele-converter.
Question :
What lenses are compatible with the Focus Stacking mode?
Answer:
The following M.ZUIKO DIGITAL lenses are compatible with the Focus Stacking mode:
· M.ZUIKO DIGITAL ED 8mm F1.8 Fisheye PRO
· M.ZUIKO DIGITAL ED 30mm F3.5 Macro
· M.ZUIKO DIGITAL ED 60mm F2.8 Macro
· M.ZUIKO DIGITAL ED 90mm F3.5 Macro IS PRO
(Updating the OM-5 firmware to version 1.1 is recommended.
Teleconverter MC-20 and MC-14 can be used.)
· M.ZUIKO DIGITAL ED 300mm F4.0 IS PRO
(Teleconverter MC-20 and MC-14 can be used.)
· M.ZUIKO DIGITAL ED 7-14mm F2.8 PRO
· M.ZUIKO DIGITAL ED 8-25mm F4.0 PRO
· M.ZUIKO DIGITAL ED 12-40mm F2.8 PRO
· M.ZUIKO DIGITAL ED 12-40mm F2.8 PRO II
· M.ZUIKO DIGITAL ED 12-45mm F4.0 PRO
· M.ZUIKO DIGITAL ED 12-100mm F4.0 IS PRO
· M.ZUIKO DIGITAL ED 40-150mm F2.8 PRO
(Teleconverter MC-20 and MC-14 can be used.)
· M.ZUIKO DIGITAL ED 40-150mm F4.0 PRO
· M.ZUIKO DIGITAL ED 100-400mm F5.0-6.3 IS
(Teleconverter MC-20 and MC-14 can be used.)
· M.ZUIKO DIGITAL ED 150-400mm F4.5 TC1.25x IS PRO
(Teleconverter MC-20 and MC-14 can be used.)
Note:
The images taken by focus stacking mode will have the periphery of the original image cut off by approximately 7% after the processing. The frame in the following image indicates the area with focus stacking effect that remains after the cut. 
Question :
How do I change the pixel count for image size M (Middle) / S (Small)?
Answer:
The image size M (Middle) / S (Small) can be changed to the following pixel count:
(when the aspect ratio is [4:3], the pixel count with the * mark is the default setting)
| Image size |
Selectable pixel count |
| M (Middle) |
[3200 x 2400]
(equivalent to approx. 8 million pixel) * |
[1920 x 1440]
(equivalent to approx. 2.8 million pixel) |
| S (Small) |
[1280 x 960]
(equivalent to approx. 1.22 million pixel) * |
[1024 x 768]
(equivalent to approx. 0.8 million pixel) |
How to change the pixel count for the image size M (Middle) / S (Small)
1. In (Custom Menu), select  /WB/Color /WB/Color. Select Pixel Count and press the [ OK] button.

2. Select the image mode you want to change the pixel count (M or S) and press the arrow pad Right button.
Image mode M is selected in this procedure.

3. Select the pixel count you want to assign to the image mode M and press the [ OK] button.
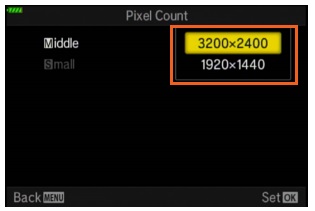
The setting is complete.
If you select image mode M or S, you can shoot with the selected pixel count.
Question :
How do I change the image size and compression rate in JPEG image quality mode?
Answer:
The default combination of image size and compression rate in JPEG image quality mode is "L-SF", "L-F", "L-N" and "M-N".
You can set four combinations in JPEG image quality mode, choosing from three image sizes (L, M, S) and three compression rates (SF, F, N). The selectable JPEG image quality modes displayed in Live Control are the combination of image size and compression rate that are set in image quality setting.
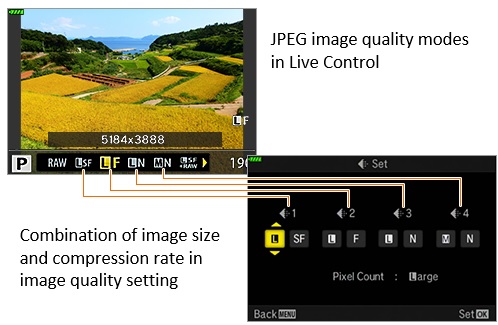
Change the combination of JPEG image quality mode in image quality setting if you want to use JPEG image size S (Small) or a different compression mode (compression rate).
Selectable JPEG image size and compression rate
| JPEG image size |
Image size
(Pixel size) |
L
(Large) |
5184 × 3888 |
M
(Middle) |
3200 × 2400 * |
S
(Small) |
1280 × 960 * |
| Compression mode |
Compression rate |
SF
(Super Fine) |
1/2.7 |
F
(Fine) |
1/4 |
N
(Normal) |
1/8 |
* You can change the pixel count for image size M and S to a different size. Refer to the following question:
How do I change the pixel count for image size M (Middle) / S (Small)?
How to change the image size and compression rate in JPEG image quality mode
Press the [ MENU] button. In (Custom Menu), select /WB/Color. Change the JPEG image quality mode in  Set Set.
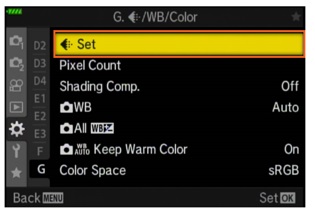
Select the image size or compression for each JPEG image quality mode ( 1 - 4) using the arrow pad Left and Right button and change its mode using the arrow pad Up and Down button. Press the [ OK] button to complete the setting.

Question :
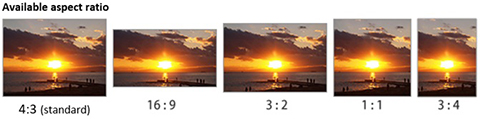
How do I take pictures in different aspect ratios (horizontal-to-vertical ratio)?
Answer:
You can select an aspect ratio that best fits the expression and purpose of the image from five aspect ratio options including the standard 4:3 (default). You can take pictures while previewing the image on the live view monitor at the selected aspect ratio.
How to set aspect ratio
Press the [OK] button in shooting mode to display the LV super control panel. Select the aspect ratio option using the arrow pad button, and then select a desired aspect ratio using the front dial.

Pixel count in each aspect ratio
* The pixel count for JPEG image size M / S differs from the following table if they are changed to a pixel count other than the default setting.
| |
[4:3]
(Standard) |
[16:9] |
[3:2] |
[1:1] |
[3:4] |
| L |
5184×3888 |
5184×2920 |
5184×3456 |
3888×3888 |
2912×3888 |
| M |
3200×2400 |
3200×1800 |
3216×2144 |
2400×2400 |
1824×2432 |
| S |
1280×960 |
1280×720 |
1296×864 |
960×960 |
720×960 |
High Res
50M |
8160×6120 |
8160×4592 |
8160×5440 |
6112×6112 |
4592×6120 |
High Res
25M |
5760×4320 |
5760×3240 |
5760×3840 |
4320×4320 |
3248×4320 |
RAW images that are recorded with a selected aspect ratio
- RAW images are recorded in 4:3 regardless of the selected aspect ratio. The aspect ratio information selected at the time of shooting is recorded to the image.
- When shooting with High Res Shot Tripod, RAW images are recorded in 80M (10368x7776). When shooting with High Res Shot Handheld, they are recorded in 50M (8160x6120).
- When shooting with High Res Shot Tripod, the maximum JPEG image size that can be created by the RAW editing function of the camera is equivalent to 50M.
- When playing back RAW images on the camera or displaying thumbnails in OM Workspace software on the computer, the images are displayed with a frame based on the selected aspect ratio at the time of shooting.
- When RAW development is carried out in the camera or in OM Workspace, the aspect ratio at the time of shooting can be used to crop the images and convert them to a JPEG file.

Question :
How do I restore each camera setting to the default setting?
Answer:
There are two options for the reset function that restores your camera to the default setting; Basic and Full.
[Basic]
Basic functions for shooting are restored to the default setting.
Settings for buttons, dials and levers are not reset.
[Full]
All functions except for some settings such as date, time and language are restored to the default setting.
Note:
The default settings for each function and the functions that are reset by Basic and Full are listed in "Default Settings" of the PDF instruction manual, starting on page 390.
Manual download OM-5
How to restore to the default setting
The following procedure explains how to restore the camera to the default setting. Full is selected for the reset option in this procedure.
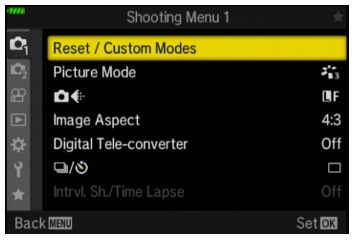
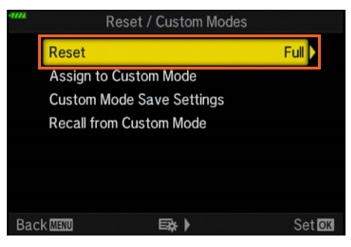
1. Press the [ MENU] button. In  (Shooting Menu 1), select Reset / Custom Modes and press the arrow pad Right button.
2. Select Reset and press the arrow pad Right button.

3. Select Basic or Full using the arrow pad Up and Down button and press the [ OK] button.

4. Check that Reset is highlighted in Reset / Custom Modes and press the [ OK] button.
5. Select Yes using the arrow pad Up and Down button and press the [ OK] button. If you want to stop restoring the camera to the default setting, select No.

6. (Shooting Menu 1) is displayed on the screen when the reset is complete.
Question :
How do I assign camera settings to Custom Mode C, C2, C3 and C4?
Answer:
What is Custom Mode?
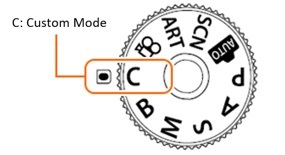
The Custom Mode (C, C2, C3 and C4) is used for saving and recalling camera settings. When you set the mode dial to C, the pre-assigned camera setting is recalled, enabling you to shoot in the assigned settings.
The settings that are saved to Custom Mode C2, C3 and C4 can be recalled from the camera menu or by pressing a button that is assigned with the custom mode. You can assign Custom Mode C, C2, C3 and C4 to a button in Button Function.
Note:
- Refer to the OM-5 instruction manual, starting on page 406, for the functions that can be assigned to Custom Mode.
Manual download OM-5
- The settings assigned to each custom mode can be returned to the default settings. In (Shooting Menu 1), select Reset and then Full.
Saving camera settings to Custom Mode C, C2, C3 and C4
The following procedure explains how to save camera settings to Custom Mode C, C2, C3 and C4.
1. Set the mode dial to a mode other than AUTO, SCN, ART or (movie). Set your camera to the settings you want to save to the custom mode.
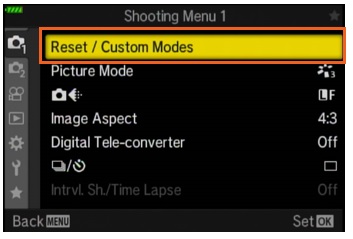
2. Press the [ MENU] button. In (Shooting Menu 1), select Reset / Custom Modes and press the [ OK] button.
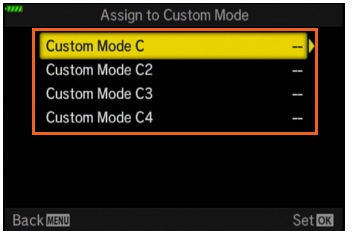
3. Select Assign to Custom Mode and press the arrow pad Right button.

4. Select a Custom Mode (C, C2, C3 or C4) where to save the settings and press the [ OK] button. Custom Mode C is selected in this procedure.
5. Select Set and press the [ OK] button.
- If any settings are already saved to the selected custom mode, it will be overwritten.
- If you want to restore a custom mode to the default setting, select Reset and press the [ OK] button.

6. The Assign to Custom Mode menu is displayed on the screen again when the saving is complete.
 Recalling the settings that are assigned to Custom Mode C, C2, C3 and C4
The settings that are assigned to Custom Mode C, C2, C3 and C4 can be recalled when the mode dial is set to a mode other than AUTO, SCN, ART or . Even if a different shooting mode is assigned to the custom mode, the shooting mode is fixed to the mode selected with the mode dial. If the settings are recalled when the mode dial is set to C, the shooting mode changes to the assigned mode.
You can also recall the settings by pressing a button that is assigned with a custom mode (Custom Mode C, C2, C3 and C4) in Button Function.
Recalling from the camera menu
1. Press the [ MENU] button. In (Shooting Menu 1), select Reset / Custom Modes and press the [ OK] button.
2. Select Recall from Custom Mode and press the arrow pad Right button.
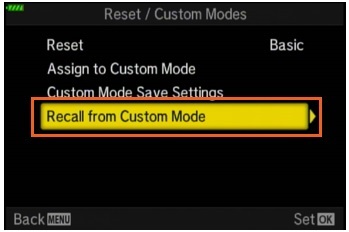
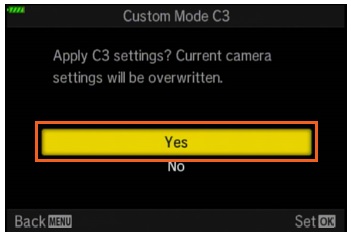
3. Select a custom mode and press the arrow pad Right button. Custom Mode C3 is selected in this procedure.

4. Select Yes and press the [ OK] button. If you want to stop recalling the custom mode settings, select No.
 Recalling by pressing a button that is assigned with a custom mode in Button Function
When Custom Mode C, C2, C3 and C4 is assigned to a button in Button Function, you can recall the settings that are saved to the custom mode by pressing the button. If you press the button again, the settings return to the previous settings.
Refer to the OM-5 instruction manual, starting on page 167, for the customizable buttons and how to change the function assigned to a button.
Manual download OM-5
Note:
When the settings are recalled by pressing a button, the recalling of custom mode will be stopped if you:
turn off the camera, switch the mode dial to other modes, press the MENU button during shooting, perform Reset, or save or recall custom settings.
How to save the changes that are made after recalling a custom mode
The changes made after recalling a custom mode (C, C2, C3 and C4) can be saved automatically to the custom mode when Custom Mode Save Settings is set to Hold. The changed settings remain even if you turn the mode dial. You can use the Custom Mode just like P / A / S / M / B mode.
In (Shooting Menu 1), select Reset / Custom Modes and then Custom Mode Save Settings. You can select Hold or Reset for each custom mode (C, C2, C3 and C4).

|