 |
 |
|
|
Questions:
 |
What exciting new functions are in the E-30? |
|
Is the E-30 body splashproof? |
|
What kind of materials are used for the camera body? |
|
What is the origin and meaning of the Supersonic Wave Filter (SSWF)? Where does the dust go? |
|
Is it necessary to clean or change the dust-collection components? |
|
Can I use my OM- Series 35mm SLR lenses on the E-30? |
|
What are the purposes of the different record modes? |
|
When the Mode Dial is set to AUTO, why are some of the menu options deactivated (grayed-out)? |
|
In the White Balance (WB) menu, what do all of those numbers followed by a "K" mean? |
|
With so many White Balance settings available, why and when should I use One-Touch White Balance? |
|
In the PICTURE MODE > MONOTONE menu feature, what is the purpose of the B&W Filter options? |
|
My 35mm SLR had a mirror lockup to let the camera vibration settle down before the shutter tripped. Does the E-30 have this? |
|
How is the Enlarged Display operation used in Live View? |
|
What accessories are available to remotely control the E-30? |
|
How can I take long (BULB) exposures using the optional RM-UC1 Remote Cable Release? |
|
How can I take long (BULB) exposures using the optional RM-1 Remote Control? |
|
Does the E-30 support the Olympus wireless RC flash system? |
|
I have a third-party electronic flash. Can I use it on the E-30? |
|
Which lenses are compatible with the high-speed imager AF? |
|
Which types of memory cards can I use? |
|
When I put a formatted CompactFlash card in my E-30, the display shows a capacity of RAW files that doesn't appear to be accurate. Why? |
|
In the CARD SETUP menu, the options are ALL ERASE and FORMAT. What is the difference between these settings? |
|
What is the difference between Olympus' high-speed imager AF and the Contrast AF used in Panasonic's LUMIX DMC-L10? |
|
How long does the battery last? |
|
Do I need a voltage converter to use my battery charger outside my country? |
|
What are the field of view, viewfinder magnification, eye point and dioptric correction range of the optical viewfinder? |
|
What are the differences between the image stabilizer modes? Can I turn off the image stabilizer? |
|
How many pictures can be taken sequentially per second? |
|
How can I display the Level Gauge on the control panel or the LCD monitor? |
|
How can I change the aspect ratio of the images? (IMAGE ASPECT, ASPECT SHOOTING) |
|
What is IMAGE ASPECT? |
|
What is ASPECT SHOOTING? (ASPECT SHOOTING) |
|
Can I preview the aspect ratio when taking pictures using the viewfinder? |
|
What kind of functions can be assigned to the [Fn] (function) button? |
|
For how many steps of shutter speed does the image stabilizer compensate? |
|
When I use the Live View under fluorescent, sodium-vapor or mercury light, flickering or horizontal stripes occur on the LCD monitor. Why is that? |
|
Sometimes when I turn off the E-30, I feel a slight vibration or hear a noise. Why is that? |
|
How to adjust the AF with the AF Focus adj. function. |
|
How do I install OLYMPUS Master 2 packaged with the camera? I would like to transfer pictures to my computer. |
|
What kind of information can be displayed on the LCD monitor while shooting with Live View? |
Question
What exciting new functions are in the E-30?
Answer:
Question
Is the E-30 body splashproof?
Answer:
| |
No, the camera is not designed to be used in severe environmental conditions. The Olympus E-3 would be more appropriate for use in severe conditions.
|
Question
What kind of materials are used for the camera body?
Answer:
| |
The camera body is made of high-impact polycarbonate.
|
Question
What is the origin and meaning of the Supersonic Wave Filter (SSWF)? Where does the dust go?
Answer:
| |
The filter is so named because it shakes dust off the image sensor by using supersonic wave vibrations. The dropped dust is affixed to a dust-collection component under the filter.
|
Question
Is it necessary to clean or change the dust-collection components?
Answer:
| |
It is not necessary to clean or change the dust-collection components under normal use for several years. The dust-collection system can easily deal with the particles that are a result of the dust-reduction system. If the camera is used constantly in severe conditions, OLYMPUS recommends that the camera body be sent to an authorized OLYMPUS repair service center approximately at an interval of three to five years. As part of OLYMPUS' camera service maintenance, the dust-collection components are replaced.
|
Question
Can I use my OM- Series 35mm SLR lenses on the E-30?
Answer:
| |
OLYMPUS OM- Series lenses can be mounted on Four Thirds series DSLRs with the optional MF-1 OM Adapter. OM- series lenses are unable to communicate with the firmware in Four Thirds series camera bodies. Therefore, their use in this fashion has the following restrictions:
- Autofocus is not available.
- OM- series autofocus lenses cannot be manually focused.
- Stop-down metering is used.
- Spot metering does not work properly.
- Although it is possible to use the A (Aperture priority AE) shooting mode in auto exposure, the aperture display is not available.
- The aperture display in the M (Manual) shooting mode is not available.
- In P (Program AE) or S (Shutter speed priority AE) shooting mode, the shutter releases, but the auto exposure control does not work.
- The distance scale on the OM- series lens may not indicate the actual distance. Always use the viewfinder or Live View for focusing.
Because the OM- series lenses were designed for film rather than for use with a digital sensor, the image quality may not equal that produced by ZUIKO DIGITAL lenses.
|
Question
What are the purposes of the different record modes?
Answer:
| |
Record modes allow photographers to quickly and conveniently vary the quality settings used to capture and save images in-camera. While it is possible to always shoot at the higher-quality settings and then process the images down into smaller file sizes later with a computer, it may be more convenient in some situations to use other than the higher-quality settings. For example, it may be preferable to shoot using a lower-quality setting when the shots are intended for use on the Internet, where small file size is more important than rich detail.
Record modes can be selected via the Super Control Panel, the Control Panel or the camera menu. The E-30 offers nine record modes, whose benefits are outlined below.
- RAW: This is the highest-quality record mode available in the E-30, and it allows the photographer the most creative control in post-production. Images are saved to the memory card from the camera sensor with minimal image processing. Factors such as white balance, sharpness, contrast and color are unchanged so they can be modified later on a computer. Some photographers prefer to shoot RAW all the time for all subjects, while others may shoot RAW in situations that pose complicated exposure problems, such as wedding photography.
Each camera manufacturer has its own version of RAW tailored to its cameras; therefore, special software is required to process RAW files and convert them to other image file formats such as JPEG and TIFF. OLYMPUS Master and OLYMPUS Studio contain RAW processing and conversion software for the OLYMPUS RAW format, which bears the file extension *.orf. Third-party imaging software and operating systems may use RAW plug-ins or upgrades to process Olympus RAW files. Without them, they would not be able to read RAW images from Olympus digital cameras. Most photo kiosks, printers and photo labs cannot read unconverted RAW images.
- JPEG: Four record modes in the E-30 create compressed JPEG image files. When the camera processes a captured JPEG image and saves it to the memory card, it uses algorithms to discard some of the data to make the file size smaller. The process of mathematically reducing a file's size by discarding some of its data is called compression. The greater the compression ratio, the more data will be discarded and the smaller will be the file size. When the image is opened on a computer, the JPEG algorithms reconstruct the discarded data.
The E-30 allows the photographer the option to customize the four JPEG record modes by mixing and matching their quality settings. The factors that define a JPEG record mode are image size (determined by number of pixels) and compression ratio.
The table below shows all of the combinations of image size and compression ratio available in the E-30.
| |
|
 |
 |
| Applicatlon |
Image
size |
Pixel
count |
Compression ratio |
SF(Super Fine)
1/2.7 |
F
(Fine)
1/4 |
N
(Nomal)
1/8 |
B
(Basic)
1/12 |
| Select for the print size |
L
(Large) |
4032
x
3024 |
LSF |
LF |
LN |
LB |
M
(middle) |
3200
x
2400 |
MSF |
MF |
MN |
MB |
2560
x
1920 |
1600
x
1200 |
S
(Small) |
1280
x
960 |
SSF |
SF |
SN |
SB |
1024
x
768 |
For
small-sized
prints and
use on a web site |
640
x
480 |
|
|
Customization of the quality settings is performed via the  SET option, which is found in the SET option, which is found in the  / ASPECT / COLOR / WB. Pixel counts are expressed as either L (Large), M (Middle) or S (Small). The PIXEL COUNT menu item, also in menu , further customizes the M and S settings by offering a choice of display resolutions. / ASPECT / COLOR / WB. Pixel counts are expressed as either L (Large), M (Middle) or S (Small). The PIXEL COUNT menu item, also in menu , further customizes the M and S settings by offering a choice of display resolutions.
RAW+JPEG: Four record modes in the E-30 save both a RAW and a JPEG image when a picture is taken. This can be advantageous when shots are intended for use in multiple media or when the medium in which the images will ultimately be published has not been determined.
The quality settings used to process the JPEGs in the RAW + JPEG record modes are tied to the quality settings defined for the four JPEG record modes. The first RAW + JPEG record mode uses the JPEG settings of the first registered JPEG record mode; the second RAW + JPEG mode uses the JPEG settings of the second registered JPEG mode; and so on. Changing the JPEG quality settings via the SET menu and PIXEL COUNT menus affects both a JPEG record mode and its RAW + JPEG record mode "counterpart."
|
Question
When the Mode Dial is set to AUTO, why are some of the menu options deactivated (grayed-out)?
Answer:
| |
In the AUTO shooting mode, the camera operates with a minimum of input from the user. Many shooting functions are controlled entirely by the camera; the photographer cannot change their settings. Therefore, the menu options that control those settings are deactivated (grayed-out) in AUTO mode.
|
Question
In the White Balance (WB) menu, what do all those numbers followed by a "K" mean?
Answer:
| |
The color balance of different light sources in the color spectrum is rated numerically by color temperature in the standard Kelvin (K) temperature scale. A color temperature value is expressed as a number followed by a "K," for Kelvin. The chart below shows approximate values of different light sources in the E-30 White Balance menu:
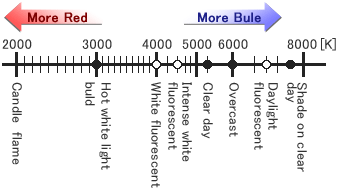
The E-30 White Balance menu displays icons to the left of the color temperature values to illustrate the relationship of the type of light to its Kelvin value. The Custom White Balance (CWB) settings in the White Balance menu allow photographers to select more accurate color temperature settings. Many commercially available lamps are labeled with color temperature ratings that fall between 3000K and 4000K, so a photographer is able to set up the camera for more accurate color rendition.
|
Question
With so many White Balance settings available, why and when should I use One-Touch White Balance?
Answer:
| |
There are many light sources and situations that are not covered by Auto White Balance or the other settings in the White Balance menu.
There are many noncontinuous light sources that do not have all of the colors of the spectrum, such as fluorescent, mercury vapor, and sodium vapor lights.
There are also situations in which many different types of lights are used in one environment. These do not neatly fit into what the camera firmware knows about white balance, so it is necessary to “educate” the camera about the specific light balance by shooting a white reference subject such as a white card and saving the data in the White Balance menu as a One-Touch White Balance.
|
Question
In the PICTURE MODE > MONOTONE menu feature, what is the purpose of the B&W Filter options?
Answer:
| |
In black-and-white film photography, different colored filters are placed in front of the lens to modify the tones in the final image. These are called contrast filters. One popular effect created with contrast filters results in a landscape photograph with majestic clouds against an almost black sky. This effect is obtained by shooting through a deep red filter, which makes the blue in the sky darker.
A general rule of thumb regarding the use of contrast filters is: The filter makes its own color lighter in tone and its opposite color darker in tone.
The E-30 is able to create these effects without using physical filters by modifying the performance of the red, green and blue color channels in the MONOTONE mode.
- RED - The red filter darkens blues and greens and lightens reds. In landscape photography, it produces dark skies that make clouds look more dramatic. The red filter can also cut through atmospheric haze to some degree. It can be used in portraiture to diminish skin blemishes on light-skinned people.
- YELLOW - The yellow filter darkens the blue in the sky so clouds separate from the sky without producing the dramatic effect of the red filter. Many black and white photographers routinely keep a yellow filter on their camera because the effects appear more natural than those of other filters. In copy photography of old documents, the yellow filter brightens the look of yellowed paper.
- ORANGE - The effect of the orange filter falls midway between that of the red and yellow filters.
- GREEN - The green filter lightens plants in images. It will also make red subject matter darker and add contrast to sunsets.
The B&W Filter effects can be previewed on the Live View screen before shooting.
|
Question
My 35mm SLR had a mirror lockup to let the camera vibration settle down before the shutter tripped. Does the E-30 have this?
Answer:
| |
The E-30 has an [ANTI-SHOCK] function that diminishes camera shake caused by vibrations when the mirror flips up.
This feature can be useful in astrophotography, photo microscopy or other applications where a very slow shutter speed is used and camera vibration needs to be minimized.
The interval between the mirror flipping up and the shutter opening can be preset from one second to 30 seconds via the [ ] menu. ] menu.
|
Question
How is the Enlarged Display operation used in Live View?
Answer:
| |
The Live View Enlarged Display option provides an enlarged view of a selected area in the image to facilitate fine manual focus.
When Live View is enabled, pressing the [INFO] button reveals a green target area that is to be enlarged in the center of the LCD screen.
The target area can be repositioned on another area of the image by using the arrow keys on the camera back. Pressing the [OK] button causes the target area to be enlarged.
The degree of magnification can be changed to 5x or 7x or 10x by turning either the main dial or the sub dial. Pressing [OK] will return the image on the LCD screen to the normal viewing size.
|
Question
What accessories are available to remotely control the E-30?
Answer:
| |
Two optional remote controllers are available for the E-30: The RM-UC1 Remote Cable Release and the RM-1 Remote Control .
The RM-UC1 connects to the same USB port on the camera that is used to connect the camera to a computer. The RM-1 is a wireless controller.
Both devices remotely trigger the camera's shutter button, and both can be used for long (BULB) exposures such as night photographs. The camera can be set to release the shutter immediately or two seconds after the shutter button on the remote control is pressed. The response time is set by pressing the Remote Control/Self-Timer/Sequential Shooting button, located on the top of the camera to the left of the viewfinder, and then using the control dial to select the setting.
The E-30 can also be remotely controlled from a computer using the bundled USB cable and the Camera Control feature of the OLYMPUS Studio application.
|
Question
How can I take long (BULB) exposures using the optional RM-UC1 Remote Cable Release?
Answer:
| |
The RM-UC1 has a sliding lock to lock the cable release for BULB exposures such as night photographs. When the lock is in the "Up" position, the camera shutter will remain open after the shutter button on the remote control is pressed. Slide the lock to the "Down" position to close the shutter.
|
Question
How can I take long (BULB) exposures using the optional RM-1 Remote Control?
Answer:
| |
The procedure is as follows:
- Set the camera's Mode Dial to the M (Manual) shooting mode.
- Using the Control Dial, set the shutter speed to BULB.
- Aim the RM-1 Remote Control at the Remote Control Receiver and press the [W] button on the RM-1 to open the shutter.
- Press the [T] button on the RM-1 to close the shutter.
Notes:
- For best results, the camera should be set up on a tripod.
- If eight minutes elapse after the [W] button is pressed, the shutter will close automatically.
- The shutter will not be released if the subject is not in focus. The photographer should stand behind or to one side of the camera so that the autofocus does not focus on the photographer.
- Under bright light conditions, the remote control lamp may be difficult to see, making it hard to determine whether or not the picture has been taken.
- Zoom is not available on the remote control.
|
Question
Does the E-30 support the Olympus wireless RC flash system?
Answer:
| |
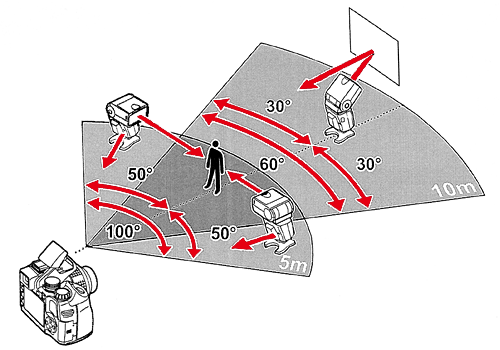
Yes. The camera's built-in flash acts as a controller that sends data commands to the (optional) FL-36R and FL-50R electronic flash units.
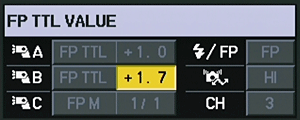
The system can control up to three groups of flash units. The camera and flashes have four control channels to choose from so the flashes and camera will not receive signals from other Olympus wireless RC flash systems operating nearby. The photo below shows the main setup screen for the wireless flash system in the E-30.
The flash group, channel and settings are then set up on the flash units. When the camera shutter is tripped, the camera's built-in flash emits a very high-speed burst of data in a pre-flash that commands the performance of the flash units.
This diagram shows a placement of three flash groups using the Olympus wireless RC flash system:
For details on the operation of the wireless RC flash system operation, please refer to the manual for the FL-36R or FL-50R.
|
Question
I have a third-party electronic flash. Can I use it on the E-30?
Answer:
| |
Flash units that are not part of the Four Thirds series may pose problems if used on the E-30.
Thyristor-type flash units can be used with the E-30's Manual shooting mode as long as the sync voltage does not exceed 6 VDC. Third-party TTL flash units will not have TTL capability because the contact pins in the camera hot shoe probably won't align with the contacts on the flash. In addition, the TTL communication with the E-30 may damage the camera circuitry or corrupt the camera firmware.
|
Question
Which lenses are compatible with the high-speed imager AF?
Answer:
| |
The following lenses are compatible with the high-speed imager AF:
ZUIKO DIGITAL Lenses:
- ZUIKO DIGITAL 25mm F2.8
- ZUIKO DIGITAL ED 9-18mm F4.0-5.6
- ZUIKO DIGITAL ED 14-42mm F3.5-5.6*
- ZUIKO DIGITAL 14-54mm F2.8-3.5 II
- ZUIKO DIGITAL ED 40-150mm F4.0-5.6*
LEICA D Lenses:
- LEICA D VARIO-ELMAR 14-50mm/F3.8-5.6 ASPH./MEGA O.I.S.
- LEICA D VARIO-ELMAR 14-150mm/F3.5-5.6 ASPH./MEGA O.I.S.
- LEICA D SUMMILUX 25mm/F1.4 ASPH.*
*To use the high-speed imager AF, the firmware in the lens must be updated.
Visit the following website for more information: Four Thirds System Firmware Update.
Note:
| - |
When using a lens that is not compatible with [IMAGER AF], [HYBRID AF] will be selected automatically.
|
| - |
In the [HYBRID AF] Live View autofocus mode, the AF is set automatically to approximate focus by pressing the shutter button halfway. When the shutter button is fully depressed, the focusing is completed using the AF sensor.
|
|
|
Question
Which types of memory cards can I use?
Answer:
| |
The E-30 can use xD-Picture Card™ and CompactFlash® (Type I & type II) or Microdrive™ memory cards.
You can also copy images from one type of card to another inside the camera.
|
Question
When I put a formatted CompactFlash card in my E-30, the display shows a capacity of RAW files that doesn't appear to be accurate. Why?
Answer:
| |
When the E-30 saves a captured image as digital data and writes it onto the memory card, it performs complex mathematical calculations to convert the image into binary code data to be saved and later retrieved. Since images are unique, each calculation is unique. The manual for the E-30 shows that a RAW file is approximately 11 megabytes. However, since the factors comprising each image are unique, each calculation is unique and the results of the calculation will vary. The E-30 writes a lossless RAW file, and one of the ways it does this is by sampling some of the factors in the image.
When the E-30 polls a formatted memory card, it is looking at a blank slate. It has yet to do the math for any images and is programmed to start out with a conservative capacity estimate. As the camera shoots more images, it recalculates the capacity as it "learns" about the image files it is creating. As the card fills up, the estimated capacity of RAW files on the display will become more accurate.
The majority of photographers carry more than one memory card in the event that the memory card in the camera should fill up. The E-30 also features an xD-Picture Card slot to hold a second card. If the capacity of the CompactFlash card is close to maximizing, the photographer can switch to the xD-Picture Card media or can transfer files from the CompactFlash card to the xD-Picture Card media to free up more capacity on the CompactFlash card.
|
Question
In the CARD SETUP menu, the options are ALL ERASE and FORMAT. What is the difference between these settings?
Answer:
| |
ALL ERASE deletes all of the images from the memory card directory except for those that have been protected. FORMAT deletes all of the images from the memory card directory and overwrites the directory. In both cases, the actual digital images are still on the memory card until new images are shot that overwrite the old images. Therefore, if images are inadvertently erased or formatted, it may be possible to retrieve them via image recovery software.
If ALL ERASE is used exclusively to delete images, over time a buildup of artifacts in the directory may corrupt the memory card. The FORMAT option is recommended to preserve the integrity of the memory card and extend its useful life.
|
Question
What is the difference between Olympus' high-speed imager AF and the Contrast AF used in Panasonic's LUMIX DMC-L10?
Answer:
| |
There is no difference. The high-speed imager AF and Contrast AF use the same contrast-detection system.
Both AF modes are compatible with each company's products, although some products require a firmware update to use the technology.
|
Question
How long does the battery last?
Answer:
| |
The battery life varies depending on whether you use the Live View function or the optical viewfinder.
| |
Shots per charge |
Battery model |
| Using optical viewfinder |
Approx.750
(based on CIPA battery life measurement standards) |
BLM-1 |
| Using Live View |
Approx.500
(based on Olympus' testing conditions, when using the Live View 50%) |
BLM-1 |
|
|
Question
Do I need a voltage converter to use my battery charger outside my country?
Answer:
| |
The bundled BCM-2 Battery Charger bundled with the E-30 is rated at 100-240 V AC and automatically adjusts itself for the local electrical current. However, you may have to get a set of plug adapters for the different wall outlets used in foreign countries. Plug adapter kits are available at electronics and luggage stores.
|
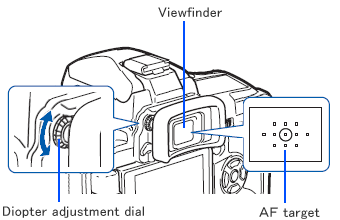
Question
What are the field of view, viewfinder magnification, eye point and dioptric correction range of the optical viewfinder?
Answer:
| |
The following list describes each value:
- Field of view: Approx. 98%
- Viewfinder magnification: Approx. 1.02x
- Eye point: Approx. 24.2mm (-1.0m-1) from eyepiece lens
- Dioptric correction range: -3 to +1-1 diopters
The viewfinder magnification increased about 20% in diagonal length compared to Olympus' conventional models.
The high-resolution viewfinder and the enlarged field of view let you focus on the subjects even when shooting in Manual Focus mode.
You can adjust the built-in camera diopter using the eyecup DE-P3 (for adjusting toward plus) or DE-N3 (for adjusting toward minus).
With the built-in camera diopter adjustment function, DE-P3 compensates up to +4.0m-1 and DE-N3 compensates up to -6.0m-1.
Adjusting the viewfinder's diopter
While looking through the viewfinder, rotate the diopter adjustment dial to the left or right until you can see the AF frame clearly.
|
Question
What are the differences between the image stabilizer modes? Can I turn off the image stabilizer?
Answer:
| |
You can select from three image stabilizer modes: I.S.1, I.S.2 and I.S.3.
In the default setting, the image stabilizer is set to OFF.
| Mode |
|
| OFF |
Image stabilizer is OFF. |
| I.S.1 |
Image stabilizer is ON. |
| I.S.2 |
This allows you to track the subject by panning the camera horizontally. The image stabilizer corrects only the vertical camera shake. |
| I.S.3 |
This allows you to track the subject by panning the camera vertically. The image stabilizer corrects only the horizontal camera shake. |
|
Note:
| - |
The image stabilizer cannot correct excessive camera shake or camera shake that occurs when using an extremely slow shutter speed.
|
| - |
When attaching the camera to a lens with its own image stabilizer function, turn off the image stabilizer function of either the lens or the camera.
|
|
|
Question
How many pictures can be taken sequentially per second?
Answer:
| |
The number of frames per second depends on which sequential shooting speed option is selected from the custom menu.
The following table shows each value:
| |
Sequential shooting speed |
Maximum |
| Sequential Shooting H |
5 frames per second |
Approx. 14 frames |
| Sequential Shooting L |
1 to 4 fps |
Depends on compression ratio and the number of pixels.
(LN mode: Approx. 280 frames) |
|
You can select from 1 to 4 fps in sequential shooting L mode.
Press the [MENU] button, and then select  (custom menu 1) . (custom menu 1) .
In RELEASE/ , select L fps to set the number of pictures per second. , select L fps to set the number of pictures per second.
In the default setting, sequential shooting L mode is set to 3 frames per second.
Note:
| - |
The sequential shooting mode does not function with the following art filters: Soft Focus, Grainy Film and Pin Hole. |
|
|
Question
How can I display the Level Gauge on the control panel or the LCD monitor?
Answer:
| |
Using the enhanced sensor in the camera, the bi-directional Level Gauge lets you detect horizontal and vertical tilting.
The Level Gauge is displayed on the viewfinder, LCD control panel and Live View monitor.
This function is convenient for confirming the alignment of the camera with respect to left-and-right and up-and-down axes:
- When the image does not contain any vertical or horizontal lines.
- When the screen is dark while shooting night scenes.
To Display the Level Gauge
Press the [MENU] button, and then select (custom menu 1). In DISP/ /PC, select LEVEL GAUGE. Set the LEVEL GAUGE to ON. /PC, select LEVEL GAUGE. Set the LEVEL GAUGE to ON.
In the default setting, the Level Gauge is turned off.
After enabling the Level Gauge, follow the operation below.
Display the Level Gauge in the viewfinder and the control panel:
Press the shutter button halfway until the Level Gauge (for horizontal panning) is displayed in the viewfinder and the control panel.
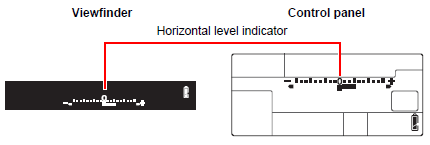
Display the Level Gauge on the LCD monitor while shooting in Live View:
Press the [INFO] button on the camera repeatedly to display the Level Gauge.
The ruled line (for horizontal and vertical movement) is displayed on the LCD monitor.
![Press the [INFO] button on the camera repeatedly to display the Level Gauge.
The ruled line (for horizontal and vertical movement) is displayed on the LCD monitor.](/en/support/imsg/digicamera/qa/products/e30/images/live-view.gif)
You can also register the Level Gauge function to the [Fn] (function) button.
Each time you press the [Fn] button, the Level Gauge will be displayed or hidden.
|
Question
How can I change the aspect ratio of the images? (IMAGE ASPECT, ASPECT SHOOTING)
Answer:
| |
Use the IMAGE ASPECT function to select the desired aspect ratio.
When IMAGE ASPECT is set to any value except 4:3 (default setting), use the ASPECT SHOOTING function to select whether the aspect ratio is applied only when taking pictures using Live View (default setting) or always, whether taking pictures using Live View or the optical viewfinder.
|
Question
What is IMAGE ASPECT?
Answer:
| |
The IMAGE ASPECT function is used to change the aspect ratio (horizontal-to-vertical ratio) of images when taking pictures using Live View.
The E-30 provides nine aspect ratio options. Select the one that best fits the expression and purpose of the pictures.
When composing using Live View, you can preview the shot in the selected aspect ratio on the LCD monitor.
To change the aspect ratio:
Press the [MENU] button, and then select (custom menu 1).
In /ASPECT/COLOR/WB, select IMAGE ASPECT to set the aspect ratio.
You can select from 4:3 (standard, default setting), 3:2, 16:9, 6:6, 5:4, 7:6, 6:5, 7:5 or 3:4.

JPEG images are cropped and recorded using the selected aspect ratio. When a JPEG image is reviewed in Playback mode or in the OLYMPUS Studio 2 or OLYMPUS Master 2 software, it is displayed at the cropped dimensions.
RAW images are not cropped, but the aspect ratio information is recorded to the digital files with the image data at the time of shooting. When a RAW image is reviewed in Playback mode or in the OLYMPUS Studio 2 or OLYMPUS Master 2 software, the uncropped image data is shown overlaid by a template, or frame, based on the selected aspect ratio. The frame is provided as a reference so you can preview the effect of applying the crop.
Note:
| - |
The aspect ratio information stored with RAW images can be used to crop the images in the camera or in the OLYMPUS Studio 2 or OLYMPUS Master 2 software. The software may require an update to recognize the saved aspect ratio information. |
|
The following list describes the pixel size for JPEG images in each aspect ratio:
[4:3] (Standard, default setting):
| |
4032 x 3024 / 3200 x 2400 / 2560 x 1920 / 1600 x 1200 /
1280 x 960 / 1024 x 768 / 640 x 480 |
[3:2] (35mm camera):
| |
4032 x 2688 / 3216 x 2144 / 2544 x 1696 / 1584 x 1056 /
1296 x 864 / 1008 x 672 / 624 x 416 |
[16:9] (HDTV):
| |
4032 x 2272 / 3200 x 1800 / 2560 x 1440 / 1536 x 864 /
1280 x 720 / 1024 x 576 / 640 x 360 |
[6:6] (6x6 medium format camera)
:
| |
3024 x 3024 / 2400 x 2400 / 1920 x 1920 / 1216x1216 /
960 x 960 / 768 x 768 / 480 x 480 |
[5:4] (4x5 medium format camera):
| |
3776 x 3024 / 3040 x 2432 / 2400 x 1920 / 1440 x 1152 /
1200 x 960 / 960 x 768 / 640 x 512 |
[7:6] (7x6 medium format camera):
| |
3536 x 3024 / 2800 x 2400 / 2240 x 1920 / 1344 x 1152 /
1120 x 960 / 896 x 768 / 560 x 480 |
[6:5] (Quarter):
| |
3632 x 3024 / 2880 x 2400 / 2304 x 1920 / 1440 x 1200 /
1152 x 960 / 912 x 760 / 576 x 480 |
[7:5] (Large format camera, L format, A/B format):
| |
4032 x 2880 / 3248 x 2320 / 2576 x 1840 / 1568 x 1120 /
1232 x 880 / 1008 x 720 / 672 x 480 |
[3:4] (Four Thirds, vertical):
| |
2272 x 3024 / 1824 x 2432 / 1440 x 1920 / 864 x 1152 /
720 x 960 / 576 x 768 / 384 x 512 |
|
|
Question
What is ASPECT SHOOTING? (ASPECT SHOOTING)
Answer:
| |
When the aspect ratio is set to a value other than 4:3 (default setting), the ASPECT SHOOTING function determines when and how the camera applies the selected aspect ratio to captured images.
Press the [MENU] button, and then select (custom menu 1).
In /ASPECT/COLOR/WB, select ASPECT SHOOTING and then choose either LV or ALL.
LV:
When shooting in Live View mode, the aspect ratio information is used to compose and capture images.
| |
Before taking a picture, you can preview the shot in the selected aspect ratio on the Live View LCD monitor.
JPEG images are cropped and recorded using the selected aspect ratio. When a JPEG image is reviewed in Playback mode or in the OLYMPUS Studio 2 or OLYMPUS Master 2 software, the cropped dimensions are used.
RAW images are not cropped, but the aspect ratio information is recorded to the digital files with the image data at the time of shooting. When a RAW image is reviewed in Playback mode or in the OLYMPUS Studio 2 or OLYMPUS Master 2 software, the uncropped image data is shown overlaid by a template, or frame, based on the selected aspect ratio. The frame is provided as a reference so you can preview the effect of applying the crop.
Note:
| - |
The aspect ratio information stored with RAW images can be used to crop the images in the camera or in the OLYMPUS Studio 2 or OLYMPUS Master 2 software. The software may require an update to recognize the saved aspect ratio information.
|
|
When shooting using the viewfinder, the aspect ratio information is ignored.
|
ALL:
When shooting in Live View mode, the aspect ratio information is used in the same manner as in LV mode.
When shooting using the viewfinder, the aspect ratio information is stored but not applied to captured images.
| |
The effects of the selected aspect ratio are not displayed in the viewfinder.
Images are not cropped, but the aspect ratio information is recorded to the digital files along with the image data at the time of shooting. When an image is reviewed in Playback mode or in the OLYMPUS Studio 2 or OLYMPUS Master 2 software, the uncropped image data is shown overlaid by a template, or frame, based on the selected aspect ratio. The frame is provided as a reference so you can preview the effect of applying the crop.
Note:
| - |
The aspect ratio information stored with the images can be used to crop the images in the camera or in the OLYMPUS Studio 2 or OLYMPUS Master 2 software. The software may require an update to recognize the saved aspect ratio information.
|
|
When shooting using the viewfinder, the aspect ratio information is ignored.
|
|
Question
Can I preview the aspect ratio when taking pictures using the viewfinder?
Answer:
| |
It is not possible to preview the aspect ratio in the optical viewfinder because the viewfinder does not generate an electronic image. Rather, the viewfinder simply provides an optical path to view, in real time, what the lens "sees."
|
Question
What kind of functions can be assigned to the [Fn] (function) button?
Answer:
| |
|
| |
You can assign various functions to the [Fn] button, which is on the back of the camera.
Press the [MENU] button, and then select (custom menu 1).
In BUTTON/DIAL, select ![[Fn]](/en/support/imsg/digicamera/qa/products/e3/images/E-3_Fn_Button.gif) FUNCTION to change the function assigned to the [Fn] button. FUNCTION to change the function assigned to the [Fn] button.
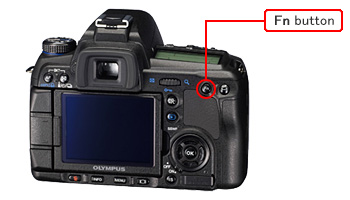
You can assign the following functions to the [Fn] button:
Fn FACE DETECT
Press the [Fn] button to turn on the FACE DETECT. When the button is pressed again, the function is turned off.
PREVIEW/LIVE PREVIEW (Electronic)
While holding down the [Fn] button, you can preview the picture in fixed aperture.
When you press the [Fn] button in LIVE PREVIEW setting, the camera automatically switches to Live View to preview the picture on the LCD monitor.
 (One-Touch White Balance) (One-Touch White Balance)
While holding down the [Fn] button, press the shutter button to register the optimum white balance value.
 HOME HOME
Press the [Fn] button to switch to the registered AF home position.
Press the button again to return to the original AF target position.
If the camera is turned off while the [Fn] button is set to AF home position, the original AF target position does not remain.
MF
Press the [Fn] button to switch the AF mode to MF (manual focus). Press the button again to switch to the original AF mode.
RAW
By pressing the [Fn] button, JPEG image quality changes to RAW + JPEG, or from RAW + JPEG to JPEG.
You can change the image quality mode by turning the main dial or the sub dial while holding down the [Fn] button.
TEST PICTURE
This function enables you to shoot a picture and see it on the LCD monitor without saving it to the memory card.
While holding down the [Fn] button, press the shutter button. It is useful for checking the setup effects on the monitor.
MY MODE
You can apply the settings registered in MY MODE SET-UP. Keep the [Fn] button depressed, and release the shutter.
LEVEL GAUGE
Press the [Fn] button to display the level gauge in the viewfinder or on the control panel.
When the button is pressed again, the level gauge indicator disappears.
[OFF]
The functions are not assigned to the [Fn] button.
|
Question
For how many steps of shutter speed does the image stabilizer compensate?
Answer:
| |
The gyroscope in the camera detects the degree and directions of any camera shake. Then, the built-in high speed Live MOS sensor minimizes the blurring effects. You can use the image stabilizer function with all Four Thirds® system lenses because the feature is built into the camera body.
The effect of the image stabilizer is equivalent to up to five shutter speed steps. (Olympus' testing condition)
The value varies depending on the lens and shooting conditions.
For example, when you shoot with shutter speed 1/15, the image stabilizer compensates for camera shake equivalent to 1/500.
Note:
| - |
Image stabilization may not be possible at very slow shutter speeds or when the camera is severely shaken.
|
|
|
Question
When I use the Live View under fluorescent, sodium-vapor or mercury light, flickering or horizontal stripes occur on the LCD monitor.Why is that?
Answer:
| |
This is a feature of the Live MOS image sensor used in this camera. This is not a malfunction.
Neither the flickering nor the stripes appears on the recorded pictures.
|
Question
Sometimes when I turn off the E-30, I feel a slight vibration or hear a noise. Why is that?
Answer:
| |
When the camera is powered down, slight vibration and noise occur as the Supersonic Wave Drive (SWD) motor resets the image sensor to its default position. The E-30 takes this action when shooting with the Image Stabilizer function set to I.S. 1 or I.S. 2. In either mode, the camera moves the sensor during shooting in order to counter the effects of camera shake. When the power is turned off, the camera moves the sensor back into the default position.
When Image Stabilizer is set to OFF, the sensor does not move during shooting and so does not need to be reset. However, if shooting with a zoom lens, some noise may still be heard when the camera is powered off as the lens resets its focus to infinity.
If both Image Stabilizer and Lens Reset are set to OFF, the camera will power down in silence.
|
Question
How to adjust the AF with the AF Focus adj. function.
Answer:
Question
How do I install OLYMPUS Master 2 packaged with the camera? I would like to transfer pictures to my computer.
Answer:
Question
What kind of information can be displayed on the LCD monitor while shooting with Live View?
Answer:
| |
Press the [ INFO ] button repeatedly to cycle through the available information display options while shooting with Live View. You can also switch the display information by turning the dial while holding down the [ INFO ] button.
![Press the [INFO] button repeatedly,on turn the dial while holding down the [INFO] button.](/en/support/imsg/digicamera/qa/products/e30/images/e30_infobutton.gif)
When the information display option is changed, the camera remembers the new selection even if Live View or the camera power is turned off. The next time the [ INFO ] function is accessed, the LCD monitor will display that selection.
The available options are:
- Information display ON
The LCD displays current camera settings as well as icons that represent features and functions that are enabled.
- Histogram display
The LCD shows a graphical display of luminance information.
- Zoom display
A green frame is displayed in the center of the LCD. When the  button is pressed, the area within the frame will be enlarged for inspection. Turn the dial to change the degree of magnification (5x/7x/10x). Use the arrow pad to move the frame to a desired position. button is pressed, the area within the frame will be enlarged for inspection. Turn the dial to change the degree of magnification (5x/7x/10x). Use the arrow pad to move the frame to a desired position.
- Multi view display
You can compare the effects of exposure compensation or white balance on a 4-split screen. Press  or or  to switch between exposure compensation and white balance. to switch between exposure compensation and white balance.
This option is not available when [ MULTIPLE EXPOSURE ] is enabled.
- Image only display / Multiple exposure display
In Image only display, the LCD presents minimal information so the photographer can see more of the image area.
When [ MULTIPLE EXPOSURE ] is enabled, the Image only display is replaced by Multiple exposure display. In this view, captured images are overlaid semitransparently onto the LCD to assist in composing subsequent images.
- Scale display
The LCD presents a ruled line display to assist with aligning subjects in the imaging area  . will be displayed in the default setting. You can also activate . will be displayed in the default setting. You can also activate  or or  from the LV-INFO menu. To do so, press the [ MENU ] button, and then use the arrow pad to select (custom menu 1), DISP / / PC , INFO SETTING and LV-INFO. Set the scales you wish to display to ON. Press to activate the settings. from the LV-INFO menu. To do so, press the [ MENU ] button, and then use the arrow pad to select (custom menu 1), DISP / / PC , INFO SETTING and LV-INFO. Set the scales you wish to display to ON. Press to activate the settings.
- Digital level gauge display
The LCD displays a bi-directional level gauge to detect tilting horizontally and in the forward and backward direction. This view is available only when [ LEVEL GAUGE ] is set to [ ON ].
All [ INFO ] display options except Information display ON can be set to ON or OFF (display or hide). Frequently used display options can be accessed more quickly by hiding other options.
To hide or display a view, press the [ MENU ] button, and then use the arrow pad to select (custom menu 1), DISP / / PC , INFO SETTING and LV-INFO. Set the visibility of each option as desired, and then press to activate the settings.
The arrows in the illustrations below indicate the order in which the default display options occur.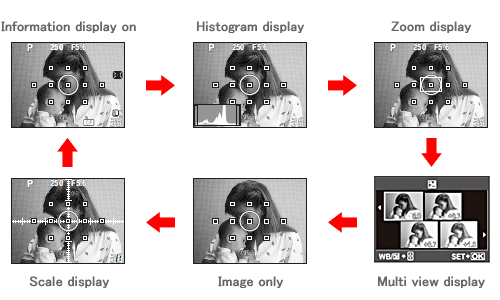
Note:
Scale display will have additional views when and / or are enabled.
When [ LEVEL GAUGE ] is set to [ ON ], the Level gauge display is inserted before Information display ON.
|
|
|
|


