 |
 |
|
|
Questions :
See the following Web page for general questions and answers for OLYMPUS OM-D and OLYMPUS PEN series cameras :
Question :
What type of materials are used for the camera body?
Answer:
The camera body is made of a magnesium alloy.
Question :
Can I use the image stabilizer while shooting movies?
Answer:
Yes, you can. In movie shooting, Movie-I.S. is used.
Movie-I.S.: In addition to Auto image stabilization, camera shake that occurs when shooting while walking is also reduced.
Note:
- When using a tripod, set the Image Stabilizer to OFF.
- When using a lens with an image stabilization function switch, priority is given to the lens side setting.
- You may notice an operating sound or vibration when the image stabilizer is activated.
Question :
What are the features of the built-in electronic viewfinder?
Answer:
The following describes the main features of the built-in electronic viewfinder:
- 2,360,000 dot resolution
- Field of view: 100%
- Maximum viewfinder magnification: 1.48x
- Eye point: Approx. 21 mm (in -1m⁻1)
- Diopter adjustment range: -4 to +2m
- Eye sensor available
- Finder: Choose from 3 types
- Eyecup: Interchangeable, optional eyecup EP-13 (sold separately) is available
Question :
How long is the shutter-release lag time?
Answer:
After the shutter button is pressed halfway, it takes about 50 msec to release the shutter. (confirmed by Olympus' internal testing)
Question :
What are the compression rates and what size are the image files in each record mode?
Answer:
【 Still Pictures 】
The following table shows the approximate values when shooting still pictures in the 4:3 aspect ratio.
| Record Mode |
Number of Pixels |
Compression Rate |
File Format |
File Size
(approx.) |
Photo Capacity |
| 1 GB SD / SDHC / SDXC card |
| RAW |
4608 x 3456 |
Lossless Compression |
ORF |
17.0 MB |
41 |
| L (Large) |
SF
(SuperFine) |
1/2.7 |
JPEG |
11.0 MB |
79 |
F
(Fine) |
1/4 |
7.5 MB |
114 |
N
(Normal) |
1/8 |
3.5 MB |
248 |
B
(Basic) |
1/12 |
2.4 MB |
369 |
| M (Middle) |
SF |
3200 x 2400 |
1/2.7 |
5.6 MB |
155 |
| F |
1/4 |
3.4 MB |
257 |
| N |
1/8 |
1.7 MB |
508 |
| B |
1/12 |
1.2 MB |
753 |
| SF |
2560 x 1920 |
1/2.7 |
3.2 MB |
271 |
| F |
1/4 |
2.2 MB |
398 |
| N |
1/8 |
1.1 MB |
782 |
| B |
1/12 |
0.8 MB |
1,151 |
| SF |
1920 x 1440 |
1/2.7 |
1.8 MB |
476 |
| F |
1/4 |
1.3 MB |
701 |
| N |
1/8 |
0.7 MB |
1,356 |
| B |
1/12 |
0.5 MB |
1,968 |
| SF |
1600 x 1200 |
1/2.7 |
1.3 MB |
678 |
| F |
1/4 |
0.9 MB |
984 |
| N |
1/8 |
0.5 MB |
1,906 |
| B |
1/12 |
0.4 MB |
2,653 |
| S (Small) |
SF |
1280 x 960 |
1/2.7 |
0.9 MB |
1,034 |
| F |
1/4 |
0.6 MB |
1,488 |
| N |
1/8 |
0.4 MB |
2,773 |
| B |
1/12 |
0.3 MB |
3,813 |
| SF |
1024 x 768 |
1/2.7 |
0.6 MB |
1,564 |
| F |
1/4 |
0.4 MB |
2,260 |
| N |
1/8 |
0.3 MB |
4,068 |
| B |
1/12 |
0.2 MB |
5,547 |
| SF |
640 x 480 |
1/2.7 |
0.3 MB |
3,589 |
| F |
1/4 |
0.2 MB |
5,085 |
| N |
1/8 |
0.2 MB |
7,627 |
| B |
1/12 |
0.1 MB |
10,170 |
Note:
- The same image (Olympus' standard image) is used to calculate the photo capacity and file size in each mode.
- The capacity depends on the image quality, the type of memory card or whether print reservation is enabled. The number of remaining pictures on the LCD may not change even when a picture is taken or deleted.
- The capacity in this table differs from the number of remaining pictures displayed on the LCD. This table shows the approximate number, but the camera shows the maximum (up to 9999).
【 Movies 】
| Record Mode |
Image Size |
Frame Rate (frames per second) |
Record Format |
Recording Rate |
Maximum Recording Time (approx.) |
| Full HD Fine |
1920 x 1080
(16:9) |
30p
(29.97 fps) |
MOV
(MPEG-4AVC/H.264)
*1 |
24Mbps |
22 min. *1 |
| Full HD Normal |
16Mbps |
29 min. *1 |
| HD Fine |
1280 x 720
(16:9) |
30p
(29.97 fps) |
12Mbps |
29 min. *1 |
| HD Normal |
8Mbps |
29 min. *1 |
| HD |
1280 x 720
(16:9) |
30 fps *2 |
AVI
(Motion JPEG)
*3 |
- |
7 min. *3 |
| SD |
640 x 480
(4:3) |
- |
14 min. *3 |
| *1 |
The maximum file size of a movie is 4 GB or 20 min. |
| *2 |
When shooting movies with an Art Filter, the frame rate varies based on the selected filter. |
| *3 |
The maximum file size of a movie is 2 GB, 7 min. (in HD mode) or 14 min. (in SD mode). |
Question :
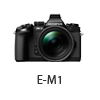
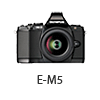
What differentiates the E-M1 from the E-M5?
Answer:
The following table describes the differences:
|
 |
 |
| Lens Mount |
Micro Four Thirds Mount |
| Image Processor |
TruePic VII |
TruePic VI |
| Effective Pixels |
16.28 million pixels |
16.05 million pixels |
| Sensor Type |
4/3 High-speed Live MOS Sensor |
| ISO Sensitivity |
Auto: ISO LOW (approx. 100) - 25600
(Customizable, Default: LOW - 1600)
Manual: LOW, ISO 200 - 25600 |
Auto: ISO 200 - 25600
(Customizable, Default: ISO 200 - 1600)
Manual: ISO 200 - 25600 |
| Body Color |
Black |
Black
Silver |
| Body Material |
Magnesium Alloy |
| Dustproof and Splash proof |
Available |
| Memory |
SD Memory Card
(SD, SDHC, SDXC (UHS-I compatible))
Eye-Fi card |
| Built-in Wi-Fi Function |
Available
- GPS info. Function
( by using Smartphone GPS data )
- Wireless Shooting
( by using Smartphone or remote control function )
- Image Share
( Orders for image upload onto a Smartphone can be saved. )
- Easy Connection
( QR code setting )
|
Not available |
| Flash |
FL-LM2 (External flash, packaged with the camera) |
| Sequential Shooting |
Approx. 10.0 fps
(Sequential shooting H mode) |
Approx. 9.0 fps
(Sequential shooting H mode) |
| Viewfinder |
Built-in, Eye-level electronic viewfinder
2.36 million dots
Field of view: 100 %
Magnification: 1.48x (maximum) |
Built-in, Eye-level electronic viewfinder
1.44 million dots
Field of view: 100 %
Magnification: 1.15x (maximum) |
| Hot Shoe |
Available |
| Accessory Port (AP2) |
Available |
| Monitor |
3.0 inches, 3:2
Approx. 1,040,000 dots
Movable HyperCrystal LCD |
3.0 inches, 3:2
Approx. 610,000 dots
Movable Organic EL monitor |
| Touch Panel |
Available |
| Control Dial |
2 dials |
| Function Lever |
Available |
Not available |
| Movie |
MOV (MPEG-4AVC / H.264)
AVI (Motion JPEG) |
| HD Movie Compatibility |
Full HD (1920 x 1080) shooting possible |
| AF System |
High-speed imager AF
(Contrast AF, Phase contrast AF)
* Phase contrast AF is used when a Four Thirds lens is attached.
|
High-speed image AF
(Contrast AF) |
| AF Area |
81 points
* 37 points when a Four Thirds lens is attached.
|
35 points |
| Focus Modes |
Single AF (S-AF),
Continuous AF (C-AF),
Manual Focus (MF),
S-AF + MF,
AF tracking (C-AF + TR) |
| Advanced AF |
Available |
| Shutter Speed |
60 - 1 / 8000 sec. |
60 - 1 / 4000 sec. |
| Art Filter |
12 art filters
- Pop Art
- Soft Focus
- Pale&Light Color
- Light Tone
- Grainy Film
- Pin Hole
- Diorama
- Cross Process
- Gentle Sepia
- Dramatic Tone
- Key Line
- Watercolor
Art filter variation and 8 art effects available
|
11 art filters
- Pop Art
- Soft Focus
- Pale&Light Color
- Light Tone
- Grainy Film
- Pin Hole
- Diorama
- Cross Process
- Gentle Sepia
- Dramatic Tone
- Key Line
Art filter variation and 5 art effects available
|
| Photo Story |
Available |
Not available |
| Creative Control |
Highlight & Shadow
Multi Aspect
Enlarged display
Color Creator |
Highlight & Shadow
Multi Aspect
Enlarged display
White balance |
| Multi Exposure |
2 frames max. |
| Level Gauge |
2-axis |
| Menu Language |
34 languages, including Japanese and English |
| Underwater Housing (Sold separately) |
PT-EP11 |
PT-EP08 |
| HDMI Output Connector |
HDMI Micro Connector (Type D) |
| Battery |
BLN-1 |
Power Battery Holder
(Sold separately) |
HLD-7 |
HLD-6 |
Dimensions
(excluding protrusions) |
130.4 mm (W) x 93.5 mm (H) x 63.1 mm (D) / 5.1" (W) x 3.7" (H) x 2.5" (D) |
121.0 mm (W) x 89.6 mm (H) x 41.9 mm (D) / 4.8" (W) x 3.5" (H) x 1.6" (D) |
| Weight |
- Approx. 497g (including battery and SD card)
- Approx. 443 g (body only)
|
- Approx. 425g (including battery and SD card)
- Approx. 373g (body only)
|
| Release Date |
October 2013 |
March 2012 |
Question :
What comes packaged with the camera?
Answer:
The following items are packaged with the camera:
- E-M1 camera
- Lithium-ion Rechargeable Battery (BLN-1)
- Lithium-ion Battery Charger (BCN-1)
- Flash (FL-LM2)
- USB Cable (CB-USB6)
- Body Cap
- Strap
- Flash Case
- Olympus Setup CD-ROM:
OLYMPUS Viewer 3 software (Windows / Mac)
- Instruction Manual
- Warranty Card
Question :
What type of memory card can I use with this model?
Answer:
This model is compatible with SD, SDHC and SDXC cards, including Eye-Fi cards.
xD-Picture Card™ and CompactFlash® media cannot be used.
Question :
Where can I find the instruction manual for my camera?
Answer:
You can find the manual online. You can either read it online or download the instruction manual for your camera.
See the following Web page to find the available manuals:
 Download Manuals Download Manuals
Question :
When recording movies I can hear the sound of the lens focusing, how can I reduce this sound?
Answer:
When recording sound in a movie, the sound made by the lens and camera operating may be recorded. This is due to the proximity of the microphone to the lens. If desired, you can reduce these sounds by shooting with [AF Mode] set to [S-AF], or by limiting the amount of times you press the buttons. Using an external microphone, you can extend the microphone away from the lens. If you are using a non-MSC lens, you may want to consider a lens with this type of mechanism which is near silent during AF operation.
Question :
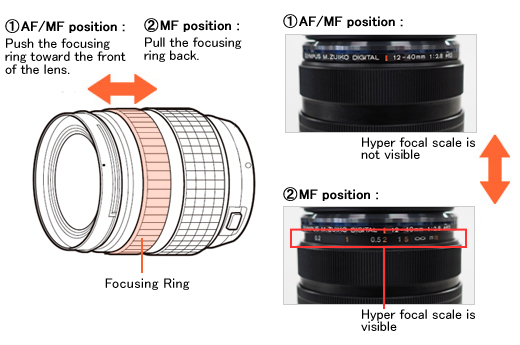
My lens is not auto-focusing. What should I do?
Answer:
If you are not able to take pictures in AF (auto focus), try the following settings:
Switch the focus ring of the lens to the AF/MF position.
In the micro four thirds lineup the following lenses, M. Zuiko ED 12-40mm f2.8 Pro, M. Zuiko 12mm f1.8, and M. Zuiko 17mm f1.8 have a function called Manual Focus Clutch Focusing. This ring controls whether the camera/lens is in MF (Manual Focus) or AF (Auto Focus).
If you are using one of these lenses, grasp the focusing ring between your thumb and forefinger and push it toward the front of the lens. It will snap forward and set the focus mode to AF.
If you pull it back to expose the Hyper focal scale it will be in Manual mode. Basically this allows for quick switching in situations where manual focus is better suited for the situation.
When you cannot shoot in AF (auto focus) even if the focus ring is switched to the AF/MF position, change the AF mode setting in the camera to a mode other than MF (manual focus).
Even if the focus ring is switched to the AF/MF position, you cannot shoot in AF (auto focus) when the AF mode setting of the camera is set to MF.
Leaving the focus ring to the AF/MF position, change the AF mode setting by either of the following ways:
Change the setting from the super control panel.
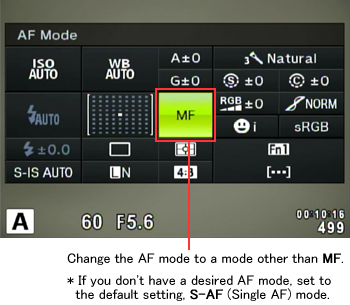
Change the setting from the MENU.
- Press the [MENU] button.
- In Custom Menu, select AF/MF and select AF Mode.
- In Still Pictures, select a AF mode other than MF and press the [OK] button.
* If you don't have a desired AF mode, set to the default setting, S-AF (Single AF) mode.

Note:
- When the focus ring is in the AF/MF position, the lens operates in the AF mode that is set on the camera.
- When the focus ring is in the MF position, the lens operates in MF (Manual Focus) regardless of the AF mode setting.
Question :
Can I use the Digital Tele-converter function in E-M1 with any kinds of lenses?
Answer:
The Digital Tele-converter function is an in-camera function. You can use the function with all lenses that can be attached to the camera.
Note:
- Digital Tele-converter function cannot be used in SCN mode (such as 3D Photo, Panorama, Fisheye Effect, Wide-Angle and Macro mode), PHOTO STORY and Multiple Exposure.
- When a RAW photo is displayed in playback, the area that you displayed on the monitor using Digital Tele-converter is indicated by a white frame.
- In movie mode, the function is not available when Movie Effect is On.
- The number of AF target points decreases when using Digital Tele-converter.
Question :
Which lenses are compatible with the Focus Stacking mode?
Answer:
The following lenses are compatible with the Focus Stacking mode which were added by the E-M1 firmware update version 4.0:
- M.ZUIKO DIGITAL ED 60mm F2.8 Macro
- M.ZUIKO DIGITAL ED 12-40mm F2.8 PRO
- M.ZUIKO DIGITAL ED 40-150mm F2.8 PRO
- M.ZUIKO DIGITAL ED 7-14mm F2.8 PRO (*)
- M.ZUIKO DIGITAL ED 8mm F1.8 Fisheye PRO (*)
- M.ZUIKO DIGITAL ED 30mm F3.5 Macro (*)
- M.ZUIKO DIGITAL ED 300mm F4.0 IS PRO (*)
- * Compatible with Focus Stacking mode if the firmware of E-M1 camera is updated to version 4.2.
Note:
The angle of view of the images created by Focus Stacking will be reduced approximately 7%.
Question :
Is image stabilization available while shooting movies with the E-M1?
Answer:
Movie-I.S. is available while shooting movies. In addition to Auto image stabilization, camera shake that occurs when shooting movies while walking is also compensated.
Note:
- When using the tripod, set the image stabilization to OFF.
- When using a lens with built-in image stabilization, priority is given to the lens setting.
- When image stabilizer is activated, you may feel slight vibration and noise.
Question :
I scanned the QR code that is displayed on the monitor of the camera using the Easy Setup, but couldn't obtain a Wi-Fi connection. What should I do?
Answer:
See the following Web page for questions and answers for OI.Share:
Q&A for OI.Share
Question :
I am using OI.Share, but the QR code reading display in Easy Setup is not displayed. What should I do?
Answer:
See the following Web page for questions and answers for OI.Share:
Q&A for OI.Share
Question :
How many shots can be taken in time lapse photography and how long can I set its shooting interval?
Answer:
You can shoot up to 999 shots in time lapse photography and you can set its shooting interval between 1 second and 24 hours.
The following procedure explains how to set and shoot time lapse photography.
How to set time lapse photography
Time lapse function is selectable when using the P, A, S or M shooting mode.
Press the [MENU] button. In Shooting Menu 1, select  and press the [OK] button. In Time Lapse Settings, select On and press the arrow pad Right button. Set the number of frames and interval to a desired value and press the [OK] button to complete the setting. and press the [OK] button. In Time Lapse Settings, select On and press the arrow pad Right button. Set the number of frames and interval to a desired value and press the [OK] button to complete the setting.
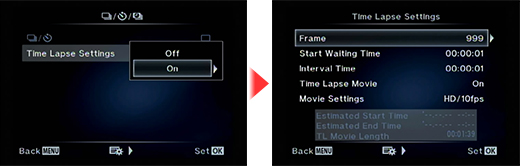
Frame
Sets the number of frames of time lapse photography. You can choose between 1 and 999 shots.
Start Waiting Time
Sets the time from pressing the shutter button until the first picture is taken. You can choose between 1 second and 24 hours.
Interval Time
Sets the shooting interval after the shooting starts. You can choose between 1second and 24 hours.
Time Lapse Movie
The sequence of time lapse photography can be converted to a movie.
Off: Records each frame as a still picture.
On: Records each frame as a still picture and generates a time lapse movie.
Movie Settings
You can choose the Movie Resolution (4K, Full HD, HD) and Frame Rate (30fps, 15fps, 10fps, 5fps).
- * Firmware version 4.0 or later is required for the Time Lapse Movie settings.
- * In 4K, the frame rate is fixed to 5fps.
- * In FullHD, you can choose the frame rate from 15fps, 10fps and 5fps.
How to take time lapse photography
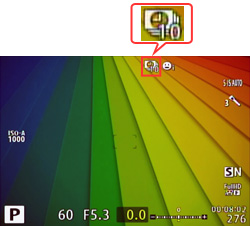
When you set the time lapse photography to On, the icon for time lapse photography is displayed on the monitor. The number on the icon indicates the number of shots you can take.
Press the shutter button to start the time lapse photography.
Tips:
- After autofocus, the camera starts shooting even if the image is not in focus. If you want to fix the focus position, shoot in MF mode.
- Rec View operates for 0.5 seconds.
- If the Start Waiting Time or Interval Time is set to 1 minutes 31 seconds or longer, the monitor and camera power turns off after 1 minute.
10 seconds before the setting time, the power automatically turns on again.
While the monitor is off, you can also turn the power on by pressing the shutter button.
- When the time lapse shooting is finished, time lapse photography is set to Off.
Note:
- Time lapse photography is available only in P, A, S and M mode.
- When the AF mode is set to C-AF or C-AF+TR, the setting automatically changes to S-AF.
- Touch operation is disabled during time lapse photography.
- Time lapse photography cannot be used with HDR photography.
- Time lapse photography cannot be used simultaneously with Bulb, Time Shooting, Bracketing and Multiple Exposure.
- The flash will not work when the flash charging time is longer than the shooting interval.
- If the camera automatically turns off during time lapse photography, it turns on in time before the next shot.
- If any of the still pictures are not recorded correctly, the time lapse movie will not be generated.
- If there is not enough space on the card, time lapse movie is not recorded.
- Time lapse photography is cancelled if any of the following function is operated:
Mode dial, MENU button,  button, lens release button or connecting the USB cable. button, lens release button or connecting the USB cable.
- Time lapse photography is cancelled if you turn off the camera.
- The shooting stops if there is not enough power left on the battery.Make sure your camera's battery is fully charged.
|
|


