 |
 |
|
|
Questions :
See the following Web page for general questions and answers for OLYMPUS OM-D and OLYMPUS PEN series cameras :
Question :
What comes packaged with the camera?
Answer:
The following items are packaged with the camera:
- E-M10 MarkII camera body
- Lithium-ion Rechargeable Battery (BLS-50)
- Lithium-ion Battery Charger (BCS-5)
- Eyecup (EP-15)
- USB Cable (CB-USB6)
- Body Cap
- Shoulder Strap
- Software CD-ROM
- OLYMPUS Viewer 3 (Windows / Mac)
- Instruction Manual
- Warranty Card
Question :
What differentiates the E-M10 Mark II from the E-M10?
Answer:
The following table describes the differences:
|
 |
 |
| Lens Mount |
Micro Four Thirds Mount |
| Image Processor |
TruePic VII |
| Effective Pixels |
16.05 million pixels |
| Sensor Type |
4/3 High-speed Live MOS Sensor |
| Image Stabilization |
5-axis stabilization, 4 steps, Corrects for angular shake, shift blur and rolling blur |
3-axis stabilization, 3.5 steps, Corrects for angular shake and rolling blur |
| Electronic Viewfinder (EVF) |
2.36 million dots
Field of view: 100%
Magnification: 1.23x (maximum)
OVF simulation available |
1.44 million dots
Field of view: 100%
Magnification: 1.15x (maximum) |
| Monitor |
Approx. 1,040,000 dots, Movable LCD (Upward tilting angle: 85 degrees, Downward tilting angle: 45 degrees) |
Approx. 1,040,000 dots, Movable LCD (Upward tilting angle: 80 degrees, Downward tilting angle: 50 degrees) |
| Touch Panel |
Available
AF Targeting Pad equipped |
Available |
| Memory |
SD Memory Card
(SDHC, SDXC, UHS-II compatible, Eye-Fi card compatible) |
SD Memory Card
(SDHC, SDXC, UHS-I compatible, Eye-Fi card compatible) |
| Flash |
Built-in |
| Hot Shoe |
Available |
Front Dial
Rear Dial |
Available |
| Sequential Shooting (Sequential Shooting H mode, maximum) |
Approx. 8.5 fps |
Approx. 8.0 fps |
| Movie |
MOV (MPEG-4AVC / H.264)
AVI (Motion JPEG) |
| HD Movie Compatibility |
Full HD (1920 x 1080) shooting possible |
| AF System |
High-speed imager AF (Contrast AF) |
| AF Area |
81 points |
| Focus Modes |
Single AF (S-AF), Continuous AF (C-AF), Manual Focus (MF), S-AF+MF, AF tracking (C-AF+TR) |
| Electronic Zoom Speed Setting |
Available |
Not available |
| ISO Sensitivity |
Auto: ISO LOW (approx. 100) - 25600
(Customizable, Default: ISO LOW - 1600)
Manual: LOW, ISO 200 - 25600 |
| Shutter Speed |
60 - 1 / 4000 sec.
Bulb / Time shooting: 30 min. maximum (Default setting: 8 min.) |
| Silent Mode |
Available |
Not available |
| SCN (scene) Mode |
25 modes |
24 modes |
| Interval Shooting, Multiple Exposure |
Multiple Exposure (2 frames max.), Live Bulb / Live Time shooting, Interval shooting / Time Lapse Movie (4K, Full HD, HD), Live Composite Photography, Photo in Movie |
Multiple Exposure (2 frames max.), Live Bulb / Live Time shooting, Interval shooting / Time Lapse Movie (HD), Live Composite Photography, Photo in Movie |
| Art Filter |
14 art filters |
12 art filters |
| Photo Story |
5 modes |
4 modes |
| Creative Control |
Highlight & Shadow, Multi Aspect, Enlarged display,
ISO / White balance, Color Creator |
| Movie Effect |
One Shot Echo
Multi Echo
Art Fade
Old Film |
One Shot Echo
Multi Echo
Art Fade |
| Movie Tele-converter |
4x |
| Keystone Compensation |
Available |
Not available |
| Level Gauge |
2-axis |
| Built-in Wi-Fi |
Available |
HDMI Output Connector
(Type D) |
Available
Live View Output via HDMI is possible |
Available |
| Menu Language |
34 languages, including Japanese and English |
| Battery |
BLS-50 (bundled) |
BLS-5 (bundled) |
| Quick Sleep Mode |
Available |
Not available |
| Number of Storable Shots |
Approx. 350 shots
(When using the BLS-50 battery and Toshiba EXCERIA™ UHS-I SDHC card (Type1, 32GB), IS set to ON, based on CIPA test standards)
Approx. 750 shots
(When Quick Sleep Mode is On, based on CIPA test standards) |
Approx. 320 shots
(When using the BLS-5 battery and Toshiba Super High Speed SDHC card (Class6, 4GB)) |
| Body |
Metal exterior |
| Weight |
- Approx. 390g
(including battery and card, excluding eye cup)
- Approx. 342g
(body only)
|
- Approx. 396g
(including battery and card, excluding eye cup)
- Approx. 350g
(body only)
|
| Dimensions (Excluding Protrusions) |
119.5 mm (W) x 83.1 mm (H) x 46.7 mm (D) / 4.7" (W) x 3.3" (H) x 1.8" (D) |
119.1 mm (W) x 82.3 mm (H) x 45.9 mm (D) / 4.7" (W) x 3.2" (H) x 1.8" (D) |
| Color |
Silver, Black |
Silver, Black
(Limited Edition: Orange, Green, Black) |
| Camera Grip (sold separately) |
ECG-3 |
ECG-1 |
| Release Date |
September 2015 |
February 2014 |
Question :
What are the compression rates, and what size are the image files in each record mode?
Answer:
[Still Pictures]
The following table shows the approximate values when shooting still pictures in the 4:3 aspect ratio.
| Record Mode |
Number of Pixels |
Compression Rate |
File Format |
Number of Storable Pictures 1GB SD / SDHC / SDXC card |
File Size (Approx.) |
| RAW |
4608 x 3456 |
Lossless Compression |
ORF |
55 |
17.3 MB |
L
(Large) |
SF
(SuperFine) |
1/2.7 |
JPEG |
88 |
10.8 MB |
F
(Fine) |
1/4 |
127 |
7.5 MB |
N
(Normal) |
1/8 |
274 |
3.5 MB |
B
(Basic) |
1/12 |
409 |
2.4 MB |
M
(Middle) |
SF |
3200 x 2400 |
1/2.7 |
172 |
5.6 MB |
| F |
1/4 |
285 |
3.4 MB |
| N |
1/8 |
559 |
1.7 MB |
| B |
1/12 |
836 |
1.2 MB |
| SF |
2560 x 1920 |
1/2.7 |
300 |
3.2 MB |
| F |
1/4 |
442 |
2.2 MB |
| N |
1/8 |
859 |
1.1 MB |
| B |
1/12 |
1,271 |
0.8 MB |
| SF |
1920 x 1440 |
1/2.7 |
526 |
1.8 MB |
| F |
1/4 |
772 |
1.3 MB |
| N |
1/8 |
1,488 |
0.7 MB |
| B |
1/12 |
2,179 |
0.5 MB |
| SF |
1600 x 1200 |
1/2.7 |
753 |
1.3 MB |
| F |
1/4 |
1,089 |
0.9 MB |
| N |
1/8 |
2,104 |
0.5 MB |
| B |
1/12 |
2,906 |
0.4 MB |
S
(Small) |
SF |
1280 x 960 |
1/2.7 |
1,151 |
0.9 MB |
| F |
1/4 |
1,649 |
0.6 MB |
| N |
1/8 |
3,051 |
0.4 MB |
| B |
1/12 |
4,359 |
0.3 MB |
| SF |
1024 x 768 |
1/2.7 |
1,743 |
0.6 MB |
| F |
1/4 |
2,441 |
0.4 MB |
| N |
1/8 |
4,359 |
0.3 MB |
| B |
1/12 |
6,102 |
0.2 MB |
| SF |
640 x 480 |
1/2.7 |
3,814 |
0.3 MB |
| F |
1/4 |
5,548 |
0.2 MB |
| N |
1/8 |
8,718 |
0.2 MB |
| B |
1/12 |
10,171 |
0.1 MB |
Note:
- The same image (Olympus' standard image) is used to calculate the photo capacity and file size in each mode.
- The capacity depends on the image quality, the type of memory card or whether print reservation is enabled. The number of remaining pictures on the LCD may not change even when a picture is taken or deleted.
- The capacity in this table differs from the number of remaining pictures displayed on the LCD. This table shows the approximate number, but the camera shows the maximum (up to 9999).
Question :
How do I set the Anti-Shock function?
Answer:
What is Anti-Shock?
To prevent camera shake caused by the small vibrations that occur during shutter operation, Anti-Shock shooting is performed using an electronic front-curtain shutter.
When Anti-Shock is enabled, the shutter is released a while after the shutter button is pressed all the way down.
The interval between the shutter button is pressed and the shutter is released can be set from 0 second to 30 seconds. (Default setting is 0 second)
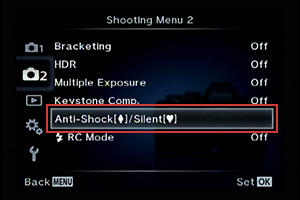
Please see the following procedure for how to enable Anti-Shock and how to set its interval:
How to enable Anti-Shock function
Select one of the items marked  (Single shooting, sequential shooting, self-timer or custom self-timer) on the Super control panel or Live Control. (Single shooting, sequential shooting, self-timer or custom self-timer) on the Super control panel or Live Control.

How to set the interval of Anti-Shock
The following procedure explains how to change the interval from the default 0 second to 1/4 seconds.
- Press the [MENU] button. In
 (Shooting Menu 2), select Anti-Shock[] / Silent [♥] and press the [OK] button. (Shooting Menu 2), select Anti-Shock[] / Silent [♥] and press the [OK] button.
- Select Anti-Shock[] and press the arrow pad Right button.
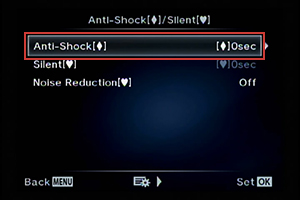
- Select []0sec and press the arrow pad Right button.

- Select []1/4sec and press the [OK] button.
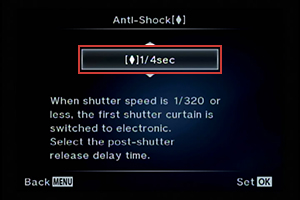
- Make sure the interval of Anti-Shock is changed.

Question :
How many pictures can be taken sequentially per second?
Answer:
While the shutter button is fully depressed, you can shoot approximately 8.5 frames per second (max.).
| Mode |
Image Quality |
Sequential Shooting Speed |
Recordable Pictures on Sequential Shooting |
| Sequential Shooting H |
RAW |
Approx. 8.5 frames per second (when image stabilization is OFF) |
Approx. 22 frames *2 |
| Sequential Shooting L |
Approx. 4.3 frames per second (when image stabilization is OFF) *1 |
Up to card capacity *3 |
| Sequential Shooting H |
JPEG |
Approx. 8.5 frames per second (when image stabilization is OFF) |
Approx. 36 frames *2 |
| Sequential Shooting L |
Approx. 4.3 frames per second (when image stabilization is OFF) *1 |
Up to card capacity *3 |
- *1 In S-AF or MF mode (Approx. 4.0 frames per second in C-AF mode)
- *2 In sequential shooting H mode, 8.5 frames per second
- *3 In sequential shooting L mode, 4 frames per second
- * When using the M.ZUIKO DIGITAL ED 14-42mm F3.5-5.6 EZ lens
- * When using the Toshiba SDHC UHS-II R260·W240 EXCERIA™ PRO card
- * Based on Olympus testing
Note:
- Sequential shooting speed may differ according to the shooting condition; for example, the lens you use or its zoom position.
- When shooting in sequential shooting H mode, focus, exposure and white balance are locked at the first frame.
While shooting in this mode, the last picture taken is displayed briefly after the shutter button is pressed.
- When shooting in sequential shooting L mode, focus and exposure is fixed based on the AF mode and AEL / AFL mode.
While shooting in this mode, the pictures taken are not displayed. You can playback the pictures after shooting.
- When the battery check icon blinks because of low battery power, the camera stops the shooting and starts to store the pictures.
Depending on the amount of power remaining in the battery, the camera may not be able to store all pictures.
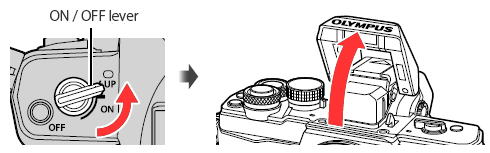
Question :
Does the flash automatically pop up when shooting in low light conditions?
Answer:
No, the flash will not automatically pop up.
To use the flash unit, rotate the ON / OFF lever to  UP. UP.
Question :
How far can I adjust the angle of the LCD monitor?
Answer:
The LCD monitor can be moved up and down.
You can tilt up the monitor to about 85-degree angle and tilt down to about 45-degree angle.

Question :
Can I attach the camera grip ECG-3 to other OM-D cameras?
Answer:
The ECG-3 is a dedicated camera grip for E-M10 Mark II.
You cannot attach the camera grip to other Olympus OM-D series digital SLR cameras.
Question :
How many shots can be taken in time lapse photography and how long can I set its shooting interval?
Answer:
You can shoot up to 999 shots in time lapse photography and you can set its shooting interval between 1 second and 24 hours.
The following procedure explains how to set and shoot time lapse photography.
How to set time lapse photography
Time lapse function is selectable when using the P, A, S or M shooting mode.
Press the [MENU] button. In Shooting Menu 1, select  and press the [OK] button. In Intrvl. Sh./Time Lapse, select On and press the arrow pad Right button. Set the number of frames and interval to a desired value and press the [OK] button to complete the setting. and press the [OK] button. In Intrvl. Sh./Time Lapse, select On and press the arrow pad Right button. Set the number of frames and interval to a desired value and press the [OK] button to complete the setting.
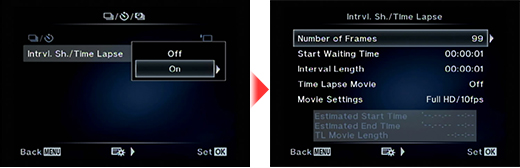
Number of Frames
Sets the number of frames of time lapse photography. You can choose between 1 and 999 shots.
Start Waiting Time
Sets the time from pressing the shutter button until the first picture is taken. You can choose between 1 second and 24 hours.
Interval Length
Sets the shooting interval after the shooting starts. You can choose between 1 second and 24 hours.
Time Lapse Movie
The sequence of time lapse photography can be converted to a movie.
Off: Records each frame as a still picture.
On: Records each frame as a still picture and generates a time lapse movie.
Movie Settings
You can choose the Movie Resolution (4K, Full HD, HD) and Frame Rate* (30fps, 15fps, 10fps, 5fps).
- * In 4K, the frame rate is fixed to 5fps.
- * In FullHD, you can choose the frame rate from 15fps, 10fps and 5fps.
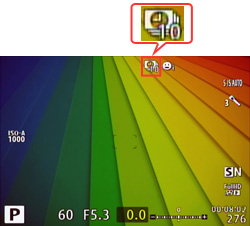
How to take time lapse photography
When you set the time lapse photography to On, the icon for time lapse photography is displayed on the monitor. The number on the icon indicates the number of shots you can take.
Press the shutter button to start the time lapse photography.
Tips:
- After autofocus, the camera starts shooting even if the image is not in focus. If you want to fix the focus position, shoot in MF mode.
- Rec View operates for 0.5 seconds.
- If the Start Waiting Time or Interval Length is set to 1 minutes 31 seconds or longer, the monitor and camera power turns off after 1 minute.
10 seconds before the setting time, the power automatically turns on again.
While the monitor is off, you can also turn the power on by pressing the shutter button.
- When the time lapse shooting is finished, time lapse photography is set to Off.
Note:
- Time lapse photography is available only in P, A, S and M mode.
- When the AF mode is set to C-AF or C-AF+TR, the setting automatically changes to S-AF.
- Touch operation is disabled during time lapse photography.
- Time lapse photography cannot be used with HDR photography.
- Time lapse photography cannot be used simultaneously with Bulb, Time, Composite Shooting, Bracketing and Multiple Exposure.
- The flash will not work when the flash charging time is longer than the shooting interval.
- If the camera automatically turns off during time lapse photography, it turns on in time before the next shot.
- If any of the still pictures are not recorded correctly, the time lapse movie will not be generated.
- If there is not enough space on the card, time lapse movie is not recorded.
- Time lapse photography is cancelled if any of the following function is operated:
Mode dial, MENU button,  button, lens release button or connecting the USB cable. button, lens release button or connecting the USB cable.
- Time lapse photography is cancelled if you turn off the camera.
- The shooting stops if there is not enough power left on the battery. Make sure your camera's battery is fully charged.
- Depending on the computer system, you may not be able to view 4K time lapse movies (.avi) on your computer.
- The compatible software for viewing 4K time lapse movie is OLYMPUS Viewer 3 (1.5 or later version).
Question :
What type of memory card can I use with this model?
Answer:
This model is compatible with SD, SDHC and SDXC cards, including Eye-Fi cards.
xD-Picture Card™ and CompactFlash® media cannot be used.
Question :
Where can I find the instruction manual for my camera?
Answer:
You can find the manual online. You can either read it online or download the instruction manual for your camera.
See the following Web page to find the available manuals:
 Download Manuals Download Manuals
Question :
What software can I use to view 4K time-lapse movies on my computer?
Answer:
For viewing 4K time-lapse movies on your computer, use the OLYMPUS Viewer 3 software (version 1.5 or later).
Question :
How do I set the Digital Tele-converter function to the function button?
Answer:
You can use the Digital Tele-converter function by assigning to the function button [Fn1], [Fn2], [Fn3] or movie [ ] button. ] button.
The following procedure explains how to enable the Digital Tele-converter function in the E-M10 Mark II.
Assigning the Digital Tele-converter to the [Fn1] function button:
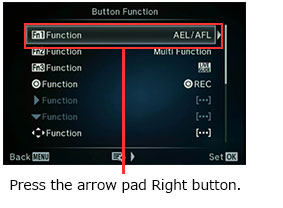
- In
 (Custom Menu), select (Custom Menu), select  (Button/Dial) and press the [OK] button. (Button/Dial) and press the [OK] button.

- Select Button Function and press the [OK] button.

- Select
 Function and press the arrow pad Right button. Function and press the arrow pad Right button.
- Select
 Digital Tele-converter using the arrow pad Up and Down button and press the [OK] button. Digital Tele-converter using the arrow pad Up and Down button and press the [OK] button.
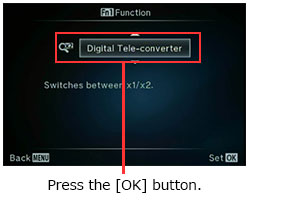
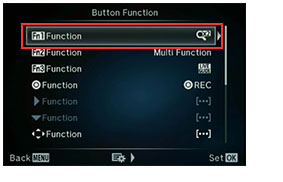
- Make sure that the Function is set to (Digital Tele-converter).
- When you press the button in shooting mode, the image on the monitor will be enlarged by 2x.
The image will be recorded as it is displayed on the monitor.
To cancel the zoom view on the monitor, press the button again.
Note:
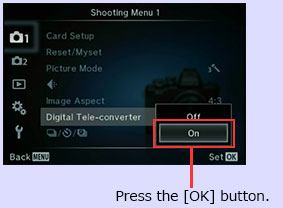
The Digital Tele-converter function can also be set to On / Off in Shooting Menu 1.
Note:
- Digital Tele-converter is not available in PHOTO STORY, Multiple Exposure and when 3D photo, Panorama, Fisheye Effect, Wide Angle and Macro is selected in SCN mode.
- In movie mode, the function is not available when Movie Effect is On.
- When a RAW photo is displayed in playback, the area that you displayed on the monitor using Digital Tele-converter is indicated by a frame.
- While using the Digital Tele-converter, the number of AF targets decreases.
Question :
Which shooting mode should I use? [Shooting mode, Scenes]
Answer:
The available modes are iAUTO, P (Program Auto), A (Shutter priority), S (Aperture priority), M (Manual),  (PHOTO STORY), SCN (25 scene modes), ART (14 art filters) and  Movie Movie.
iAUTO
iAUTO is a fully automated mode.
This mode is best suited for beginners because the camera determines the optimum settings for the shooting conditions automatically.
You can also use the live guide.
* Some menu settings cannot be changed.
P (Program Auto)
The camera automatically sets the optimum aperture and shutter speed based on the lighting conditions.
A (Aperture-priority Mode)
This mode enables you to take photos by setting the aperture (F-number) manually. The camera sets the shutter speed automatically.
If a larger aperture (lower F-number) is set, the focus range becomes narrower. You will get pictures of a subject with out-of-focus background.
If a smaller aperture (higher F-number) is set, the focus range becomes wider. Both the subject and the background come into focus.
S (Shutter-priority Mode)
In this mode, the shutter speed can be set manually. The aperture is set automatically.
A fast shutter speed can freeze a fast-moving action without blurring.
A slow shutter speed will blur a fast-moving action. This blurring will give the impression of dynamic motion.
M (Manual)
Both the aperture and the shutter speed can be set manually.
You can also set the BULB (Bulb photography), LIVETIME (Live time photography) and LIVECOMP (Live composite photography).
(PHOTO STORY)
Photo story combines multiple photos into a single image. There are five patterns: Standard, Speed, Zoom In/Out, Layout and Fun Frames.
You can set different variations (effects, aspect ratios) and take photos in touch screen operation.
SCN (Scene Mode)
The camera offers 25 scene modes for shooting in various conditions:
-
 Portrait Portrait
This mode is best suited for taking portraits. The camera automatically sets the optimal shooting conditions to produce natural skin tones.
-
 e-Portrait e-Portrait
The camera produces smooth skin textures. This mode is best suited for HDTV (High Definition Television).
-
 Landscape Landscape
This mode is suitable for taking pictures of landscapes. It vividly reproduces blues and greens.
-
 Landscape+Portrait Landscape+Portrait
This mode is suitable for shooting both a foreground subject and background landscape. It clearly reproduces blues, greens and natural skin tones.
-
 Sport Sport
Captures fast-moving action without blurring.
-
 Hand-Held Starlight Hand-Held Starlight
This mode is best suited for taking night scenes without a tripod.
8 frames are shot at one time and the images are then combined.
-
 Night Scene Night Scene
This mode is best suited for shooting illuminated scenes in the evening or at night. The camera sets a slower shutter speed than in normal shooting.
Use a tripod so your camera remains steady when shooting.
-
 Night+Portrait Night+Portrait
This mode is best suited for shooting both a foreground subject and an illuminated background in the evening or at night. The camera sets a slower shutter speed than in normal shooting.
-
 Children Children
This mode is best suited for taking pictures of fast-moving children.
-
 High Key High Key
This mode processes images in bright light situations.
-
 Low Key Low Key
This mode processes images in low light situation.
-
 DIS Mode DIS Mode
This mode reduces blur caused by a moving subject or by camera shake.
-
 Macro Macro
This mode is best suited for taking close-up pictures.
-
 Nature Macro Nature Macro
This mode is best suited for taking close-up pictures. It vividly reproduces the colors of flowers and insects.
-
 Candle Candle
This mode is ideal for shooting under candlelight.
Warm colors are reproduced.
-
 Sunset Sunset
This mode is suitable for shooting the setting or rising sun. It vividly reproduces reds and yellows.
-
 Documents Documents
This mode is suitable for shooting paper documents. It increases contrast between letters and background.
-
 Panorama Panorama
The camera captures images for creating a panoramic picture.
The captured images are combined later using the included Olympus Viewer 3 software.
-
 Fireworks Fireworks
This mode is suitable for shooting fireworks at night. The camera sets a slower shutter speed than is used in normal shooting.
-
 Beach & Snow Beach & Snow
This model is ideal for shooting white sand on the seaside or snow-capped mountains. The colors of the sky, greenery and people are reproduced clearly.
-
 Fisheye Effect Fisheye Effect
This mode is for shooting with the Fisheye converter FCON-P01.
-
 Wide-Angle Wide-Angle
This mode is for shooting with the Wide converter WCON-P01.
-
 Macro Macro
This mode is for shooting with the Macro converter MCON-P02 or MCON-P01.
-
 3D Photo 3D Photo
This mode can only be used with a 3D lens(*). The captured images can be viewed on 3D supported devices.
The 3D images cannot be viewed on the camera monitor.
- * Panasonic 3D lens: H-FT012
-
 Panning Panning
When you move the camera to track a subject, the camera sets the optimal shutter speed in detecting the movement of the camera.
ART (art filter)
You can take creative pictures using the following art filters:
Pop Art, Soft Focus, Pale&Light Color, Light Tone, Grainy Film, Pin Hole,
Diorama, Cross Process, Gentle Sepia, Dramatic Tone, Key Line, Watercolor,
Vintage, Partial Color
ART BKT (Art Filter Bracket) is also available.
This mode enables the camera to shoot an image and then automatically process the image to create additional images using the selected art filter.
Movie
This mode enables you to create movies that take advantage of the effects available in still photography mode.
You can also apply a fade effect or zoom in on an area of the image during movie recording.
Question :
What kinds of in-camera editing functions are available for this camera?
Answer:
The following in-camera editing functions are available for this camera:
RAW Data Edit
The RAW image is edited and saved as a JPEG image. (RAW processing)
| Function |
Operation |
| Current |
The image is processed using the current camera settings.
Adjust the camera settings before choosing this option. |
| Custom 1 |
Editing can be performed while changing the settings on the monitor.
You can save the settings used. |
| Custom 2 |
| ART BKT |
The image is edited using settings for the selected art filter. |
JPEG Edit
The JPEG image is edited and saved as a new JPEG image.
| Function |
Operation |
| Shadow Adj |
Brightens a dark backlit subject. |
| Redeye Fix |
Reduces the red-eye phenomenon during flash shooting. |
 (Trimming) (Trimming) |
Use the front dial or rear dial to choose the size of the crop and use the arrow pad button to specify the crop position. |
| Aspect |
Changes the aspect ratio of images from 4:3 (standard) to 3:2, 16:9, 1:1 or 3:4.
After changing the aspect ratio, use the arrow pad button to specify the trimming position. |
| Black & White |
Creates black and white images. |
| Sepia |
Creates sepia-toned images. |
| Saturation |
Sets the color depth. Adjust the color saturation checking the picture on the screen. |
 (Resizing) (Resizing) |
Converts the image file size to 1280 x 960, 640 x 480 or 320 x 240.
Images with an aspect ratio other than 4:3 (standard) are converted to the closest image file size. |
| e-Portrait |
Makes skin look smooth.
The editing may not be possible depending on the images, for example, if face detection fails. |
Note:
- Red-eye correction may not work depending on the image.
- When resizing an image, you cannot select a larger number of pixels than was originally recorded.
- (Trimming) and Aspect can only be used to edit images with an aspect ratio of 4:3 (standard).
- When Picture Mode is set to ART, Color Space is locked to sRGB.
- 3D photos or movies and temporarily saved files for PHOTO STORY cannot be edited.
- Editing of a JPEG image is not possible in the following cases:
when an image is processed on a PC, when there is not enough space in the card memory, when an image is recorded on another camera
|
|


