| |
 |
|
|
Questions :
Question :
What differentiates the E-M10 Mark IV from the E-M10 Mark III?
Answer:
The following table describes the differences:
|
 |
 |
| Lens Mount |
Micro Four Thirds Mount |
| Effective Pixels |
20.30 million pixels |
16.05 million pixels |
| Sensor Type |
4/3 High-speed Live MOS Sensor |
| Image Processor |
TruePic VIII |
| Image Stabilization |
Built-in 5-axis sensor-shift image stabilization,
4.5 steps |
Built-in 5-axis sensor-shift image stabilization,
4 steps |
| Electronic Viewfinder (EVF) |
3.0 inches, 2.36 million dots, Field of view: 100%, Magnification: 1.23x |
| Monitor |
Approx. 1,040,000 dots,
Movable LCD: Upward tilting angle 80 degrees, Downward tilting angle 180 degrees (Selfie compatible)
Touch Panel (AF Targeting Pad equipped) |
Approx. 1,040,000 dots,
Movable LCD: Upward tilting angle 85 degrees, Downward tilting angle 45 degrees
Touch Panel (AF Targeting Pad equipped) |
| Memory |
SD Memory Card
(SDHC, SDXC, UHS-II compatible) |
SD Memory Card
(SDHC, SDXC, UHS-II compatible, Eye-Fi card compatible) |
| AF System |
High-speed imager AF (Contrast AF) |
| AF points and AF target settings |
121 AF points
All Targets (121 points), Single Target (1 point), Group Target (9 points) |
| Focus Modes |
Single AF (S-AF), Continuous AF(C-AF), Manual Focus (MF), S-AF+
MF, AF tracking(C-AF+TR)
* Improved the AF accuracy and tracking performance in C-AF, and the face detection and eye priority AF |
Single AF (S-AF), Continuous AF(C-AF), Manual Focus (MF), S-AF+MF, AF tracking(C-AF+TR) |
| ISO Sensitivity |
Auto: ISO LOW (approx. 100) - 25600
(Customizable, Default: ISO LOW - 6400)
Manual: LOW, ISO200 - 25600 |
| Shutter Speed |
60 - 1/4000 sec.
Bulb / Time shooting: 30 min. maximum (Default setting: 8 min.) |
| Sequential Shooting |
Approx. 8.7 fps
(in Sequential Shooting H mode)
Approx. 5.0 fps
(in Sequential Shooting L mode)
Approx. 15.0 fps
(in Silent Sequential Shooting H mode)
Approx. 6.3 fps
(in Silent Sequential Shooting L mode) |
Approx. 8.6 fps
(in Sequential Shooting H mode)
Approx. 4.8 fps
(in Sequential Shooting L mode) |
| Flash |
Built-in Flash (Hot Shoe available)
|
| Wireless RC Flash |
RC Flash system / Radio Wireless Flash Control (by using FC-WR or FL-700WR) |
RC Flash system (Available by updating the firmware) |
| Shooting modes selectable using the mode dial |
AUTO / SCN (Scene) / AP (Advanced Photo) / ART (Art Filter) / P (Program) / A (Aperture Priority) / S (Shutter Priority) / M (Manual) / Movie |
| SCN (Scene) modes |
22 modes
Portrait, e-Portrait, Portrait + Landscape, Portrait + Nightscape, Nightscape, Handheld Starlight, Fireworks, Light Trails, Children, Sport, Panning, Landscape, Sunset, Beach & Snow, Backlight HDR, Candlelight, Silent, Macro, Nature Macro, Documents, Multi Focus Shot, Panorama
|
21 modes
Portrait, e-Portrait, Portrait + Landscape, Portrait + Nightscape, Nightscape, Handheld Starlight, Fireworks, Light Trails, Children, Sport, Panning, Landscape, Sunset, Beach & Snow, Backlight HDR, Candlelight, Silent, Macro, Nature Macro, Documents, Multi Focus Shot |
| Shooting Option |
- Live Composite
- Live Time
- Multiple Exposure
- HDR shooting
- Silent shooting
- Panorama
- Keystone Compensation
- AE Bracketing
- Focus Bracketing
- Interval shooting
(Creating Time-lapse movie is available)
- Live Time / Live Bulb
* Multiple Exposure and Silent shooting are available in P / A / S / M mode. |
- Live Composite
- Live Time
- Multiple Exposure
- HDR shooting
- Silent shooting
- Panorama
- Keystone Compensation
- AE Bracketing
- Focus Bracketing
- Interval shooting
(Creating Time-lapse movie is available)
- Live Time / Live Bulb |
| Art Filters |
16 art filters
Pop Art*, Soft Focus*, Pale&Light Color, Light Tone, Grainy Film, Pin Hole, Diorama, Cross Process, Gentle Sepia, Dramatic Tone, Key Line, Watercolor, Vintage, Partial Color, Bleach Bypass, Instant Film
* Art Filter Fine Tune is available in Pop Art (Pop Art I only) and Soft Focus. |
15 art filters
Pop Art, Soft Focus, Pale&Light Color, Light Tone, Grainy Film, Pin Hole, Diorama, Cross Process, Gentle Sepia, Dramatic Tone, Key Line, Watercolor, Vintage, Partial Color, Bleach Bypass |
| Movie |
MOV (MPEG-4AVC/H.264) |
| 4K movie |
Compatible |
| Movie Effect |
Not available |
One Shot Echo, Multi Echo, Art Fade, Old Film, Movie Tele-converter |
| Movie Edit |
- Trimming movies (You can choose whether the section to be deleted begins with the first frame or ends with the last frame.)
- Saving a selected frame as a still image (only for 4K movies) |
| Level GaugeI |
2-axis |
| Built-in Wi-Fi |
- Wireless Shooting
(Remote control shooting by smartphone)
- Image Share
(Orders for image upload onto a Smartphone can be saved)
- Easy Connection
(Connect using a QR code)
- GPS Info Function
(by using Smartphone GPS data / OI. Track) |
| Bluetooth Functions |
Available |
Not available |
| Connector |
- USB microB connector
- HDMI Micro Connector (TypeD) |
| Menu Language |
34 languages, including Japanese and English |
| Battery |
BLS-50 (bundled) |
| Number of Storable Shots |
Approx. 360 shots
(When using the BLS-50 battery and Toshiba EXCERIA™ UHS-I SDHC card (Type1, 32GB))
|
Approx. 330 shots
(When using the BLS-50 battery and Toshiba EXCERIA™ UHS-I SDHC card (Type1, 32GB)) |
| USB Charging |
Built-in battery can be charged with USB
(by using the bundled USB-AC adapter) |
Not available |
| Dust-proof, Splash-proof |
Not available |
| Weight |
- Approx. 383g
(including battery and card, excluding eye cup)
- Approx. 335g
(body only) |
- Approx. 410g
(including battery and card, excluding eye cup)
- Approx. 362g
(body only) |
Dimensions
(Excluding Protrusions) |
121.7mm (W) x 84.6mm (H) x 49mm (D) / 4.8" (W) x 3.3" (H) x 1.9" (D) |
121.5mm (W) x 83.6mm (H) x 49.5mm (D) / 4.8" (W) x 3.3" (H) x 1.9" (D) |
| Color |
Silver, Black |
| Release Date |
September 2020 |
September 2017 |
Question :
What additional items are packaged with the camera?
Answer:
The following items are packaged with the camera:
- - Body Cap (*)
- - Eyecup EP-15 (*)
- - Hot Shoe Cover (*)
- - Lithium-ion Rechargeable Battery BLS-50
- - USB-AC Adapter F-5AC
- - USB cable CB-USB12 (micro USB connector)
- - Strap
- - Instruction Manual
- - Warranty Card
* The body cap, eyecup and hot shoe cover is attached to the camera.
Image editing and management software Olympus Workspace:
The Olympus Workspace software CD-ROM is not packaged with the E-M10 Mark IV camera. The software is available to Olympus camera users via Internet as a free download. (The serial number of the camera is required.)
 How do I download the free Olympus Workspace software? How do I download the free Olympus Workspace software?
Question :
How can I charge the battery while in camera using the bundled USB-AC adapter?
Answer:
The battery in E-M10 Mark IV can be charged while in camera by using the bundled F-5AC USB-AC adapter and the USB cable. The battery is charged only when the camera power is off. It takes about four hours to fully charge the battery.
The USB-AC adapter cannot be used as a power source for taking images or playing the recorded images.

How to charge the battery with USB-AC adapter F-5AC
The following procedure explains how to charge the battery in the camera by using the USB-AC adapter F-5AC and the USB cable.
- Insert the BLS-50 battery into the camera and turn off the camera power.

- Connect the camera to the F-5AC USB-AC adapter using the bundled USB cable.

The CHARGE lamp lights during charging.
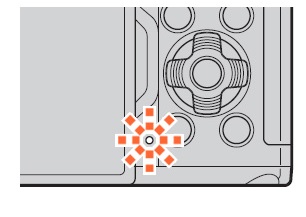
- The CHARGE lamp goes out when the battery reaches full charge. Charging stops when the camera is turned on.
Notes:
- ▪ The USB-AC adapter cannot be used to charge the battery when the camera is turned on.
- ▪ The CHARGE lamp blinks if there is an error in charging. Disconnect and reconnect the USB cable.
- ▪ USB charging is available when the battery temperature is between 0 and 40 ℃.
- ▪ Even if the camera is turned off, the battery cannot be charged if pictures are uploaded to a smartphone via Wi-Fi by background auto upload.
The BLS-50 battery can be charged using the separately sold BCS-5 Lithium-ion Battery Charger. Charging takes about 3 hours 30 minutes.
 |
Question :
What type of memory card can I use with this model?
Answer:
The following table shows the types of memory cards that can be used:
✔: compatible, ✕: not compatible
|
SD card |
SDHC card |
SDXC card |
Eye-Fi card |
| E-M10 Mark IV |
✔ |
✔ |
✔ |
✕ |
To see the list of compatible SD / SDHC/ SDXC cards, click here:
Compatibility table for SD / SDHC / SDXC Memory Cards
Note:
- Use a Speed Class 10 SD card for movie recording.
When shooting in 4K, use a Class 3 or faster UHS-II / UHS-I card.
- Cards must be formatted with the E-M10 Mark IV camera before first use.
Question :
Where can I find the instruction manual for my camera?
Answer:
You can find the manual online. You can either read it online or download the instruction manual for your camera.
See the following Web page to find the available manuals:
Download Manuals
Question :
What types of shooting modes are available from the mode dial?
Answer:
Available shooting modes from the mode dial are  (AUTO mode), (AUTO mode),  (AP, Advanced Photo mode), SCN (Scene mode), ART (Art Filter), P (Program mode), A (Aperture Priority mode), S (Shutter Priority mode), M (Manual mode) and (AP, Advanced Photo mode), SCN (Scene mode), ART (Art Filter), P (Program mode), A (Aperture Priority mode), S (Shutter Priority mode), M (Manual mode) and  (Movie mode). (Movie mode).
The shooting modes can be selected from the mode dial. You can select a sub mode on the monitor in AP mode, SCN mode and Movie mode.

Shooting Modes for E-M10 Mark IV
 AUTO mode AUTO mode
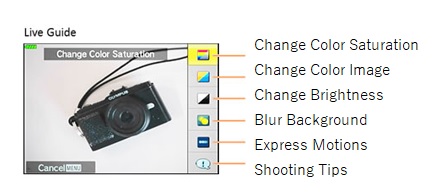
The camera automatically adjusts the settings best suited for the scene, which is convenient for beginners. Use the Live Guide to easily adjust color, brightness and background blurring.
Camera settings cannot be changed except some settings, because this is an automatic mode.
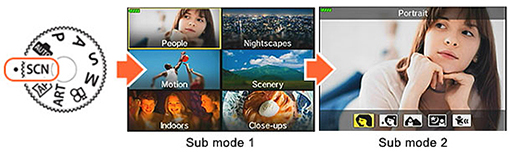
SCN (Scene mode)
This mode enables you to shoot in the appropriate settings by selecting a sub mode best suited to the subject or scene.
Select a general situation in sub mode 1, and then a more specific mode in sub mode 2. Camera settings are limited to maximize the effect of each Scene mode.
Refer to the following question for more information:
What kinds of SCN (Program shooting) modes are available?

Sub Mode 1
(Subject type)
|
Sub Mode 2 (Scene mode) |
| People |
Portrait, e-Portrait, Portrait + Landscape, Portrait + Nightscape, Children |
| Nightscapes |
Nightscape, Portrait + Nightscape, Handheld Starlight, Fireworks, Light Trails |
| Motion |
Sport, Children, Panning |
| Scenery |
Landscape, Sunset, Beach & Snow, Panorama, Backlight HDR |
| Indoors |
Candlelight, Silent, Portrait, e-Portrait, Children, Backlight HDR |
| Close-ups |
Macro, Nature Macro, Documents, Multi Focus Shot |
 AP mode (Advanced Photo mode) AP mode (Advanced Photo mode)
This mode enables you to take creative photos unique to D-SLR cameras.
Advanced shooting modes like Live Composite, Multiple Exposure and Live Time can be set with a simple operation.
While SCN modes such as Silent, Panorama and Light Trails achieve effects that are similar to the Live Composite in AP mode, more advanced settings are possible in AP mode than in SCN mode.
Refer to the following question for more information:
What kinds of AP modes are available?

| AP mode |
| Live Composite, Live Time, Multiple Exposure, HDR, Silent, Panorama, Keystone Compensation, AE Bracketing, Focus Bracketing |
Art Filter
You can take creative pictures using art filters. The effects of art filters can be checked on the live view monitor before shooting, so you can select a desired art filter by checking the effects.
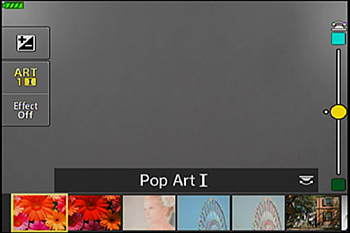
The following art filters are available:
| Art Filters |
| Pop Art, Soft Focus, Pale&Light Color, Light Tone, Grainy Film, Pin Hole, Diorama, Cross Process, Gentle Sepia, Dramatic Tone, Key Line, Watercolor, Vintage, Partial Color, Bleach Bypass, Instant Film |
Some art filters have altered versions of the original art filter. (e.g. Pop Art I/II, Pin Hole I/II/III) Color Filter and Monochrome Color options are available with some art filters.
In Pop Art I and Soft Focus, you can adjust the color filter by moving the slider on the monitor up and down.
P (Program mode)
The camera automatically adjusts the settings best suited for the scene. Camera menu settings such as white balance and exposure compensation can be changed.
Refer to the following question for more information:
What differentiates the AUTO mode from P (Program shooting) mode?
A (Aperture Priority mode)
When the aperture value (F-number) is set manually, the camera sets the appropriate shutter speed automatically.
If a smaller aperture (F-number) is set, the focus range becomes narrower. You will get pictures of a subject with out-of-focus background. If a larger aperture (F-number) is set, the focus range becomes wider. Both the subject and the background come into focus.
S (Shutter Priority mode)
When the shutter speed is set manually, the camera sets the appropriate aperture automatically.
A fast shutter speed can freeze a fast-moving action without blurring. A slow shutter speed will blur a fast-moving action. This blurring will give the impression of dynamic motion.
M (Manual mode)
Both the aperture and the shutter speed can be set manually. You can also set the BULB (Bulb photography), LIVE TIME (Time photography) or LIVECOMP (Live composite photography).
 (Movie mode) (Movie mode)
This mode enables you to create movies. In addition to standard movies, you can shoot 4K movies (in 4K mode) or slow motion movies (in High-speed mode).
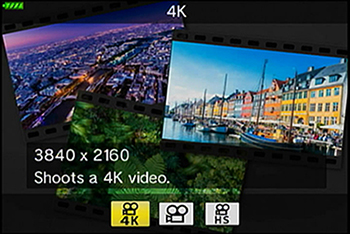
Movie modes
|
Description |
| 4K |
Shoot 4K movies. |
| Standard |
Shoot standard movies. |
| High-speed |
Record slow-motion movies. Sound is not recorded. |
Question :
Question:
What differentiates the AUTO mode from P (Program shooting) mode?
Answer:
The followings describes the differences:
In AUTO mode, the camera determines the appropriate settings for the shooting conditions and subjects.
The camera automatically sets to the best suited shooting mode such as Landscape, Portrait, Portrait + Nightscape or Macro. AUTO mode is convenient for beginners.
Camera settings cannot be changed, except some menu options, because this is a fully automatic mode. Use the Live Guide to easily adjust color, brightness and background blurring.
P mode is for program shooting. The camera automatically sets the optimum aperture and shutter speed based on the lighting conditions. Shooting settings such as exposure compensation, white balance and sequential shooting can be changed.
After getting used to shooting with the camera using the AUTO mode, SCN mode or AP mode, we recommend you to use the P mode for changing to the desired settings manually.
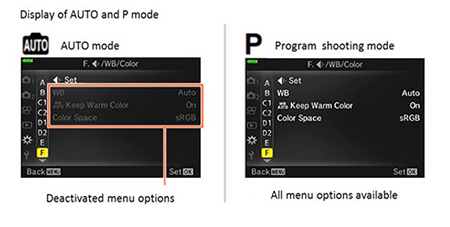
Notes:
In AUTO mode, the camera may not set to the desired shooting mode depending on the shooting condition.
Question :
What kinds of SCN (Scene) modes are available?
Answer:
In SCN (Scene) mode, you can shoot in an appropriate setting by selecting a subject or shooting scene.
Set the mode dial to SCN, and then select a sub mode from 22 modes.
When the mode dial is already set to SCN (Scene) mode, press the  button to select other sub modes. button to select other sub modes.
Available SCN (Scene) modes:
People |

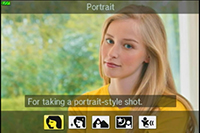
Portrait |
Suitable for portrait shooting.
Brings out skin texture. |

e-Portrait |
Smooths out skin tones and texture. The camera records two pictures: one with the effect applied and one without. |

Portrait + Landscape |
Suitable for portraits with a landscape in the background.
Blues, greens, and skin tones are captured beautifully. |

Portrait + Nightscape |
Suitable for portrait shooting against a background of night view. Raise the flash manually.
The use of a tripod and remote control via OI.Share is recommended. |

Children |
Suitable for photographs of children or other active subjects. |
Nightscapes |

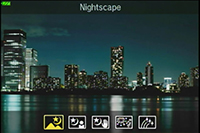
Nightscape |
Suitable for shooting of night scenes using a tripod to hold the camera steady. The camera uses a slower shutter speed than normal. The use of a tripod and remote control via OI.Share is recommended. |
Portrait + Nightscape |
Suitable for portrait shooting against a background of night view. Raise the flash manually.
The use of a tripod and remote control via OI.Share is recommended. |

Handheld Starlight |
Suitable for shooting night scenes without using a tripod. Reduces blur when shooting low light/illuminated scenes.
The camera makes eight exposures and combines them into a single photograph. |

Fireworks |
Suitable for shooting fireworks at night.
The camera uses a slower shutter speed than normal.
The use of a tripod and remote control via OI.Share is recommended. |

Light Trails |
The camera automatically shoots multiple images, combines each bright areas, and composites them into a single image.
With normal long exposure, an image of light trace such as star trails with bright buildings tends to get too bright. Using Light Trails mode, you can capture such images without over exposure while checking the progress on the monitor.
Press the shutter button to start shooting. While the camera automatically shoots multiple images, you can view the changing result on the monitor. Press the shutter button again to end shooting once the desired result is achieved (maximum 3 hours).
The use of a tripod and remote control via OI.Share is recommended.
Advanced settings is available via live composite photography (dark and light field composite) in M mode. |
Motion |

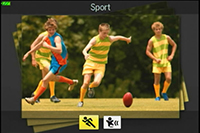
Sport |
Suitable for fast action shooting. The camera will take photos while the shutter button is pressed. |
Children |
Suitable for photographs of children or other active subjects. |

Panning |
Suitable for photographs of moving subjects with a blurred background. The camera chooses the optimal shutter speed for panning shots based on camera motion. |
Scenery |

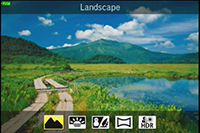
Landscape |
Suitable for landscape shooting. |

Sunset |
Suitable for shooting the sunset. |

Beach & Snow |
Suitable for shooting at snow-capped mountains, seascapes in the sun, and other whitish scenes. |

Panorama |
Take panoramic photos with a wider angle of view than that of normal shots.
Press the shutter button, and then pan the camera slowly in the direction indicated by the arrow in the display. |

Backlight HDR |
Suitable for contrasting scenes. This mode captures multiple images and merges them into one properly exposed image. |
Indoors
| 
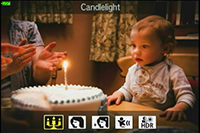
Candlelight |
Suitable for shots of candlelit scenes. Warm colors are preserved. |

Silent [ ♥ ] |
Disable camera sounds and lights in situations in which they may be unwelcome. |
Portrait |
Suitable for portrait shooting.
Brings out skin texture. |
e-Portrait |
Smooths out skin tones and texture. The camera records two pictures: one with the effect applied and one without. |
Children |
Suitable for photographs of children or other active subjects. |
Backlight HDR |
Suitable for contrasting scenes. This mode captures multiple images and merges them into one properly exposed image. |
Close-ups
| 
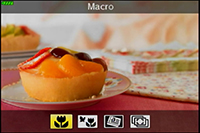
Macro |
Suitable for close-ups. |

Nature Macro |
Suitable for vivid close-ups of flowers or insects. |

Documents |
Suitable for photos of timetables or other documents.
The camera heightens the contrast between the letters and background. |

Multi Focus Shot |
The camera takes up to eight images at once at different focus positions. |
Notes:
- To maximize the effect of the scene modes, some settings for shooting function are disabled.
- Recording pictures taken with e-Portrait may take time. When the image quality mode is RAW, the image is recorded in RAW+JPEG.
- Movies cannot be recorded in e-Portrait, Handheld Starlight, Panorama or Backlight HDR.
- When RAW is selected in Handheld Starlight, a JPEG image that is combined with the first frame recorded as a RAW image is recorded in RAW+JPEG.
- Backlight HDR records HDR-processed images in JPEG format. When the image quality mode is set to RAW, the image is recorded in RAW+JPEG.
- In Panning,
 is displayed during panning detection, and is displayed during panning detection, and  is displayed when panning is not detected. is displayed when panning is not detected.
- When using a lens with an image stabilizer switch in Panning, turn the image stabilizer switch off. Sufficient panning effects may not be obtained in bright conditions. Use a commercially available ND filter to obtain effects more easily.
Question :
What kinds of AP modes are available?
Answer:
AP (Advanced Photo) mode enables you to shoot in advanced settings like Live Composite and Multiple Exposure with a simple operation.

While SCN modes such as Silent, Panorama and Light Trails achieve effects that are similar to the Live Composite in AP mode, more advanced settings are possible in AP mode than in SCN mode.
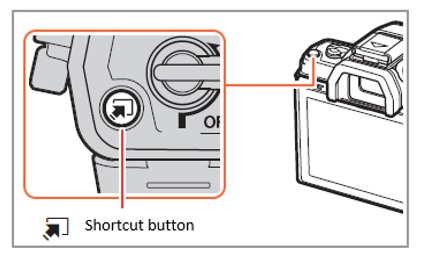
When the mode dial is already set to AP mode, press the (Shortcut) button to select other modes.
Notes:
In order to maximize the effect of each mode, some of the function settings are disabled.
Available SCN (Scene) modes:
| AP mode |
Description |
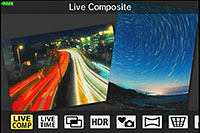
Live Composite |
For recording light trails of stars and other objects while keeping the overall exposure constant. The results of each moment can be checked on the monitor while shooting.
Picture mode and White Balance can be changed, which is not possible in the SCN mode Light Trails.
- It is recommended to stabilize the camera using a tripod to prevent camera shake and to shoot with remote control using the wireless remote mode via OI.Share.
- The maximum recording time for one file is approximately 3 hours.
- Advanced settings can be configured via Live Composite (LIVECOMP.) in M mode.
|

Live Time |
For recording pictures in long time exposures without pressing the shutter button. The results of each moment can be checked on the monitor while shooting. The recording stops when you press the shutter button again or when the set time has elapsed.
- It is recommended to stabilize the camera using a tripod to prevent camera shake and to shoot with remote control using the wireless remote mode via OI.Share.
- Advanced settings can be configured via BULB / TIME in M mode.
|

Multiple Exposure |
Combines two different images into a single shot.
After taking the first image by depressing the shutter button, the first image is displayed translucently on the monitor, so the second shot can be composed using the first image as a guide.
Advanced settings can be configured via Multiple Exposure in P / A / S / M mode. |
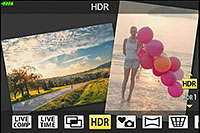
HDR |
Captures details in both bright highlights and deep shadow areas. A series of four shots with different exposure are captured and combined into a single image.
- Noise may be noticeable when taking photos in conditions where the shutter speed becomes slow.
- For best results, stabilize the camera using a tripod.
|
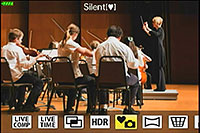
Silent  |
Disables camera sounds and lights in situations in which they may be unwelcome. Electronic shutter is enabled in this mode.
- Note that due to the electronic shutter, the desired results may not be achieved under flickering light sources such as fluorescent or LED lamps or if the subject moves abruptly during shooting. The subject may appear to be distorted in photographs if camera moves quickly during shooting or when shooting fast-moving subjects.
- Advanced settings can be configured via Silent in P / A / S / M / ART mode.
|
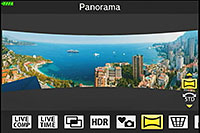
Panorama |
Takes a series of shots that are joined together to create a wide-angle photo (Panorama photo) only by following an on-screen guide. Choose from two angles of view: a wider angle than normal shots (  ), or an even wider angle ( ), or an even wider angle (  ). ).
• Shooting may be cancelled and an error displayed if:
the camera is panned too slowly or too quickly / the camera is panned diagonally / the camera is panned in the opposite direction to the arrow in the display / the lens is zoomed in or out / panning does not start within a set period |
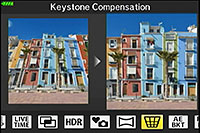
Keystone Compensation |
Correct the effects of perspective in photos of buildings or landscapes.
You can correct the image using the control dial (Up, Down, Right, Left button) while looking at the image on the monitor. |

AE Bracketing |
Each time the shutter button is pressed, the camera takes a series of photos, varying exposure with each frame.
3 or 5 frames are taken once the shutter button is depressed.
- 3f (3 frames):
Takes 3 frames. The first at ±0.0 EV (optimal exposure), the second at -1.0 EV and the third at +1.0 EV.
- 5f (5 frames):
Takes 5 frames. The first at ±0.0 EV (optimal exposure), the second at -1.3 EV, the third at -0.7 EV, the fourth at +0.7 EV and the fifth at +1.3 EV.
|

Focus Bracketing |
Each time the shutter button is pressed, the camera takes a series of eight photos, varying the focus distance with each shot. The camera takes pictures at the focus distance that is secured by pressing the shutter button halfway down, and at slightly different points shifting the focus from the foreground to the background.
You can choose the amount of focus distance changes from two modes:
 (changes by a large amount) and (changes by a large amount) and  (changes by a small amount). (changes by a small amount). |
|
|


