The following table describes the differences between the E-M1 MarkIII and E-M1 Mark II (Ver. 3.2):
|
 |
 |
| Type |
| Lens Mount |
Micro Four Thirds |
| Image Sensor |
| Image Processor |
TruePic IX |
TruePic VIII |
| Effective Pixels |
20.37 million pixels |
| Sensor Type |
4/3 Live MOS Sensor |
| Memory |
| Number of Card Slots |
2 card slots |
| Memory |
SD cards (SDHC, SDXC, UHS-I / II compatible), Eye-Fi card
* Card slot 1: UHS-I / II compatible, Card slot 2: UHS-I compatible |
| Image Stabilization |
| System Type |
Built-in image stabilization
(5-axis sensor- shift) |
| Stabilization Performance |
7.5 EV
When using M.ZUIKO DIGITAL ED 12-100mm F4.0 IS PRO
focal length = 100mm (35mm equivalent: 200mm),
with camera body halfway release IS set to OFF and frame rate to High
7.0 EV
When using M.ZUIKO DIGITAL ED 12-40mm F2.8 PRO
focal length = 40mm (35mm equivalent: 80mm) |
6.5 EV
When using M.ZUIKO DIGITAL ED 12-100mm F4.0 IS PRO
focal length = 100mm (35mm equivalent: 200mm),
with camera body halfway release IS set to OFF
5.5 EV
When using M.ZUIKO DIGITAL ED 12-40mm F2.8 PRO
focal length = 40mm (35mm equivalent: 80mm) |
| Viewfinder |
| Finder Type |
Built-in Eye-level electronic viewfinder, approx. 2.36 million dots |
Field of View / Viewfinder Magnification
* with a 50mm lens set to infinity at -1m-1 |
Field of View: Approx. 100 % /
Magnification:
Approx. 1.30x (in Finder Style 1, 2 (aspect ratio 4:3))
Approx. 1.48x (in Finder Style 3 (aspect ratio 4:3)) |
| Frame Rate / Time Lag |
Maximum frame rate: 120 fps / Minimum display time lag: 5 msec |
| Monitor |
| Monitor |
3.0 inches, 2-axis movable LCD, Approx. 1,040,000 dots (3:2)
Electric capacity touch panel |
| Focusing |
| AF System |
High-speed imager AF
* Imager phase detection AF and imager contrast AF used in combination
* When a Four Thirds lens is attached, imager phase detection AF is always enabled.*1
(*1 A separately sold mount adapter is required. AF is not possible when movie recording.) |
| AF Area |
121 points (maximum)
All target (121 points)
Group target (25 points, 9 points, 5 points)
Single target
Small target
Custom target (4 types)
AF area and its increment steps selectable at vertical and horizontal position |
121 points (maximum)
All target (121 points)
Group target ( 25 points*, 9 points, 5 points)
Single target
Small target*
* Group 25-point and Small target are added if firmware is updated. |
| Focus Modes |
Single AF (S-AF),
Continuous AF (C-AF),
Manual Focus (MF),
AF tracking (C-AF+TR),
Preset MF (only AF lenses can be used),
Starry sky AF (S-AF, S-AF+MF) |
Single AF (S-AF),
Continuous AF (C-AF),
Manual Focus (MF),
AF tracking (C-AF+TR),
Preset MF (only AF lenses can be used) |
| AF via AEL/AFL button |
Available in default setting |
Available after customizing |
| Combined use of AF and MF |
Available in S-AF, C-AF(*) and C-AF+TR(*)
* only with M.ZUIKO PRO lenses |
Available in S-AF |
| AF target selection |
Arrow pad button, AF target pad, Multi Selector |
Arrow pad button, AF target pad |
| Eye Detection / Face Detection AF |
Available
Detection performance and accuracy has been enhanced. |
Available |
| ISO Sensitivity / Shutter |
| ISO Sensitivity / Shutter |
Auto: ISO LOW ( equivalent to approx. 64) - 6400
(Auto Standard: ISO 200 - 6400, customizable)
Manual: LOW (equivalent to approx. 64, approx. 100), ISO 200 - 25600 |
Auto: ISO LOW (equivalent to approx. 64) - 6400
(Auto Standard: ISO 200 - 6400, customizable)
Manual: LOW (equivalent to approx. 64, approx. 100*), ISO 200 - 25600
(* Equivalent to approx. 100 is added by firmware version 3.0.) |
| Shutter Speed |
60 sec. - 1/8000
Electronic Shutter (in Silent Mode):
60 sec. - 1/32000 sec. |
| Drive |
| Sequential Shooting Speed |
[Sequential shooting H] Approx. 15 fps, [Sequential shooting L] Approx. 10 fps,
[Silent sequential shooting H] Approx. 60 fps, [Silent sequential shooting L] Approx. 18 fps |
| Max Recordable Pictures in Sequential |
[Sequential shooting H 15 fps]
RAW: Approx. 101 frames, JPEG (LF): Approx. 134 frames
[Sequential shooting L 10 fps]
RAW: Approx. 286 frames, JPEG (LF): Until card is full
[Silent sequential shooting H 60 fps]
RAW: Approx. 50 frames, JPEG (LF): Approx. 50 frames
[Silent sequential shooting L 18 fps]
RAW: Approx. 76 frames, JPEG (LF): Approx. 90 frames |
[Sequential shooting H 15 fps]
RAW: Approx. 102 frames, JPEG (LF): Approx. 134 frames
[Sequential shooting L 10 fps]
RAW: Approx. 321 frames, JPEG (LN): Until card is full
[Silent sequential shooting H 60 fps]
RAW: Approx. 50 frames, JPEG (LN): Approx. 51 frames
[Silent sequential shooting L 18 fps]
RAW: Approx. 77 frames, JPEG (LN): Approx. 91 frames |
| Flash |
| Flash Attachment |
Hot shoe, sync terminal |
| Bundled Flash |
Not available |
FL-LM3 |
| Wireless Flash Control |
Radio wireless control, RC Flash system |
RC Flash system |
| Shooting Features |
| Shooting Modes on the Mode Dial |
P (Program AE), A (Aperture Priority AE), S (Shutter Priority AE), M (Manual), B (Bulb, Time, Live composite), C1, C2, C3, C4, Movie
|
P, A, S, M, C1, C2, C3, Movie, ART (art filter), iAUTO |
| Picture Mode |
i-Enhance, Vivid, Natural, Muted, Portrait, Monotone, Custom, e Portrait, Underwater, Color Creator, Art Filters |
| Art Filter |
16 art filters
Pop Art, Soft Focus, Pale&Light Color, Light Tone, Grainy Film, Pin Hole, Diorama, Cross Process, Gentle Sepia, Dramatic Tone, Key Line, Watercolor, Vintage, Partial Color, Bleach Bypass, Instant Film
Art filter variation and 11 art effects available |
15 art filters
Pop Art, Soft Focus, Pale&Light Color, Light Tone, Grainy Film, Pin Hole, Diorama, Cross Process, Gentle Sepia, Dramatic Tone, Key Line, Watercolor, Vintage, Partial Color, Bleach Bypass* (*Bleach Bypass is added by firmware version 2.0)
Art filter variation and 9 art effects available |
High Res Shot
(Tripod) |
- Resolution: Equivalent to 80M / 50M / 25M pixel
- Image Size:
[JPEG 80M] 10368 x 7776 pixel
[JPEG 50M] 8160 x 6120 pixel
[JPEG 25M] 5760 x 4320 pixel
[RAW] 10368 x 7776 pixel
|
- Resolution: Equivalent to 50M / 25M
- Image Size:
[JPEG 50M] 8160 x 6120 pixel
[JPEG 25M] 5760 x 4320 pixel
[RAW] 10368 x 7776 pixel
|
High Res Shot
(Handheld) |
- Resolution: Equivalent to 50M / 25M pixel
- Image Size:
[JPEG 50M] 8160 x 6120 pixel
[JPEG 25M] 5760 x 4320 pixel
[RAW] 8160 x 6120 pixel
Flash cannot be used
|
Not available |
| Max Recording Time for Live Composite |
6 hours
(The maximum recording time is selectable. The default setting is 3 hours.) |
3 hours |
| Interval Shooting |
up to 9,999 frames |
up to 999 frames |
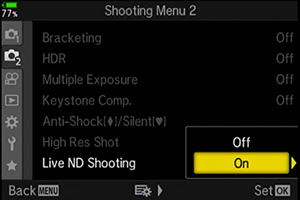
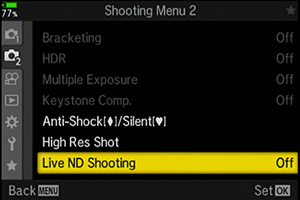
| Live ND |
Available
(ND2 / ND4 / ND8 / ND16 / ND32) |
Not available |
| Anti-Flicker Shooting |
Available |
Available
(Anti-Flicker Shooting is added by firmware version 3.0) |
| Focus Stacking Mode |
Compatible with 9 lenses
3 to 15 shots are taken at different focus points and automatically composited together into a single image. |
Compatible with 9 lenses
3 to 15 shots are taken at different focus points and automatically composited together into a single image.
(The number of compatible lenses and shots are added by updating the firmware.) |
| Multiple Exposure |
2 frames max. |
| Video |
| Video Recording Format |
MOV (MPEG-4AVC/H.264) |
MOV (MPEG-4AVC/H.264)
AVI (Motion JPEG) |
| 4K Video |
C4K [Cinema4K] (4096 x 2160)
4K (3840 x 2160) |
| HD Video |
Full HD (1920 x 1080) |
| Movie Picture Mode |
2 modes (Flat / OM-Log400)
View assist compatible |
2 modes (Flat / OM-Log400*)
(* Movie Picture Mode is added by firmware version 3.0) |
| High Speed Movie |
Available
(Full HD 120fps) |
Not available |
| Level Gauge |
| Detection |
2-axis |
| Camera Controls |
| Camera Control by PC |
- Via Wi-Fi
(Transfer of recorded images to PC via access point)
- Via USB cable
(Camera can be operated by both PC or camera controls)
|
- Via USB cable
(Camera can be operated by both PC or camera controls)
|
| Smartphone Link |
Smartphone Link
(Built-in Wi-Fi, when using OI.Share / OI.Track) |
- Wireless Shooting
(Remote control shooting by smartphone)
- Image Share
(Orders for image upload onto a Smartphone can be saved)
- Easy Connection
(Connect using a QR code)
- GPS Info Function
(by using Smartphone GPS data / OI. Track)
- Download pictures while the camera is off
- Backup function for camera settings
- Firmware updating function
|
- Wireless Shooting
- Image Share
- Easy Connection
- GPS Info Function
|
| Menu Language |
| Language Setting |
34 languages (including Japanese and English) |
| My Menu |
| Number of My Menu Items |
35 items (in 5 tabs with 7 items each) |
Not available |
| Backup Function |
| Save Camera Settings |
Available
using Olympus Workspace (computer software) or
OI. Share (smartphone application) |
Available
using Olympus Workspace (computer software) |
| Input / Output |
| Live View Shooting on a Computer |
Available
using OLYMPUS Capture |
| HDMI Output Mode |
Available
(Monitor Mode / Record Mode) |
| HDMI Connector |
HDMI Micro Connector (Type D) |
| USB Connector |
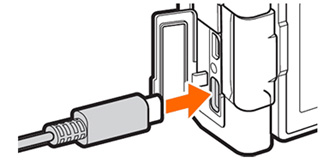
CB-USB11
(USB Type-C / USB3.0) |
| Wireless LAN |
IEEE 802.11a/b/g/n/ac |
IEEE 802.11b/g/n |
| Bluetooth |
Bluetooth Ver.4.2 BLE |
Not available |
| Remote Connector |
RM-CB2 (L type Pin Jack) |
| Headphone Connector |
Available |
| Power Requirements |
| Number of Recordable Pictures |
- Approx. 420 shots
(based on CIPA standard)
- Approx. 900 shots
(When power saving is enabled, based on CIPA standard)
|
- Approx. 440 shots
(based on CIPA standard)
- Approx. 950 shots
(When power saving is enabled, based on CIPA standard)
|
| Battery Life for Movie Recording |
- Under standard JEITA testing: 85 min.
- When zoom and other operational functions are not used: 140 min.
(using a fully charged battery, when repeatedly recording at the maximum time of 29 min.)
|
- Under standard JEITA testing: 90 min.
- When zoom and other operational function are not used: 150 min.
(using a fully charged battery, when repeatedly recording at the maximum time of 29 min.)
|
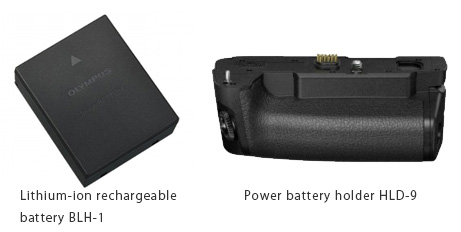
| Battery |
One Lithium-ion rechargeable battery BLH-1 |
| Battery Charger |
BCH-1 (Charging takes about 2 hours) |
| Internal Charging |
Available
(When the camera power is off, battery is charged with USB-AC adapter) |
Not available |
| USB Charging |
USB PD can be used
(PD compliant camera: Rev 3.0 Ver1.0a, include battery into the camera)
|
Not available |
| Body |
Dimensions
(Excluding Protrusions) |
134.1 mm (W) x 90.9 mm (H) x 68.9 mm (D) / 5.3" (W) x 3.6" (H) x 2.7" (D) |
| Weight |
- Approx. 580g (including battery and SD card)
- Approx. 504g (Body only)
|
- Approx. 574g (including battery and SD card)
- Approx. 498g (Body only)
|
| Color |
Black |
Black, Silver (Silver was released in February 2019) |
| Material |
Magnesium alloy |
| Vertical Grip |
HLD-9 (sold separately) |
| Dust-proof, Splash-proof |
Available |
| Underwater Housing (Sold separately) |
Not available |
PT-EP14 (sold separately) |
| Other |
| Release Date |
February 2020 |
December 2016 |


 Release/
  /Image Stabilizer on the E-M1 MarkIII is a function regarding other manufacturers' Micro Four Thirds lenses with image stabilizer function. This Lens I.S. Priority function does not affect the operations when using a lens with 5-axis Sync image stabilizer.


 (All Targets) and AF Mode to C-AF.
  Custom Menu
  AF/MF, select AF Area Pointer. Select On2 and press the [OK] button.

 D4. Disp /
  / PC and then HDMI. You can select a desired signal type in Output Size.
  HDMI Output, the signal will be output at the current movie frame size. The images are not displayed if the TV does not support the selected frame size.