|
 |
|
|
Questions :
See the following Web page for general questions and answers for OLYMPUS OM-D and OLYMPUS PEN series cameras :
Question :
What differentiates the E-P5 from the E-P3?
Answer:
The following table describes the differences:
|
 |
 |
| Effective Pixels |
16.05 million pixels |
12.3 million pixels |
| Image Processing |
TruePic VI |
| Sensor Type |
4/3 High-speed Live MOS Sensor |
| ISO sensitivity |
Auto: ISO LOW (approx. 100) - 25600
( Customizable, Default: LOW - 1600 )
Manual: LOW, ISO 200 - 25600 |
Auto: ISO 200 - 12800
( Customizable, Default: ISO 200 - 1600 )
Manual: ISO 200 - 12800 |
| Built-in Flash |
Available |
Accessory Port
( AP2 ) |
Available |
| Monitor |
3.0 inches / 3:2
Approx. 1,040,000 dots
TFT color LCD
Touch Panel, adjustable |
3.0 inches / 3:2
Approx. 610,000 dots
Organic El Touch Panel
|
| Grip |
Available
( Not removable ) |
MCG-1
( bundled, removable ) |
| Control Dial |
2 dials
( The modes can be switched with the Fn lever. ) |
2 dials |
| AF Area |
35 points |
Image Stabilizer
( Still Pictures ) |
4 modes
Auto, Vertical IS,
Horizontal IS, Landscape Panning I.S. |
3 modes
Auto, Vertical IS, Horizontal IS |
Image Stabilizer
( Movie ) |
Movie-I.S. |
Not available |
| Sequential Shooting Speed |
Approx. 9 fps
( Sequential shooting H mode, when image stabilizer is Off ) |
Approx. 3 fps |
| Shutter Speed |
60 - 1/8000 sec. |
60 - 1/4000 sec. |
| Release Lag-Time |
Normal or Short can be selected. |
Not available |
| Interval Shooting |
Available
Interval time: 1 sec. - 24 hours,
Number of storable pictures: 99 frames max. |
Not available |
Time-Lapse Movie
( Interval Movie ) |
Available
AVI Motion JPEG, 1280 x 720, 10fps |
Not available |
| Focus Mode |
Single AF (S-AF), Continuous AF (C-AF), Manual Focus (MF),
S-AF+MF (S-AF and MF combined), AF tracking (C-AF + TR) |
| Advance AF |
Available |
| Multi Exposure |
2 frames max. |
| Level Gauge |
Available |
| Picture Mode |
i-Enhance, Vivid, Natural, Muted,
Portrait, Monotone, Custom, Art filters |
| Art Filter |
12 Art Filters
- Pop Art
- Soft Focus
- Pale&Light Color
- Light Tone
- Grainy Film
- Pin Hole
- Diorama
- Cross Process
- Gentle Sepia
- Dramatic Tone
- Key Line
- Watercolor
Art filter variation and 7 art effects available |
10 Art Filters
- Pop Art
- Soft Focus
- Pale&Light Color
- Light Tone
- Grainy Film
- Pin Hole
- Diorama
- Cross Process
- Gentle Sepia
- Dramatic Tone
Art filter variation and 5 art effects available |
| Photo Story |
Available |
Not available |
| Movie Recording |
MPEG-4 AVC/H.264,
AVI ( Motion JPEG ),
( 30fps ) |
AVCHD,
AVI ( Motion JPEG ),
( 30fps ) |
| Movie Effect |
Multi-echo
One-shot echo
Art fade
Movie Tele-converter ( 4x ) |
Not available |
| Menu Languages |
34 languages including Japanese and English |
| Memory |
SD / SDHC / SDXC cards ( UHS-I compatible ),Eye-Fi card |
| Built-in Wi-Fi |
Available
- GPS info. Function
( by using Smartphone GPS data )
- Wireless Shooting
( by using Smartphone or remote control function )
- Image Share
( Orders for image upload onto a Smartphone can be saved. )
- Easy Connection
( QR code setting )
|
Not available |
| Number of recordable pictures with full battery charge |
Approx. 400 shots |
Approx. 330 shots |
Underwater Housing
(Sold Separately) |
Not available |
| HDMI output connector |
HDMI Micro Connector ( Type D ) |
HDMI Mini Connector ( Type C ) |
| Battery |
BLN-1 |
BLS-1 or BLS-5 |
Power Battery Holder
( Sold Separately ) |
Not available |
Dimensions
( Excluding Protrusions ) |
122.3 mm (W) x 68.9 mm (H) x 37.2 mm (D) / 4.8" (W) x 2.7" (H) x 1.5" (D) |
122.0 mm (W) x 69.1 mm (H) x 34.3 mm (D) / 4.8" (W) x 2.7" (H) x 1.4" (D) |
| Color |
Silver, Black, White |
Software
( Packaged with the Camera ) |
OLYMPUS Viewer 3 |
OLYMPUS Viewer 2 |
Weight
( Battery and Media Card Included ) |
Approx. 420g |
Approx. 369g |
| Release Date |
June 2013 |
July 2011 |
Question :
What other items come packaged with the camera?
Answer:
The following items are packaged with the camera:
| - |
E-P5 Camera |
| - |
Lithium-ion Rechargeable Battery ( BLN-1 ) |
| - |
Lithium-ion Battery Charger ( BCN-1 ) |
| - |
USB Cable ( CB-USB6 ) |
| - |
Body Cap |
| - |
Strap |
| - |
Olympus Setup CD-ROM: |
|
OLYMPUS Viewer 3 software ( Windows / Mac ) |
| - |
Instruction Manual |
| - |
Warranty Card |
Question :
What are the compression rates and size of the image files in each recording mode?
Answer:
The following tables show the approximate values:
【 Still Pictures 】
The following table shows the approximate values when shooting still pictures in the 4:3 aspect ratio.
| Recording Mode |
Number of Pixels |
Compression Rate |
File Format |
File Size
(Approx.) |
Number of Storable Pictures |
1GB
SD / SDHC / SDXC Card |
| RAW |
4608 x 3456 |
Lossless Compression |
ORF |
17.0 MB |
41 |
L
(Large) |
SF
(Super Fine) |
1/2.7 |
JPEG |
11.0 MB |
79 |
F
(Fine) |
1/4 |
7.5 MB |
114 |
N
(Normal) |
1/8 |
3.5 MB |
248 |
B
(Basic) |
1/12 |
2.4 MB |
369 |
M
(Middle) |
SF |
3200 x 2400 |
1/2.7 |
5.6 MB |
155 |
| F |
1/4 |
3.4 MB |
257 |
| N |
1/8 |
1.7 MB |
508 |
| B |
1/12 |
1.2 MB |
753 |
| SF |
2560 x 1920 |
1/2.7 |
3.2 MB |
271 |
| F |
1/4 |
2.2 MB |
398 |
| N |
1/8 |
1.1 MB |
782 |
| B |
1/12 |
0.8 MB |
1,151 |
| SF |
1920 x 1440 |
1/2.7 |
1.8 MB |
476 |
| F |
1/4 |
1.3 MB |
701 |
| N |
1/8 |
0.7 MB |
1,356 |
| B |
1/12 |
0.5 MB |
1,968 |
| SF |
1600 x 1200 |
1/2.7 |
1.3 MB |
678 |
| F |
1/4 |
0.9 MB |
984 |
| N |
1/8 |
0.5 MB |
1,906 |
| B |
1/12 |
0.4 MB |
2,653 |
S
(Small) |
SF |
1280 x 960 |
1/2.7 |
0.9 MB |
1,034 |
| F |
1/4 |
0.6 MB |
1,488 |
| N |
1/8 |
0.4 MB |
2,773 |
| B |
1/12 |
0.3 MB |
3,813 |
| SF |
1024 x 768 |
1/2.7 |
0.6 MB |
1,564 |
| F |
1/4 |
0.4 MB |
2,260 |
| N |
1/8 |
0.3 MB |
4,068 |
| B |
1/12 |
0.2 MB |
5,547 |
| SF |
640 x 480 |
1/2.7 |
0.3 MB |
3,589 |
| F |
1/4 |
0.2 MB |
5,085 |
| N |
1/8 |
0.2 MB |
7,627 |
| B |
1/12 |
0.1 MB |
10,170 |
Note:
| - |
The same image ( Olympus' standard image ) is used to calculate the number of storable pictures and file size in each mode. |
| - |
The number of storable pictures depends on the image quality and the type of memory card. |
| - |
The number of storable pictures in this table differs from the number of remaining pictures displayed on the LCD. This table shows the approximate number, but the camera shows the maximum ( up to 9999 ). |
【 Movies 】
| Recording Mode |
Image Size |
Frame Rate (Frames per Second) |
Recording Format |
Recording Rate |
Maximum Recording Time (Approx.) |
| Full HD Fine |
1920 x 1080
(16:9) |
30p
(29.97 fps) |
MOV
(MPEG-4AVC/H.264)
*1 |
20Mbps |
22 min. |
| Full HD Normal |
17Mbps |
29 min. |
| HD Fine |
1280 x 720
(16:9) |
30p
(29.97 fps) |
13Mbps |
29 min. |
| HD Normal |
10Mbps |
29 min. |
| HD |
1280 x 720
(16:9) |
30fps *2 |
AVI
(Motion JPG)
*3 |
- |
7 min. *4 |
| SD |
640 x 480
(4:3) |
- |
14 min. *4 |
| *1 |
The maximum file size of a movie is 22 min. ( in Full HD Fine mode ) or 29 min. ( in Full HD Normal or HD mode ). |
| *2 |
When shooting movies with an Art Filter, the frame rate varies based on the selected filter. |
| *3 |
The maximum file size of a movie is 7 min. ( in HD mode ) or 14 min. ( in SD mode ). |
| *4 |
Excluding when shooting in some art filters. |
Question :
Can I use an external flash and the optional optical viewfinder VF-1 or optional electronic viewfinder VF-2 / VF-3 / VF-4 at the same time?
Answer:
No. In order to use any of these optional viewfinders with the E-P5, it must be attached to the camera's hot shoe.
Because the E-P5 has only one hot shoe, the VF-1 or VF-2 / VF-3 / VF-4 and an external flash cannot be used simultaneously.
When shooting with an external flash, view your subject on the Live View LCD monitor. The only exception to this is if you are using an Olympus RC flash, in the RC mode, using a flash bracket or off camera flash.
Question :
How do I set the Digital Tele-converter function?
Answer:
You can use the Digital Tele-converter function by assigning the function [ Fn ] button or movie [ ] button after setting it On in the setting menu. ] button after setting it On in the setting menu.
The following procedure explains how to enable the Digital Tele-converter function in the E-P5.
Setting the Digital Tele-converter to On:
- Press the [ MENU ] button. In
 ( Shooting Menu 1 ), select Digital Tele-converter and press the [ OK ] button. ( Shooting Menu 1 ), select Digital Tele-converter and press the [ OK ] button.
- Select On, and press the [ OK ] button.
- Make sure that the Digital Tele-converter is On.
Utilize the following procedure to set the button function.
On E-P5, the Digital Tele-converter function can be assigned to camera buttons such as the [ Fn ] and [ ( movie ) ] buttons.
The following procedure explains how to assign Digital Tele-converter to the [ Fn ] function button.
Assigning the Digital Tele-converter to the [ Fn ] function button:
- In
 ( Custom Menu ), select ( Custom Menu ), select  ( Button / Dial / Lever ) and press the [ OK ] button. ( Button / Dial / Lever ) and press the [ OK ] button.

- Select Button Function and press the [ OK ] button.

- Select
 Function and press the arrow pad Right button. Function and press the arrow pad Right button.

- Select
 Digital Tele-converter using the arrow pad Up and Down button and press the [ OK ] button. Digital Tele-converter using the arrow pad Up and Down button and press the [ OK ] button.
- Make sure that the Function is set to ( Digital Tele-converter ).

- When you press the [ Fn ] button in shooting mode, the image on the monitor will be enlarged by 2x.
The image will be recorded as it is displayed on the monitor.
To cancel the zoom view on the monitor, press the [ Fn ] button again.
Note:
| - |
Digital Tele-converter is not available in PHOTO STORY, Multiple Exposure and when 3D photo, Panorama, Fisheye effect, Wide Angle and Macro is selected in SCN mode. |
| - |
In movie mode, the function is not available when Movie Effect is On. |
| - |
When a RAW photo is displayed in playback, the area that you displayed on the monitor using Digital Tele-converter is indicated by a frame. |
Question :
I scanned the bar code that is displayed on the E-P5 using the Easy Setup, but couldn't obtain a Wi-Fi connection. What should I do?
Answer:
If the Wi-Fi connection does not work after scanning the bar code on the E-P5 monitor with a smartphone using the OI.Share Easy Setup, confirm the Wi-Fi setting on your smartphone.
Your smartphone may already be connected to a different Wi-Fi network ( e.g. home LAN ) or Wi-Fi device. In the Wi-Fi setting of your smartphone, switch the network connection to the SSID ( network name ) that begins with " E-P5 ".
When the network connection is completed, you will see a check mark before the SSID in iOS or, in Android OS, you will see " Connected " below the SSID.
Note:
For more information on how to set the Wi-Fi setting, refer to the smartphone instruction manual.
Question :
I hear a slight humming noise when I press the shutter button halfway. What is this sound?
Answer:
The sound being produced when you press the shutter button halfway is the operating sound of the 5-axis image stabilizer unit. In the default setting, the image stabilizer will activate when you press the shutter button halfway.
To turn off this image stabilizer, follow the procedure below:
- Press the [ MENU ] button.
- In ( Custom Menu ), select
 Release Release  and press the [ OK ] button. and press the [ OK ] button.
- Select Half Way RIs With IS and press the [ OK ] button.
- Select Off and press the [ OK ] button.
Question :
What kind of image stabilization functions are available for this camera?
Answer:
The following table describes the available image stabilizer functions:
The default image stabilizer setting is S-IS AUTO in still picture shooting and M-IS ON in movie shooting.
Still Picture
( Default setting: S-IS) |
OFF |
IS Off |
Image stabilizer is off. |
| S-IS 1 |
Auto |
Image stabilizer is on. |
| S-IS 2 |
Vertical IS |
Image stabilization applies only to vertical (  ) camera shake ) camera shake |
| S-IS 3 |
Horizontal IS |
Image stabilization applies only to horizontal (  ) camera shake. Use when panning the camera horizontally with the camera held in portrait orientation. ) camera shake. Use when panning the camera horizontally with the camera held in portrait orientation. |
| S-IS AUTO |
Landscape Panning IS |
The camera detects the panning direction and applies the appropriate image stabilization. |
Movie
( Default setting: M-IS ) |
OFF |
M-I.S. Off |
Image stabilizer is off. |
| ON |
Movie-I.S. |
In addition to Auto image stabilization, camera shake that occurs when shooting while walking is also corrected. |
Setting the focal length when using lenses other than Micro Four Thirds or Four Thirds system lenses
When attaching the camera to a lens other than a Micro Four Thirds or Four Thirds lens, the focal length information that you set manually is used to correct camera shake.
| - |
Press the [ OK ] button to display the live control. While Image stabilizer is selected, press the [ INFO ] button and use the arrow pad Right and Left button to set the focal length. Press the [ OK ] button to complete the setting. |
| - |
The focal length can be set from 8 mm to 1000 mm. |
| - |
Set the focal length to the value (or the nearest value) that is displayed on the lens.
When a zoom lens is attached, set the focal length to the nearest value of its zoom position. |
Note:
| - |
The image stabilizer cannot correct excessive camera shake or camera shake that occurs when using an extremely slow shutter speed. Use a tripod so your camera remains steady when shooting. |
| - |
When using a tripod, set the Image Stabilizer to OFF. |
| - |
When using a lens with an image stabilization function switch, priority is given to the lens side setting. |
| - |
When priority is given to the lens side image stabilization and the camera side is set to S-IS AUTO, S-IS 1 is used instead of S-IS AUTO. |
| - |
You may notice an operating sound or vibration when the image stabilizer is activated. |
Question :
What type of memory card can I use with this model?
Answer:
This model is compatible with SD, SDHC and SDXC cards, including Eye-Fi cards.
xD-Picture Card™ and CompactFlash® media cannot be used.
Question :
Where can I find the instruction manual for my camera?
Answer:
You can find the manual online. You can either read it online or download the instruction manual for your camera.
See the following Web page to find the available manuals:
 Download Manuals : OM-D / PEN series Download Manuals : OM-D / PEN series
Question :
When recording movies I can hear the sound of the lens focusing, how can I reduce this sound?
Answer:
When recording sound in a movie, the sound made by the lens and camera operating may be recorded. This is due to the proximity of the microphone to the lens. If desired, you can reduce these sounds by shooting with [AF Mode] set to [S-AF], or by limiting the amount of times you press the buttons.
Question :
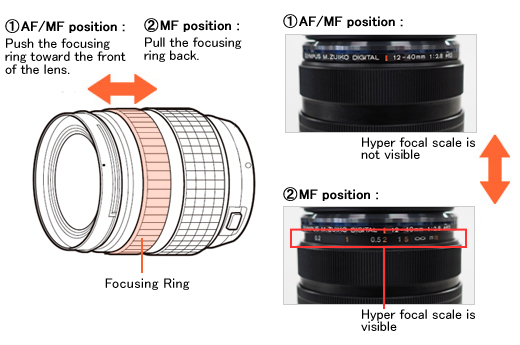
My lens is not auto-focusing, what is the cause?
Answer:
In the micro four thirds lineup the following lenses, M. Zuiko ED 12-40mm f2.8 Pro, M. Zuiko 12mm f1.8, and M. Zuiko 17mm f1.8 have a function called Manual Focus Clutch Focusing. This ring controls whether the camera/lens is in MF (Manual Focus) or AF (Auto Focus). If you are using one of these lenses, grasp the focusing ring between your thumb and forefinger and push it toward the front of the lens. It will snap forward and set the focus mode to AF. If you pull it back to expose the Hyper focal scale it will be in Manual mode. Basically this allows for quick switching in situations where manual focus is better suited for the situation.
|
|