Questions :
Question :
What additional items are packaged with the camera?
Answer:
The following items are packaged with the camera:
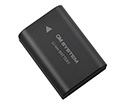
- - Lithium-ion battery BLX-1
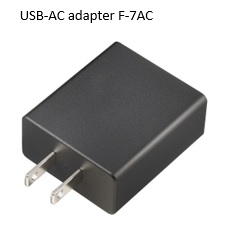
- - USB-AC adapter F-7AC
- - USB cable CB-USB13
- (Both ends of the cable are USB Type-C)
- - Eyecup EP-18 *
- - Body cap *
- - Hot shoe cover *
- - Cable clip CC-1
- (Cable clip that prevents USB cable or HDMI cable from coming off the camera body)
- - Cable protector CP-2
- (Cable protector that prevents terminal damage and cable disconnection during use)
- - Strap
- - Instruction manual
- - Warranty card
* The body cap, eyecup and hot shoe cover is attached to the camera.
OM Workspace:
The OM Workspace software CD-ROM is not packaged with the OM-1 camera. The software is available to Olympus/OM Digital solutions camera users via Internet as a free download. (The serial number of the camera is required.)
How do I download the free Olympus Workspace software?
* Olympus Workspace was renamed OM Workspace.
Question :
Can I use the same battery or power battery holder as for the E-M1X and E-M1 Mark III?
Answer:
You cannot use the same battery and power battery holder as for the E-M1X and E-M1 Mark III with OM-1.
OM-1 is included with a new type rechargeable battery BLX-1 (2280mAh), having a larger battery capacity than the BLH-1 (1720mAh).
The BLH-1 that is included with E-M1X, E-M1 Mark III and E-M1 Mark II cannot be used with the OM-1 because its shape is different from the BLX-1.
The power battery holder HLD-10 is also a dedicated battery holder for OM-1 (compatible with BLX-1).
Difference between dedicated rechargeable batteries
| Battery included with OM-1 |
Battery included with E-M1X and E-M1 Mark III |
Lithium-ion rechargeable battery
BLX-1
capacity: 2280mAh |
Lithium-ion rechargeable battery
BLH-1
capacity: 1720mAh |
Question :
What is the available recording time for movies, in each movie mode?
Answer:
The following table shows the approximate values:
| Video Size |
Compression |
Frame Rate |
Maximum Recordable Time
in 64 GB SDXC card |
Video Codec: H.264
|
Video Codec: H.265 |
C4K
(4096×2160) |
A-I |
59.94p |
Approx. 41 min |
Approx. 54 min |
| 50.00p |
Approx. 41 min |
Approx. 54 min |
| 29.97p |
Approx. 81 min |
Approx. 108 min |
| 25.00p |
Approx. 81 min |
Approx. 108 min |
| 24.00p |
Approx. 81 min |
Approx. 108 min |
| 23.98p |
Approx. 81 min |
Approx. 108 min |
4K
(3840×2160) |
- |
59.94p |
Approx. 41 min |
Approx. 54 min |
| 50.00p |
Approx. 41 min |
Approx. 54 min |
| 29.97p |
Approx. 81 min |
Approx. 108 min |
| 25.00p |
Approx. 81 min |
Approx. 108 min |
| 23.98p |
Approx. 81 min |
Approx. 108 min |
FHD
(1920×1080) |
A-I |
29.97p |
Approx. 41 min |
Approx. 101 min |
| 25.00p |
Approx. 41 min |
Approx. 101 min |
| 23.98p |
Approx. 41 min |
Approx. 101 min |
| L-GOP |
59.94p |
Approx. 160 min |
Approx. 199 min |
| 50.00p |
Approx. 160 min |
Approx. 199 min |
| 29.97p |
Approx. 312 min |
Approx. 384 min |
| 25.00p |
Approx. 312 min |
Approx. 384 min |
| 23.98p |
Approx. 312 min |
Approx. 384 min |
Video Codec H.265:
H.265 codec is a setting intended for editing on a computer, such as for video production. Although the file size can be compressed better than in H.264 codec, a TV or monitor that supports 10-bit input is required to play the video with correct color and brightness. Playback using the OM Workspace software is not possible. If you do not have an environment that allows playback or editing H.265 videos, set the recording codec to H.264.
|
Note:
- - The video file format is MOV (H.264/MPEG-4 AVC, H.265/HEVC).
- - The table shows the values when set to the maximum frame rate. The actual recorded bit rate varies depending on the shooting scene or combination of frame rates.
- - When the video taken with a SDXC card exceeds 3 hours, the video is automatically divided and the rest is saved as a separate file. (Depending on the shooting conditions, the file may be divided in less than 3 hours.)
- - When the video taken with a SD/SDHC card exceeds 4 GB, the video is automatically divided and the rest is saved as a separate file. (Depending on the shooting conditions, the file may be divided in less than 4 GB.)
Question :
What is the approximate movie recording time with a fully charged battery?
Answer:
The approximate sequential movie recording time with a fully charged BLX-1 battery are:
- Approx. 90 min according to JEITA
- Approx. 2 hr 40 min when zooming or other operations are not used
Note:
- - When the video taken with a SDXC card exceeds 3 hours, the video is automatically divided and the rest is saved as a separate file. (Depending on the shooting conditions, the file may be divided in less than 3 hours.)
- - When the video taken with a SD/SDHC card exceeds 4 GB, the video is automatically divided and the rest is saved as a separate file. (Depending on the shooting conditions, the file may be divided in less than 4 GB.)
Question :
Approximately how many shots can be taken with a fully charged battery?
Answer:
The number of recordable shots with a fully charged BLX-1 battery are:
- Approx. 520 shots when Quick Sleep Mode is Off
- Approx. 1,100 shots when Quick Sleep Mode is On
* when using KIOXIA KSDXU-A064G, IS set to ON, without flash, based on CIPA standard
Question :
What M.ZUIKO DIGITAL lenses support the dustproof and splashproof performance IP53?
Answer:
The following M.ZUIKO DIGITAL lenses and accessories support the dustproof and splashproof performance IP53 when used with the OM-1:
As of February 2022
Zoom lenses
·M.ZUIKO DIGITAL ED 7-14mm F2.8 PRO
·M.ZUIKO DIGITAL ED 8-25mm F4.0 PRO
·M.ZUIKO DIGITAL ED 12-40mm F2.8 PRO II
·M.ZUIKO DIGITAL ED 12-100mm F4.0 IS PRO
·M.ZUIKO DIGITAL ED 40-150mm F2.8 PRO
·M.ZUIKO DIGITAL ED 40-150mm F4.0 PRO
·M.ZUIKO DIGITAL ED 150-400mm F4.5 TC1.25x IS PRO
Single focus lenses
·M.ZUIKO DIGITAL ED 8mm F1.8 Fisheye PRO
·M.ZUIKO DIGITAL ED 300mm F4.0 IS PRO
Lens accessories
·M.ZUIKO DIGITAL 2.0x Teleconverter MC-20
·M.ZUIKO DIGITAL 1.4x Teleconverter MC-14
Note:
When the OM-1 is used with an M.ZUIKO DIGITAL lens having dustproof and splashproof performance other than those listed above, it has dustproof and splashproof performance equivalent to IPX1.
Question :
What M.ZUIKO DIGITAL lenses support the dustproof and splashproof performance IP53?
Answer:
The following M.ZUIKO DIGITAL lenses and accessories support the dustproof and splashproof performance IP53 when used with the OM-1:
As of February 2022
Zoom lenses
- M.ZUIKO DIGITAL ED 7-14mm F2.8 PRO
- M.ZUIKO DIGITAL ED 8-25mm F4.0 PRO
- M.ZUIKO DIGITAL ED 12-40mm F2.8 PRO II
- M.ZUIKO DIGITAL ED 12-100mm F4.0 IS PRO
- M.ZUIKO DIGITAL ED 40-150mm F2.8 PRO
- M.ZUIKO DIGITAL ED 40-150mm F4.0 PRO
- M.ZUIKO DIGITAL ED 150-400mm F4.5 TC1.25x IS PRO
Single focus lenses
- M.ZUIKO DIGITAL ED 8mm F1.8 Fisheye PRO
- M.ZUIKO DIGITAL ED 300mm F4.0 IS PRO
Lens accessories
- M.ZUIKO DIGITAL 2.0x Teleconverter MC-20
- M.ZUIKO DIGITAL 1.4x Teleconverter MC-14
Note:
When the OM-1 is used with an M.ZUIKO DIGITAL lens having dustproof and splashproof performance other than those listed above, it has dustproof and splashproof performance equivalent to IPX1.
Question :
What lenses are compatible with the Pro Capture Mode?
Answer:
The following table shows what lenses support the Pro Capture Shooting (Pro Capture/ Pro Capture SH1 / Pro Capture SH2) in OM-1:
| |
Pro Capture |
Pro Capture SH1 |
Pro Capture SH2 |
Olympus/OM Digital solutions
Micro Four Thirds lenses
(M.ZUIKO DIGITAL lenses) |
Available |
Available |
Available
*Sequential shooting speed 50 fps is only available with specific lenses |
Other brand
Micro Four Thirds lenses |
Not available |
Available |
Available
*Sequential shooting speed is limited to 25 fps |
| Four Thirds lenses |
Not available |
Available |
Not available |
Lenses without electronic contacts such as OM adapters
(including BCL-1580 / BCL-0980) |
Available |
Available |
Not available |
Note:
- - Focus accuracy decreases when the aperture is larger than F8 in [C-AF] / [C-AF MF] / [C-AF+TR] / [C-AF+TR MF].
- - In Pro Capture SH1, the AF operates only when the release button is pressed halfway. Focus is locked while pressed halfway down (during Pro Capture shooting) and while taking images.
- - In Pro Capture SH1, the lower limit of the shutter speed is 1/15 sec.
- - In Pro Capture SH2, the lower limit of the shutter speed is 1/640 sec. when Max fps under Sequential Shooting Settings is set to 50 and 1/320 sec. when set to 25.
- - Flash is disabled during Pro Capture shooting.
Question :
What lenses are compatible with the Focus Bracketing mode?
Answer:
Focus Bracketing is available with Micro Four Thirds AF lenses (e.g. M. ZUIKO DIGITAL lenses).
Focus Bracketing is not available with Four Thirds lenses (E-SYSTEM ZUIKO DIGITAL lenses) and Manual Focus lenses (including Micro Four Thirds MF lenses).
Note:
Focus Bracketing images taken with an M.ZUIKO DIGITAL lens that supports Focus Stacking can be combined by the Focus Stacking function in OM Workspace after being transferred to a computer.
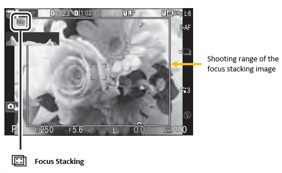
· What lenses are compatible with the Focus Stacking mode?
You can combine 3 to 15 frames with the focus stacking in the camera body, while you can combine up to 999 frames with OM Workspace. With OM Workspace, you can create photos with even wider depth of field than with the camera itself.
Question :
What lenses are compatible with the Starry Sky AF mode?
Answer:
The following M.ZUIKO DIGITAL lenses (with F5.6 or smaller f-number) are compatible with the Starry Sky AF mode.
It takes longer to focus or may not focus when using lenses that are not listed or using a teleconverter additionally.
- - M.ZUIKO DIGITAL 25mm F1.8
- - M.ZUIKO DIGITAL 45mm F1.8
- - M.ZUIKO DIGITAL ED 75mm F1.8
- - M.ZUIKO DIGITAL ED 12mm F2.0
- - M.ZUIKO DIGITAL 17mm F1.8
- - M.ZUIKO DIGITAL ED 60mm F2.8 Macro
- - M.ZUIKO DIGITAL ED 30mm F3.5 Macro
- - M.ZUIKO DIGITAL ED 8mm F1.8 Fisheye PRO
- - M.ZUIKO DIGITAL ED 17mm F1.2 PRO
- - M.ZUIKO DIGITAL ED 7-14mm F2.8 PRO
- - M.ZUIKO DIGITAL ED 25mm F1.2 PRO
- - M.ZUIKO DIGITAL ED 45mm F1.2 PRO
- - M.ZUIKO DIGITAL ED 300mm F4.0 IS PRO
- - M.ZUIKO DIGITAL ED 12-40mm F2.8 PRO
- - M.ZUIKO DIGITAL ED 12-40mm F2.8 PRO II
- - M.ZUIKO DIGITAL ED 12-45mm F4.0 PRO
- - M.ZUIKO DIGITAL ED 12-100mm F4.0 IS PRO
- - M.ZUIKO DIGITAL ED 40-150mm F2.8 PRO
- - M.ZUIKO DIGITAL ED 40-150mm F4.0 PRO
- - M.ZUIKO DIGITAL ED 150-400mm F4.5 TC1.25x IS PRO
- - M.ZUIKO DIGITAL ED 9-18mm F4.0-5.6
- - M.ZUIKO DIGITAL ED 14-150mm F4.0-5.6
- - M.ZUIKO DIGITAL 14-42mm F3.5-5.6 II
- - M.ZUIKO DIGITAL 14-42mm F3.5-5.6 II R
- - M.ZUIKO DIGITAL ED 14-42mm F3.5-5.6 EZ
- - M.ZUIKO DIGITAL ED 14-150mm F4.0-5.6
- - M.ZUIKO DIGITAL ED 14-150mm F4.0-5.6 II
- - M.ZUIKO DIGITAL ED 40-150mm F4.0-5.6
- - M.ZUIKO DIGITAL ED 40-150mm F4.0-5.6 R
Note:
- - The camera may not be able to focus in Starry Sky AF under bright conditions, for example, when city lights are too bright.
- - Starry Sky AF cannot be used when a Four Thirds lens is attached.
Question :
What lenses are compatible with the Focus Stacking mode?
Answer:
The following M.ZUIKO DIGITAL lenses are compatible with the Focus Stacking mode:
- - M.ZUIKO DIGITAL ED 8mm F1.8 Fisheye PRO
- - M.ZUIKO DIGITAL ED 30mm F3.5 Macro
- - M.ZUIKO DIGITAL ED 60mm F2.8 Macro
- - M.ZUIKO DIGITAL ED 300mm F4.0 IS PRO
(Teleconverter MC-20 and MC-14 can be used)
- - M.ZUIKO DIGITAL ED 7-14mm F2.8 PRO
- - M.ZUIKO DIGITAL ED 8-25mm F4.0 PRO
- - M.ZUIKO DIGITAL ED 12-40mm F2.8 PRO
- - M.ZUIKO DIGITAL ED 12-40mm F2.8 PRO II
- - M.ZUIKO DIGITAL ED 12-45mm F4.0 PRO
- - M.ZUIKO DIGITAL ED 12-100mm F4.0 IS PRO
- - M.ZUIKO DIGITAL ED 40-150mm F2.8 PRO
(Teleconverter MC-20 and MC-14 can be used)
- - M.ZUIKO DIGITAL ED 40-150mm F4.0 PRO
- - M.ZUIKO DIGITAL ED 100-400mm F5.0-6.3 IS
(Teleconverter MC-20 and MC-14 can be used)
- - M.ZUIKO DIGITAL ED 150-400mm F4.5 TC1.25x IS PRO
(Teleconverter MC-20 and MC-14 can be used)
Note:
The angle of view of the images created by Focus Stacking will be reduced approximately 7%. The shooting range is indicated by a frame while shooting focus stacking images.
Question :
How do I charge the battery while in camera using the bundled USB-AC adapter?
Answer:
The battery in OM-1 can be charged while in camera by using the bundled F-7AC USB-AC adapter and the USB cable. The battery can also be charged when the camera power is on, while using it as a power source for taking images or playing the recorded images.
Charging time with the camera turned off is approximately 2 hours and 30 minutes. When the camera is turned on, the charging time is longer than when the camera is turned off.
The battery in the power battery holder HLD-10 can also be charged. Charging both rechargeable batteries in the camera and in the HLD-10 takes approximately 2 hours and 30 minutes.
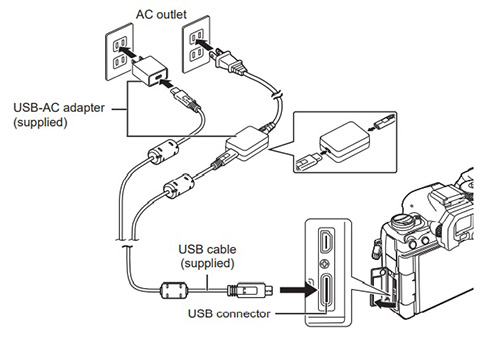
How to charge the battery with F-7AC USB-AC adapter
The following procedure explains how to charge the battery in the camera.
• Insert the battery into the camera. Connect the camera to the AC outlet using the F-7AC USB-AC adapter and the USB cable.
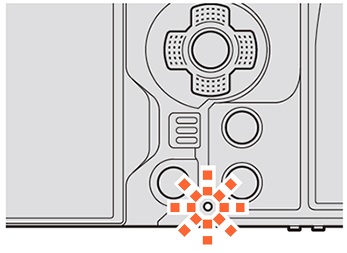
• The CHARGE lamp lights during charging.
The CHARGE lamp goes out when the battery reaches full charge. Disconnect the USB cable from the camera.
Note:
- The CHARGE lamp blinks if there is an error in charging. Try to disconnect and reconnect the USB cable for recovery.
- For safety reasons, charging may take longer or the battery may not reach full charge when the battery is charged in a high-temperature environment.
- Charging stops when the battery temperature is too high. It will resume after the battery temperature falls.
Question :
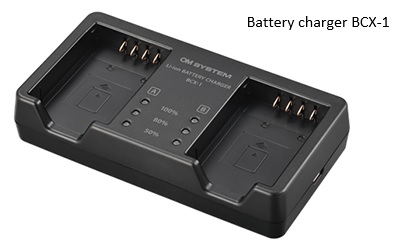
How do I charge the battery using the BCX-1 charger?
Answer:
The separately sold BCX-1 charger is a dedicated charger for the BLX-1 Lithium-ion battery. Two batteries can be charged simultaneously.
Connect the bundled F-7AC USB-AC adapter and the CB-USB13 USB cable to the charger.
A mobile battery conforming to the USB-PD standard with an output of 9V 3A can also be used as a power source.
Charging time is approximately 2 hours and 30 minutes. Charging time does not change even when you charge two batteries simultaneously.
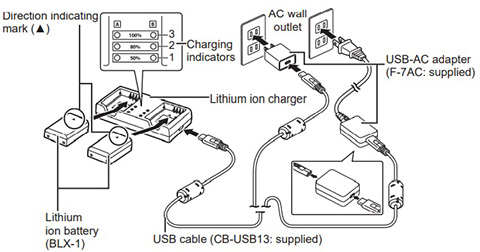
Status of the charge indicator lamp:
The progress of charging can be checked from the status of the three charge indicator lamp on BCX-1.
| Charge indicator lamp |
Battery charge |
| Lamp 1: Blinking |
Charging in progress |
Less than 50% |
Lamp 1: Light on,
Lamp 2: Blinking |
50% or more
Less than 80% |
Lamp 1 and 2: Light on,
Lamp 3: Blinking |
80% or more
Less than 100% |
| All lamps: Light out |
Charging complete |
100% |
| All lamps: Blinking |
Charging error |
Note:
F-7AC USB-AC adapter, CB-USB13 USB cable and BLX-1 battery are not included in BCX-1.
Question :
I inserted the rechargeable battery into the camera immediately after purchase, but the OM-1 does not turn on. Why?
Answer:
The bundled BLX-1 Lithium-ion battery is not fully charged at the time of purchase. Charge the battery before use.
* For compliance with transportation regulations and for safe transportation, the rechargeable batteries are shipped with a lower charge level. After purchase, the batteries must be charged before first use.
Related link:
How do I charge the battery while in camera using the bundled USB-AC adapter?
Question :
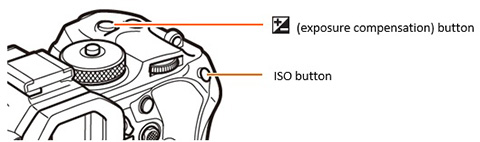
What is Handheld Assist?
Answer:
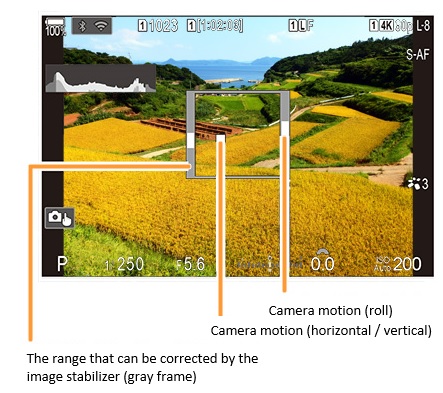
When Handheld Assist is On, the status of camera shake is displayed on the monitor when the shutter button is pressed halfway or during exposure. This is useful for reducing camera shake during long exposure in hand-held shooting.
The gray frame indicates the range that camera shake can be corrected. To minimize camera shake, hold the camera so that the outer indicators (roll shake) are stabilized near the center right/left on the frame and the center indicator (horizontal and vertical shake) near the center within the frame.
How to set Handheld Assist:
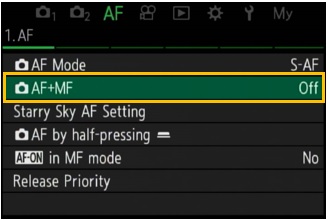
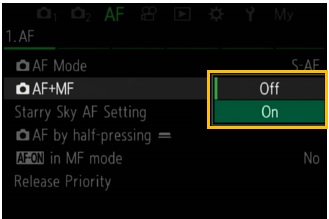
Press the [MENU] button. In  8. Image Stabilizer, select Handheld Assist. Select Off (default setting) or On. 8. Image Stabilizer, select Handheld Assist. Select Off (default setting) or On.
Note:
· Camera motion cannot be displayed correctly when the camera is close to the subject.
· Camera motion is not displayed if Image Stabilizer is set to Off or if you are using third-party lenses with only the lens image stabilizer operating.
· If  Image Stabilizer is set to Off, camera motion is displayed only during exposure. Image Stabilizer is set to Off, camera motion is displayed only during exposure.
Question :
My computer is equipped with Type-A USB port. The bundled USB cable in OM-1 box cannot be connected. What should I do? (The USB cable bundled with OM-1 is CB-USB13. Both connector ends are Type-C.)
Answer:
Use the CB-USB11 (sold separately) if the USB port on your computer is Type-A.
(The connector end of CB-USB11 is Type-C for the camera side and Type-A for the computer side. The cable is bundled with E-M1X, E-M1 Mark III and E-M1 Mark II.)
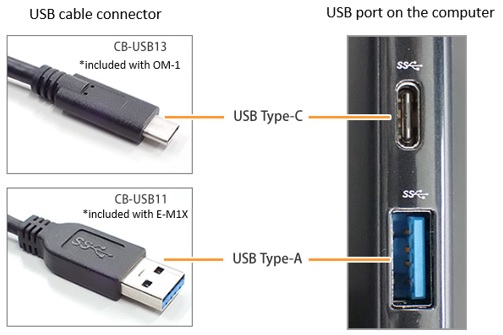
* The color of the USB port terminal on the computer varies depending on the computer.
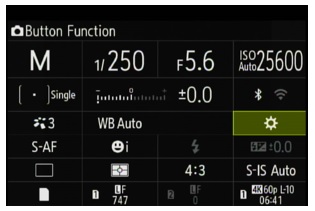
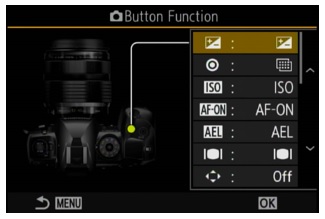
Question :
How do I assign camera settings to the Custom Mode C1, C2, C3 and C4 on the mode dial?
Answer:
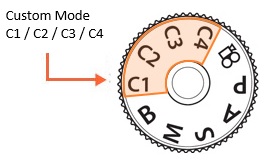
What is Custom Mode?
The Custom Mode (C1, C2, C3 and C4) is used for saving and recalling custom menu settings. When you set the mode dial to a Custom Mode (C1, C2, C3 or C4), the pre-assigned camera setting is recalled, enabling to shoot in the assigned settings.
Note:
· For the functions that can be assigned to the Custom Mode, refer to the OM-1 instruction manual (from page 311 to 326).
Download Manuals : OM l OM-D / PEN series
· The settings assigned to each Custom Mode can be returned to the default settings. In Reset/Initialize Settings, select Initialize All Settings.
Assigning camera settings to the Custom Mode C1, C2, C3 and C4
The following procedure explains how to assign camera settings to the Custom Mode C1, C2, C3 and C4.
1. Set the mode dial to a mode other than  (movie). Select the menu options you want to apply to the Custom Mode.
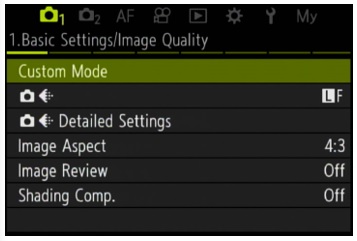
2. Press the [ MENU] button. In  , select 1.Basic Settings/Image Quality. Select Custom Mode and press the [ OK] button.
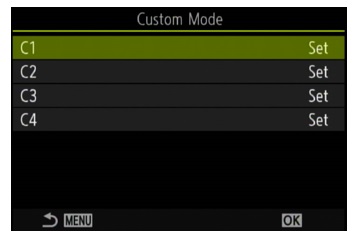
3. Select a Custom Mode (C1, C2 C3 or C4) where to assign the settings and press the [ OK] button. C1 is selected in this procedure.
4. Select Assign and press the [ OK] button.
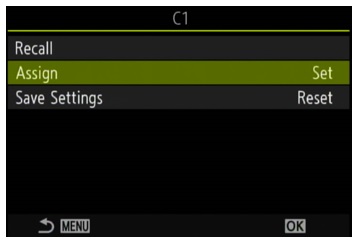
5. Select Set to save the current settings and press the [ OK] button.
If any settings are already registered to the selected custom mode, it will be overwritten.

6. The current settings are saved to Custom Mode C1.
How to save the changes made while using Custom Mode (C1, C2, C3 and C4)
The changes made while using Custom Mode (C1, C2, C3 and C4) can be saved automatically when Save Settings is set to Hold. The changed settings remain even if you turn the mode dial. You can use the Custom Mode just like P / A / S / M / B mode.
In , select Custom Mode. You can select Hold or Reset in Save Settings for each Custom Mode (C1, C2, C3 and C4).
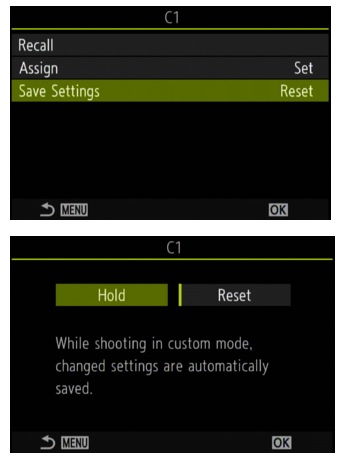 Reset
Reset is selected in default setting. Select Hold to save the changes made while using a Custom Mode.
Question :
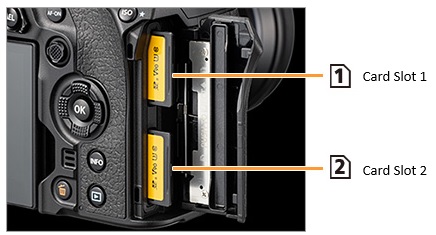
How do I set the options for shooting still images with two cards inserted into the camera?
Answer:
When you shoot still images with two cards inserted into the OM-1 camera, you can select in  Save Settings how to record the shooting data to each card. Save Settings how to record the shooting data to each card.
The available settings in Save Settings are Standard, Auto Switch, Dual Independent and Dual Same. Standard is the default setting. In Auto Switch, the recording switches to the other card when the card in use becomes full. In Dual Independent, the images in the two cards are recorded in different image quality modes. In Dual Same, the images in the two cards are recorded in the same image quality mode. These settings are available only for still image shooting.
How to change the settings
The following procedure explains how to change the save setting of card slot 1 and 2 for still image shooting.
1. Display the LV super control panel and select Save Settings.
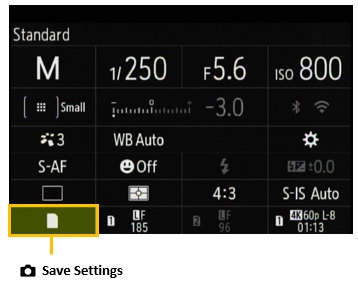
2. With Save Settings selected, turn the front dial to change the setting.
Available settings:
| Save Settings |
Description |

Standard |
When two cards are in the camera, still images are recorded to the card specified in Save Slot. You will not be able to take (record) pictures when the specified card becomes full. The images are not recorded to the other card. |

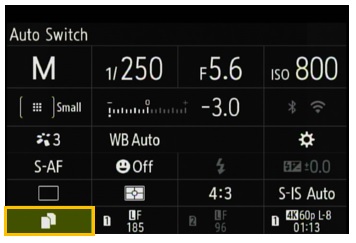
Auto Switch |
Still images are recorded to the card specified in Save Slot.
When the specified card becomes full, the recording will be continued in the card with available space. |

Dual Independent |
Images are recorded at different image quality modes to both cards in slot 1 and 2. The image quality mode can be set for each card.
You will not be able to take (record) pictures when either of the cards becomes full. |

Dual Independent |
Images are recorded at different image quality modes to both cards in slot 1 and 2. The image quality mode can be set for each card.
When either of the cards becomes full, the recording will be continued only in the card with available space. |

Dual Same |
Images are recorded at the same image quality mode to both cards in slot 1 and 2.
You will not be able to take (record) pictures when either of the cards becomes full. |

Dual Same |
Images are recorded at the same image quality mode to both cards in slot 1 and 2.
When either of the cards becomes full, the recording will be continued only in the card with available space. |
Note:
· Save Settings is set to Standard when only one card is in the camera.
· See the following web page for how to change the card where to save the images:
I want to record still images and videos on a different SD card. What should I do?
· The image quality mode may change if you change the option selected for
Save Settings or replace the recordable card by inserting or removing. Check the image quality mode before taking pictures.
Question :
I want to record still images and videos on a different SD card. What should I do?
Answer:
When there are SD cards in both card slot 1 and 2, you can select whether to record still images and videos in the same card or record them in a separate card.
How to change the card where to save still images:
1. Display the LV super control panel. Select Save Settings and press the [OK] button.
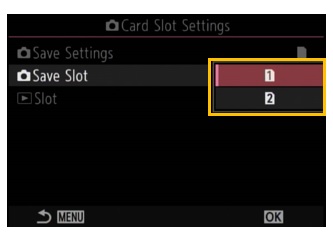
2. Select Save Slot and press the [OK] button.
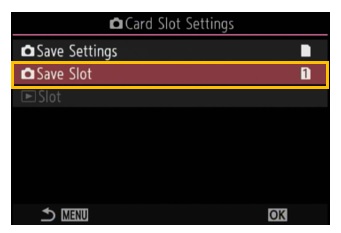
3. Select the card slot where to save still images.
Use the arrow pad Up and Down button to select  (card slot 1) or (card slot 1) or  (card slot 2) and press the [OK] button. (card slot 2) and press the [OK] button.
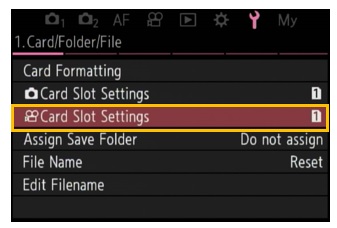
How to change the card where to save videos:
1.Press the [ Menu] button. In  , select 1.Card/Folder/File and then Card Slot Settings. Press the [ OK] button.
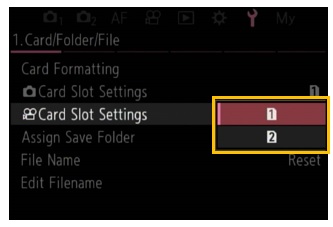
2.Select the card slot where to save videos.
Use the arrow pad Up and Down button to select (card slot 1) or (card slot 2) and press the [ OK] button.
Question :
How do I switch to the other card slot during playback?
Answer:
You can switch the card (card slot 1 or card slot 2) during playback by turning the front dial or rear dial while depressing the  (playback) button. (playback) button.
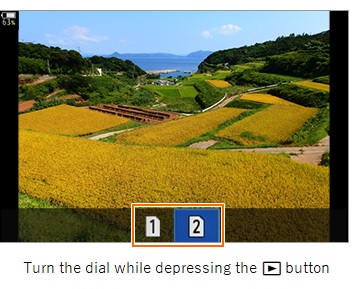
Note:
This operation does not change the Slot setting in Card Slot Settings.
Question :
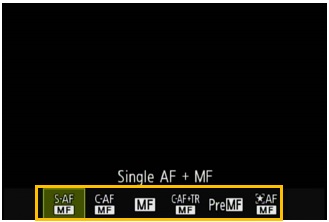
My camera is not auto-focusing when a M.ZUIKO PRO lens is attached. What should I do?
Answer:
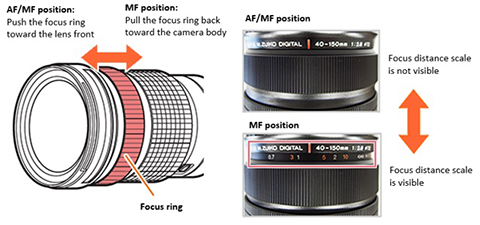
Check the position of the focus ring if you are not able to take pictures in AF (autofocus) when a M.ZUIKO PRO lens is attached to the camera.
M.ZUIKO PRO lenses (except 8mm F1.8 Fisheye PRO, 12-45mm F4.0 PRO and 40-150mm F4 PRO lens) have a "manual focus clutch mechanism". You can switch the focus to manual focus by pulling the focus ring back toward the camera side.
When the focus ring is in the MF position, the camera is in MF (manual focus) mode and cannot shoot in AF (autofocus).
Push the focus ring toward the lens front, to the AF/MF position, for shooting in AF.
Check the focus mode setting in the camera when you cannot shoot in AF (autofocus) even after switching the focus ring to the AF/MF position. You cannot shoot in AF (autofocus) when the focus mode in the camera is set to MF (manual focus). Make sure the focus mode is set to a mode other than MF.
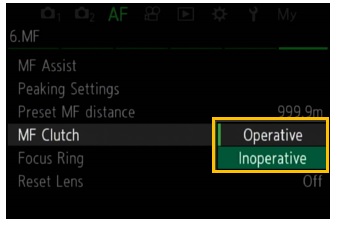
How to disable the manual focus clutch mechanism
The manual focus clutch mechanism for the focus ring can be disabled in the camera setting.
Press the [MENU] button. In AF, select 6.MF and then MF Clutch. Select Inoperative and press the [OK] button.
M.ZUIKO PRO lenses with manual focus clutch mechanism:
* as of March 2022
M.ZUIKO DIGITAL ED 7-14mm F2.8 PRO
M.ZUIKO DIGITAL ED 8-25mm F4.0 PRO
M.ZUIKO DIGITAL ED 12-40mm F2.8 PRO
M.ZUIKO DIGITAL ED 12-40mm F2.8 PRO II
M.ZUIKO DIGITAL ED 12-100mm F4.0 IS PRO
M.ZUIKO DIGITAL ED 40-150mm F2.8 PRO
M.ZUIKO DIGITAL ED 17mm F1.2 PRO
M.ZUIKO DIGITAL ED 25mm F1.2 PRO
M.ZUIKO DIGITAL ED 45mm F1.2 PRO
M.ZUIKO DIGITAL ED 300mm F4.0 IS PRO
Note:
The following lenses with snapshot focus can be switched between AF/MF position and snapshot focus by operating the focus ring in the same way as the manual focus clutch.
- M.ZUIKO DIGITAL ED 12mm F2.0
- M.ZUIKO DIGITAL 17mm F1.8
|