|
|
|
|
Questions :
Question :
What differentiates the TG-2 from the TG-1?
Answer:
The following table describes the differences:
|
 |
 |
| Effective Pixels |
12 million pixels,
CMOS: 1/2.3 |
| Monitor |
3.0 inches Approx. 610,000 dots, Organic El |
| Optical Zoom |
4 x |
| Digital Zoom |
4 x |
| Super-Resolution Zoom |
2 x |
| Image Processing |
True Pic VI |
| iHS |
Available |
| Focal Length |
4.5 mm - 18.0 mm (25 mm - 100 mm equivalent to 35 mm photography) |
Image Stabilizer
( DUAL IS ) |
Available |
| Scene Mode |
23 scene modes |
| Magic Filters |
11 magic filters |
12 magic filters |
Image Size
( Still Pictures ) |
12M, 8M, 3M, VGA
( Aspect ratio can be selected from 4:3, 16:9, 3:2 and 1:1. ) |
12M, 8M, 5M, 3M, 2M, 1M, VGA
( Aspect ratio is 4:3. )
16:9L, 16:9S |
Image Size
( Movie ) |
1080p, 720p, VGA,
HS120fps, HS240fps |
1080p, 720p, VGA |
| 3D Photo |
Not available |
Available |
GPS,
Electronic Compass Function,
Logging Function |
Available |
| Memory |
SD / SDHC / SDXC cards
Eye-Fi card, FlashAir |
SD / SDHC / SDXC cards
Eye-Fi card |
| Waterproof |
15 m |
12 m |
| Shockproof |
2.1 m |
2.0 m |
| Crushproof |
100 kgf |
| Freezeproof |
-10℃ |
| Underwater Housing |
PT-053 |
| Conversion Lens |
Fisheye Converter Lens FCON-T01 *1
Teleconverter Lens TCON-T01 *1 |
| Tap Control |
Available |
| HDMI |
Available |
| Battery |
LI-90B |
| Number of Shots per Charge |
Approx. 350 shots |
| Dimensions |
111.5 mm (W) x 66.5 mm (H) x 29.1 mm (D) / 4.4" (W) x 2.6" (H) x 1.1" (D) |
Weight
( Battery and Media Card Included ) |
230g |
| Color |
Black
Red |
Silver |
| Release Date |
February 2013 |
June 2012 |
*1 To use the Fisheye Converter Lens and Teleconverter Lens, the CLA-T01 converter lens adapter ( sold separately ) is required. Back to Questions
Question :
How do I attach a converter or a lens filter to the TG-2 using the converter lens adapter CLA-T01?
Answer:
Converter lens adapter CLA-T01:
The converter lens adapter CLA-T01 ( sold separately ) is required to attach the Teleconverter TCON-T01 or Fisheye converter FCON-T01 to the TG-2. You can also use the converter lens adapter CLA-T01 to attach a 40.5 mm lens filter that is 6 mm thick or less.
Before attaching the CLA-T01 to the TG-2, remove the lens ring from the camera.
How to attach or remove the lens ring :
How to attach or remove a conversion lens / filter :
Note:
| - |
When a filter that is 6 mm thick or more is attached, vignetting may occur in the corners of the images. In this case, use a thin circular-type polarizing filter. |
| - |
Filters cannot be attached directly to the TG-2 camera. |
| - |
The image quality when using a filter is not guaranteed. |
| - |
A filter and a Fisheye converter FCON-T01 cannot be used simultaneously. |
Question :
What additional items are packaged with the camera?
Answer:
The following items are packaged with the camera:
| - |
TG-2 camera |
| - |
Lithium-ion Rechargeable Battery ( LI-90B ) |
| - |
USB cable ( CB-USB8 ) |
| - |
USB-AC adapter ( F-2AC ) |
| - |
Strap |
| - |
Lens ring |
| - |
Olympus Setup CD-ROM: OLYMPUS Viewer 3 software ( Windows / Mac ) |
| - |
Instruction Manual |
| - |
Warranty card |
Question :
What are the compression rates and size of the image files in each record mode?
Answer:
The following tables show the approximate values:
【 Still Pictures 】
The compression rate in Fine mode ( shooting at high quality ) is 1/4. The rate in Normal mode ( shooting at normal quality ) is 1/8.
Image Size
( Aspect Rate is 4:3 ) |
Compression |
Number of storable pictures without sound |
File Size
( Approx. ) |
| 22 MB Internal memory |
4 GB
SD / SDHC / SDXC Card |
12M
( 3968 x 2976 ) |
Fine |
3 |
600 |
6.8 MB |
| Normal |
6 |
1,080 |
3.8 MB |
8M
( 3200 x 2400 ) |
Fine |
5 |
870 |
4.7 MB |
| Normal |
8 |
1,500 |
2.7 MB |
3M
( 1920 x 1440 ) |
Fine |
16 |
2,770 |
1.5 MB |
| Normal |
31 |
5,300 |
0.8 MB |
VGA
( 640 x 480 ) |
Fine |
117 |
20,340 |
0.2 MB |
| Normal |
194 |
30,510 |
0.1 MB |
【 Movies 】
| Image Size / Aspect Ratio |
Storable recording time with sound |
| 22 MB Internal memory |
4 GB SD / SDHC / SDXC Card |
| 1080P ( 1920 x 1080 / 16:9 ) |
8 sec. |
24 min. |
| 720P ( 1280 x 720 / 16:9 ) |
12 sec. |
36 min. |
| VGA ( 640 x 480 / 4:3 ) |
31 sec. |
96 min. |
| HS 120fps ( 640 x 480 / 4:3 ) |
2 sec. |
7 min. |
| HS 240fps ( 320 x 240 / 4:3 ) |
3 sec. |
10 min. |
Regarding the movie recording time:
| - |
Regardless of the card capacity, the maximum file size per movie is 4 GB. |
| - |
When recording in 1080P and 720P format, the maximum recording time per movie is 29 minutes. |
| - |
When recording in HS 120fps and HS 240fps format, the maximum recording time per movie is 20 seconds. |
Note:
The amounts of storable still pictures and storable movie recording time are approximate and calculated based on capacity. The actual amounts will differ according to the shooting conditions and other figures. The figures are not a guarantee of battery life.
Question :
Which types of memory cards can I use?
Answer:
SD, SDHC and SDXC cards, including Eye-Fi and Flash Air cards, can be used.
xD-Picture Card™ and CompactFlash® media cannot be used.
Question :
Where can I find the instruction manual for my camera?
Answer:
You can either read online or download the instruction manual for your camera.
See the following Web page to find the available manuals:
 Download Manuals Download Manuals
Question :
How do I use the GPS logging function?
Answer:
Using the GPS logging function of the TG-2, you can record and save the positioning data that is acquired with the GPS.
The following procedure explains how to use the GPS logging function.
Note:
- The logging function cannot be set to ON if an SD card is not inserted into your camera.
- The GPS logging function turns off automatically in the following conditions:
- when the remaining battery is low
- 24 hours after the power of your camera is OFF
How to set the GPS logging function:
- Press the [MENU] button and select Settings Menu 3. In GPS Settings, select GPS and press the Right arrow pad button. Select On and press the [OK] button. Then, select Track and press the Right arrow pad button. Select On and press the [OK] button.

- If you press the Up arrow pad (INFO) button several times in shooting mode, the measurement position information is displayed.
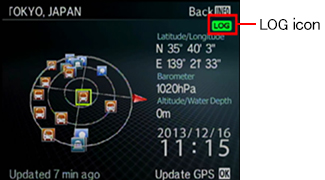
If the LOG icon is displayed on the upper right of the monitor, the GPS logging function is operating. Start recording the log data in a place where the GPS antenna is open to the sky.
- The log data is automatically recorded to the SD card at regular intervals.
If you select Save in Track setting, a separated new file will be created to record the log data. After a new file is created, the log data will be recorded automatically into the new file.
Note:
- When the date changes while recording, the log data is recorded into multiple files.
- When you change the GPS logging function setting while recording, the log data is recorded into multiple files.
- You can read and display the GPS logging data on Google Earth or the Map function in OLYMPUS Viewer 3 software.
Question :
What kind of functions can be assigned to the Custom Mode 1 or Custom Mode 2?
Answer:
If you set the mode dial to [C1] Custom Mode 1 or [C2] Custom Mode 2, you can shoot in the presets that are assigned to the mode dial.
Settings that can be assigned to the Custom Mode
In addition to the shooting modes (including scene modes and magic filters), you can assign the following settings to the Custom Mode:
- Flash
- Self-timer
- Exposure Compensation
- White Balance
- ISO Sensitivity
- Drive
- Image Size (Still Pictures / Movies)
- Aspect
- Filter Effect
- Reset
- Compression (Still Pictures)
- Shadow Adjust
|
- AF Mode
- Metering
- Digital Zoom
- Image Stabilizer (Still Pictures / Movies)
- Accessory Settings (Remote Flash / Conversion Lens)
- AF Illuminator
- Rec View
- Picture Orientation
- Icon Guide
- Date Stamp
- Super-resolution Zoom
|
How to set a Custom Mode
- Set the mode dial to a mode other than [C1] or [C2]. Select the shooting settings you want to apply to the Custom Mode.
- Press the [MENU] button. In
 (Setting Menu 1), select Custom Mode Setup and press the [OK] button. Select Custom Mode 1 or Custom Mode 2 and press the [OK] button. Select Set and press the [OK] button. (Setting Menu 1), select Custom Mode Setup and press the [OK] button. Select Custom Mode 1 or Custom Mode 2 and press the [OK] button. Select Set and press the [OK] button.
- The menu options are now registered for the Custom Mode. To apply them, rotate the mode dial to the custom mode you chose in Step 2; either [C1] (Custom Mode 1) or [C2] (Custom Mode 2).
Note:
- The previously assigned shooting setting will be overwritten if new settings are assigned to the Custom Mode.
- The following steps explains how to cancel the assigned setting on the Custom Mode:
Press the [MENU] button. In (Setting Menu 1), select Custom Mode Setup and press the [OK] button. Select a Custom Mode you want to cancel its setting, Custom Mode 1 or Custom Mode 2, and press the [OK] button. Select Reset and press the [OK] button.
|
|