|
 |
|
|
Questions :
Question :
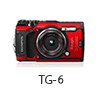
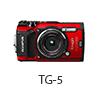
What differentiates the TG-6 from the TG-5?
Answer:
The following table describes the differences:
|
 |
 |
| Release Date |
July 2019 |
June 23, 2017 |
| Effective Pixels |
12 million pixels
1/2.3 CMOS |
| Image Processor |
TruePic VIII |
| Monitor |
3.0 inches, Approx. 1,040,000 dots, TFT color LCD |
3.0 inches, Approx. 460,000 dots, TFT color LCD |
| Zoom |
Optical Zoom: 4x |
| Digital Teleconverter |
Standard shooting mode: 2x
Microscope mode: 2x / 4x
|
Standard shooting mode: Not available
Microscope mode: 2x / 4x |
| Focal Length |
4.5 mm - 18.0 mm
(25 mm - 100 mm equivalent in 35 mm photography) |
| Focus Mode |
AF (Face Priority, ESP, Spot, AF Tracking),
MF (Focus Peaking, MF Magnify),
Super Macro (AF, MF)
|
AF (Face Priority, ESP, Spot, AF Tracking),
MF (Focus Peaking, MF Magnify) |
| Shooting Range |
Standard mode: 0.1 m to infinity
Microscope mode: 0.01 m to 0.3 m
Super Macro mode: 0.01 m to 0.3 m |
Standard mode: 0.1 m to infinity
Microscope mode: 0.01 m to 0.3 m |
| ISO |
AUTO
Manual: ISO100 - 12800 |
| Image Stabilization |
Still Pictures: CMOS-shift
Movies: Electronic |
| Shooting Mode |
P (Program mode), iAUTO, A (Aperture Priority), Custom mode 1, Custom mode 2, Movie, Underwater (Underwater snap, Underwater wide, Underwater macro, Underwater microscope, Underwater HDR), Microscope (Microscope, Focus stacking*, Focus bracket**, Microscope control), SCN (Scene)
* The number of shots and the length of time the camera waits before shooting starts can be selected.
** The length of time the camera waits before shooting starts can be selected. |
P (Program mode), iAUTO, A (Aperture Priority), Custom mode 1, Custom mode 2, Movie, Underwater (Underwater snap, Underwater wide, Underwater macro, Underwater HDR), Microscope (Microscope, Focus stacking, Focus bracket, Microscope control), SCN (Scene) |
| Art Filters |
16 art filters + filter variation (I - III):
Pop Art (I, II), Soft Focus, Pale&Light Color (I, II), Light Tone, Grainy Film (I, II), Pin Hole (I, II, III), Diorama (I, II), Cross Process (I, II), Gentle Sepia, Dramatic Tone (I, II), Key Line (I, II), Watercolor (I, II), Vintage (I, II, III), Partial Color (I, II, III), Bleach Bypass (I, II), Instant Film |
14 art filters + filter variation (I - III):
Pop Art (I, II), Soft Focus, Pale&Light Color (I, II), Light Tone, Grainy Film (I, II), Pin Hole (I, II, III), Diorama (I, II), Cross Process (I, II), Gentle Sepia, Dramatic Tone (I, II), Key Line (I, II), Watercolor (I, II), Vintage (I, II, III), Partial Color (I, II, III) |
| Scene Modes |
16 scene modes:
Portrait, e-Portrait, Landscape, Portrait + Landscape, Nightscape, Hand-held Starlight, Portrait + Nightscape, Sunset, Fireworks, Candlelight, Children, Sport, Beach & Snow, Live Composite, Panorama, Backlight HDR |
| Picture Modes |
i-Enhance, Vivid, Natural, Muted, Portrait, Monotone, Custom, e Portrait, Underwater, Art Filters |
i-Enhance, Vivid, Natural, Muted, Portrait, Monotone, Custom, e Portrait, Art Filters |
| Pro Capture Mode |
Available |
| Interval Shooting |
max 299 frames |
Date / Time Imprint
(For Still Images) |
Available |
Not available |
Image Size
(Still Pictures)
* when aspect rate is 4:3 |
L (4000 x 3000)
M (3200 x 2400)
S (1280 x 960) |
| RAW+JPEG Shooting |
Available
RAW mode or
RAW+JPEG mode |
| Images Size (Movies) |
4K (3840 x 2160) 30/25p
FHD (1920 x 1080) *
HD (1280 x 720) *
FHD HS 120fps (1920 x 1080)
HD HS 240fps (1280 x 720)
SD HS 480fps (640 x 360)
* Bit rate (compression) and frame rate (fps) can be changed. |
| Logging Function |
GPS information, manometer, compass and thermometer |
| Connection to Smartphone (Using smartphone application OI.Share and OI.Track) |
Built-in Wi-Fi available
OI.Share:
Remote Control function, Import Photos, Geotag function, Easy Setup function
OI.Track:
Update A-GPS data, Import GPS logging information, Easy Setup function |
| Memory |
SD, SDHC, SDXC cards (UHS-I compatible)
Eye-Fi cards not compatible |
SD, SDHC, SDXC cards (UHS-I compatible), Eye-Fi cards |
| Internal Memory |
Not available |
| Battery / Number of Shots per Charge |
Lithium Ion Rechargeable Battery (LI-92B)
Approx. 340 shots |
| Connector |
USB microB connector
HDMI micro connector (TypeD) |
| Waterproof / Dustproof |
15m waterproof / Dustproof available |
| Crushproof |
2.1 m |
| Freezeproof |
- 10℃ |
| Anti-fog |
Available |
| Underwater Housing (Sold Separately) |
PT-059 |
PT-058 |
| Optional Accessories for Macro Shooting (Sold Separately) |
LED Light Guide (LG-1)
Flash Diffuser (FD-1) |
| Conversion Lens (Sold Separately) |
Fisheye Converter (FCON-T02) *
Fisheye Converter (FCON-T01) *
Teleconverter (TCON-T01) * |
Fisheye Converter FCON-T01 *
Teleconverter TCON-T01 * |
| Dimensions |
113.0 mm (W) x 66.0 mm (H) x 32.9 mm (D) / 4.4" (W) x 2.6" (H) x 1.3" (D) |
113.0 mm (W) x 66.0 mm (H) x 31.9 mm (D) / 4.4" (W) x 2.6" (H) x 1.3" (D) |
| Weight (Battery and Media Card Included) |
253g |
250g |
| Color |
Red / Black |
- * The CLA-T01 converter lens adapter (sold separately) is required for use with the Fisheye Converter and Teleconverter Lens.
What are the main new features in the Tough TG-6 versus the previous Tough underwater cameras?
- ✔Tough performance
- No changes on specs but new lens barrier was released.
- ✔High image quality
- AR (Anti-Reflective coating) coating on both sides of the sealing glass on the image sensor. This can minimize ghosts and flaring, and provide clearer images.
- Digital tele-converter for max. 8x zoom.
- ✔Variable macro system
- Improved focus stacking mode
- Macro mode is available in P & A mode without mode change
- ✔Underwater Photography
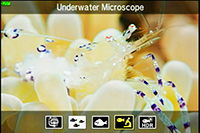
- Underwater microscope mode
- 3 new underwater WB modes
- Tuned default setting of underwater modes
- New fisheye converter and new underwater case
- ✔Others
- Higher resolution LCD monitor
- Date imprint function
- The elevation can be set to Meters or Feet. The temperature can be set to Centigrade or Fahrenheit. On TG-5, only the elevation can be set to Meters or Feet.
How is this different from the Variable Macro System on the TG-5 from 2017?
- ✔Focus stacking
- TG-6 can control number of images for compositing (From 3 to 10). On TG-5, the number was fixed.
- ✔Shorter working distance in P & A mode
- 1cm working distance macro shooting is available in P & A mode with TG-6. On TG-5, that was impossible and mode change was required.
Question :
What additional items are packaged with the camera?
Answer:
The following items are packaged with the camera:
- Lithium Ion Rechargeable Battery (LI-92B)
- USB-AC adapter (F-5AC)
- USB cable (CB-USB12, micro USB connector)
- Strap
- Instruction Manual
- Warranty card
Image editing software Olympus Workspace
The software CD-ROM is not packaged in the TG-6 camera.
The image editing software Olympus Workspace is available to Olympus camera users via Internet as a free download. (The serial number of the camera is required.)
 How do I download the free Olympus Workspace software? How do I download the free Olympus Workspace software?
* Olympus Workspace is a successor software for the OLYMPUS Viewer 3.
Question :
How close can the camera focus?
Answer:
The following table describes how close you can move the TG-6 to a subject keeping the picture in focus:
| Shooting Mode |
Shooting Range
(from the lens to the subject) |
| Standard |
from 0.1 m to infinity |
 
Super Macro AF / MF |
from 0.01 m to 0.3 m |

Microscope |
from 0.01 m to 0.3 m |
Super Macro AF / MF
You can take pictures as close as 0.01 m to 0.3 m from the lens to the subject if you set the AF mode to Super Macro AF or Super Macro MF in P, A and Movie mode.
Question :
What kinds of Microscope modes are available?
Answer:
 (Microscope mode) lets you shoot from as close as 1cm and as close as 30 cm to your subject. You can shoot images with long depth of field, and perform focus bracket shooting with setting the number of shots. (In normal shooting mode like P mode, you can shoot from 10 cm at the closest distance.)
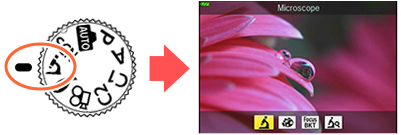
Turn the mode dial to (Microscope mode). Select the appropriate sub mode from Microscope, Focus Stacking, Focus Bracketing and Microscope Control.
When the mode dial is already set to (Microscope mode), press the arrow pad Left button to select other sub modes.
Available Microscope modes:
| Sub Mode |
Description |

Microscope |
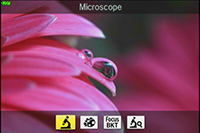
This mode lets you shoot from as close as 1 cm to your subject.
You can shoot with shooting magnification of 7x (35 mm equivalent) when using the optical zoom. |

Focus Stacking |
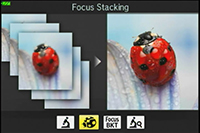
The camera shoots a number of images, automatically shifting the focus in each image. The images are combined into a composite image with a large depth of field. Two images are recorded; the first frame and the composite image.
The number of frames per shot and waiting time can be set after selecting in the sub mode . In in the sub mode . In  (Shooting menu 2), select Focus Stacking Settings (Shooting menu 2), select Focus Stacking Settings
The following settings are available:
- - Waiting time before the photographing starts can be selected from 0 to 30 seconds.
- - Number of shots can be selected from 3 to 10 frames.
Creating a composite image may not be possible due to camera shake or moving subjects. |

Focus BKT
(Focus Bracketing) |
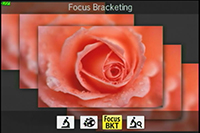
The camera shoots a number of images, automatically shifting the focus in each image.
The waiting time, number of shots and focus steps can be set after selecting  in the sub mode. In (Shooting menu 2), select Focus BKT. in the sub mode. In (Shooting menu 2), select Focus BKT.
The following settings are available:
- - Waiting time before the photographing starts can be set from 0 to 30 seconds.
- - Number of shots can be selected from 10, 20 and 30.
- - Focus steps can be selected from Wide, Normal and Narrow.
|

Microscope Control |
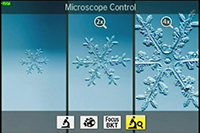
Optimized for close-ups with the subject magnified on the monitor.
You can change the magnification level to 1x, 2x or 4x by pressing the arrow pad Right button. Up to 44.4x (35 mm equivalent: 28x) is possible when using the zoom simultaneously.
For example, when shooting from as close as 1 cm to the subject, a 1 mm subject can be magnified to up to 44 mm on the monitor.
At high magnification levels, the image may become grainy.
For using the flash or LED light in Microscope Control, press the [OK] button to display the Live Control and select the flash setting with the arrow pad Up and Down button. |
Note:
- Shooting distance in Microscope mode is from 1 cm to 30 cm.
- The use of tripod is recommended for shooting in Focus Stacking or Focus BKT.
Accessories (sold separately) useful for shooting in Microscope mode:
Useful accessories (sold separately) are available to utilize the built-in flash or LED illuminator of the TG-6 for shooting in Microscope mode.
- Flash Diffuser FD-1

FD-1 is useful for macro shooting or taking pictures of insects in a low-light environment. Improved light distribution makes it possible to darken the background and make the subject stand out better.
The FD-1 can be used under water.
- LED Light Guide LG-1
LG-1 uses the camera's built-in LED light to evenly illuminate a subject to avoid shadows on the subject. The LG-1 cannot be used under water.
Question :
What differentiates the LED Light Guide LG-1 from the Flash Diffuser FD-1?
Answer:
The following table describes the differences:
| |
LED Light Guide
LG-1 |
Flash Diffuser
FD-1 |
| Compatible Cameras |
TG-6, TG-5, TG-4, TG-3, TG-2, TG-1 |
TG-6, TG-5, TG-4*
(*Firmware update is required for the TG-4) |
| Light Source |
Built-in LED light |
Built-in flash |
| Shooting Distance |
1 - 10 cm
*The distance from the lens front |
2 - 30 cm
*The distance from the lens front |
| Underwater Usage |
Not usable |
Usable |
| Light Control |
Not available |
Available
* 2 light volumes can be selected on the FD-1:
 (Normal) and (Normal) and  (Low) (Low) |
LED Light Guide LG-1
The LED Light Guide LG-1 uses the LED on the front of the camera to illuminate your subject.
In addition to lighting your subject while the image is taken, the LG-1 also assists in composing your image, as the constant light source illuminates the subject. When using the LG-1 the camera's closest focusing distance is 1 cm, allowing the camera to lay flat on the subject and still focus.
Flash Diffuser FD-1
The Flash Diffuser FD-1 uses the in-camera flash to illuminate your subject.
The in-camera flash offers a significant increase in the amount of light. This increase in light allows for usage of lower ISO settings and faster shutter speeds, as well as an increased working distance. The FD-1 can also be utilized under water. The camera's closest focusing distance to the subject is 2cm.
When using the FD-1
- To use the Light Control on TG-4, update the firmware of your camera.
- You can attach the FD-1 to the TG-3, TG-2 and TG-1 camera, but results may vary because the firmware does not support these products.
Question :
How do I attach a converter or a lens filter to the TG-6 using the converter lens adapter CLA-T01?
Answer:
Converter lens adapter CLA-T01:

The converter lens adapter CLA-T01 (sold separately) is required to attach the Teleconverter TCON-T01 or Fisheye converter FCON-T01 to the TG-6. You can also use the converter lens adapter CLA-T01 to attach a 40.5 mm lens filter that is 6 mm thick or less.
Before attaching the CLA-T01 to the TG-6, remove the lens ring from the camera.
Note:
- A lens cap is included with the CLA-T01.
- The lens ring on the TG-6 is only cosmetic and has no effect on the waterproof or dustproof ability of the camera.
How to attach or remove the lens ring:
- To remove the lens ring, rotate the lens ring in the remove direction (to the left) while pressing down the remove button (
 ). ).
- To attach the lens ring, align the white circle marks on the camera and lens ring, and then rotate the lens ring to the right until you hear a click. Do not press the remove button while attaching the lens ring.

How to attach a conversion lens / filter using the CLA-T01
- * You can attach and remove the CLA-T01 in the same procedure as attaching or removing a lens ring.
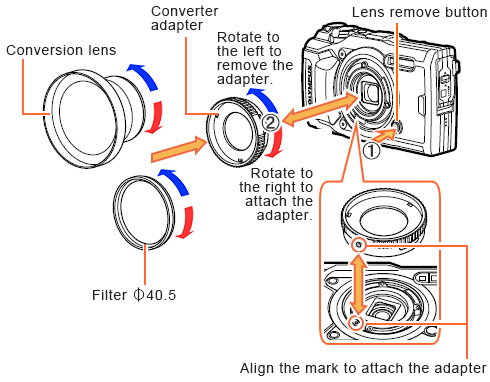
Note:
- Filters cannot be attached directly to the camera.
- When a filter that is 6 mm thick or more is attached, vignetting may occur in the corners of the images. In that case, use a thin mount or slim type of filter instead.
- The image quality when using a filter is not guaranteed.
- A filter and a Fisheye converter FCON-T01 / FCON-T02 cannot be used simultaneously.
Question :
Where can I find the instruction manual for my camera?
Answer:
You can find the manual online. You can either read it online or download the instruction manual for your camera.
Download Manuals
Question :
Can I print the date and time on my pictures?
Answer:
Yes, you can print the date and time on your pictures.
When the pictures are taken with the Date Stamp function set to On, the date and time is imprinted on the captured pictures.
The printed date and time cannot be erased from the pictures after captured with this function.
The following procedure explains how to print the date and time on your pictures.
1. Press the [MENU] button. In Shooting Menu 2, select Date Stamp and press the [OK] button.
2. Select a desired setting from Date, Time, and Date + Time using the arrow pad Up and Down button.
Press the [OK] button.
3. An icon is displayed at the top of the monitor when Date Stamp is set to On.

Note:
- Make sure to set the camera clock for setting the Date Stamp.
- You cannot include the date and time later using the camera function if your pictures are taken with the Date Stamp set to Off.
- If the camera clock is set, you can include the date and time even on the pictures taken with Date Stamp set to Off using the Photo Print function in Olympus Workspace software.
Shooting modes and settings that cannot be used with the Date Stamp function
When the following setting is On, the Date Stamp function is turned off. The Date icon on the monitor disappears. (The Date Stamp cannot be set to On in the menu.)
| Shooting mode |
- e-Portrait
- Handheld Starlight
- Backlight HDR
- Panorama
- Underwater HDR
- Focus Stacking
- Focus Bracketing
- Movie recording
|
| Drive |
- Sequential Low
- Sequential High
- Pro Capture
|
Image quality mode
|
|
| Picture mode |
|
Question :
The TG-6 / TG-5 camera's battery is consumed quickly. What should I do?
Answer:
The battery is consumed more quickly when the GPS is on than when the GPS is not used. Check the functions in TG-6 / TG-5 that use GPS and change them to a less battery consuming setting.
Check the LOG function (LOG switch)
When not using the LOG function, set the LOG switch on the top of the camera to OFF.
When the LOG function is on (when the LOG switch is in the LOG position), the camera continues to acquire GPS information even when the camera is turned off. This consumes battery power.
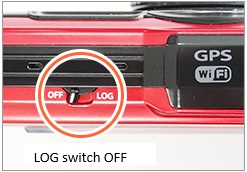 Check the GPS icon on the monitor
There are other settings that use the GPS in addition to the LOG function. When the GPS icon is displayed or blinks on the monitor, the GPS function is working. Turn off the functions that use GPS.

Note:
To reduce the drain on the battery when GPS is enabled, select Battery power for GPS Priority.
In  (Custom Menu), select  Field Sensor Field Sensor and set the GPS Priority to Battery power.
Question:
How do I charge the battery and how long does it take?
Answer:
The TG-6 / TG-5 camera is included with a lithium-ion rechargeable battery LI-92B. The following procedure explains how to charge the battery. There are three ways:
- Charge the battery using the USB-AC adapter F-5AC
- Charge the battery by connecting the camera to a computer via USB
- Charge the battery using the separately sold charger UC-92
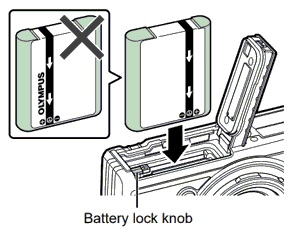
Note: When inserting the battery into the camera, make sure to insert the battery in the correct direction, with the - (minus) side to the battery lock knob side. If the battery is inserted in the wrong direction, it will not be charged.
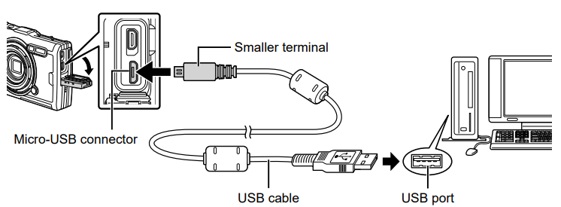
【 1 】Charge the battery using the USB-AC adapter F-5AC and USB cable
Charging time: about 3 hours

1. Insert the LI-92B battery into the camera. Make sure to insert the battery in the correct direction.
2. Connect the USB-AC adapter and USB cable to the camera.
3. Select Charge on the camera monitor and press the [ OK] button.
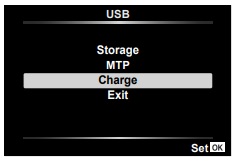
4. The indicator lamp lights during charging. The lamp goes out when the battery reaches full charge.

Note:
- The battery is not fully charged at shipment. Charge the battery before use until the indicator lamp turns off to show that the battery is fully charged.
- Never use any cable other than supplied or OM Digital Solutions-designated USB cables. This may cause smoking or burning.
- Make sure to unplug the USB-AC adapter from the power outlet when charging is complete.
- If the message "No Connection" is displayed on the monitor, disconnect and reconnect the cable.
【 2 】Charge the battery by connecting the camera to a computer via USB
The battery in the camera can be charged while the camera is connected to a computer with the USB cable. The indicator lamp lights during charging. The lamp goes out when charging is complete. It may take about 10 hours depending on the performance of the computer.
 【 3 】Charge the battery using the separately sold UC-92 charger
Charging time: about 2.5 hours
The UC-92 battery charger (sold separately) can be used to charge the battery without using the camera.

1. Connect the USB connector of the UC-92 battery charger to the USB-AC adapter (F-5AC included with the camera).
2. Insert the USB-AC adapter into the AC outlet.
3. Insert the LI-92B lithium-ion battery into the charger. The battery charge lamp lights and charging starts.
When the charge lamp does not light, check whether the battery is placed in the correct direction.
The charge lamp goes out when charging is complete.
Note:
- The UC-92 charger is sold separately. It is not included with the camera.
- UC-92 is the successor model for UC-90.
Question :
How do I delete multiple selected images on the camera?
Answer:
To delete multiple images from the SD card using the camera, use the  select button (movie button) during single-frame or index playback to choose the images, and then delete them. select button (movie button) during single-frame or index playback to choose the images, and then delete them.

Related question:
What is the difference between Format and All Erase, and how do I perform each operation?
How to delete selected images
- In playback mode, select the images you wish to delete.
- In single-frame playback :
Use the left and right buttons to display the image you wish to delete, then press the button to add a checkmark.
- In index playback :
Use the arrow buttons to select the image you wish to delete, then press the button to add a checkmark.
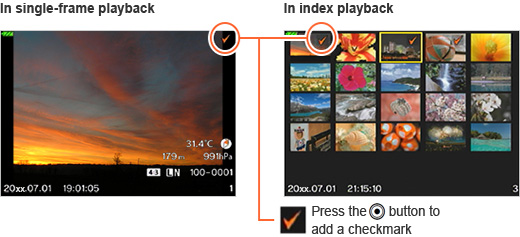
Note:
To display the index playback, press the  button to switch to single-frame playback, then rotate the zoom lever toward the [W] side.
- After selecting the images, proceed to delete them as follows.
Press the [OK] button, select Erase Selected from the menu, then press [OK] again.
Select Yes on the Erase Selected screen, then press [OK] to delete the selected images.
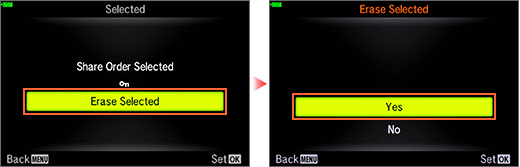
* In single-frame playback, you can also display the Erase Selected screen by pressing the  button after selecting the images. button after selecting the images.
Question :
What is the difference between Format and All Erase, and how do I perform each operation?
Answer:
The following explains the difference between All Erase and Format (formatting the card), and how to perform each operation.
The difference between All Erase and Format
- All Erase :
All images stored on the SD card will be deleted.
However, images that have been protected using the camera’s protect function will not be deleted.

- Format (formatting the card) :
All data stored on the SD card, including images, will be deleted.
This process fully erases and reformats the card, rewriting its management information.
Protected image files will also be deleted.
Regularly reformatting the SD card helps to maintain stable performance.
Note:
- SD cards that are newly purchased, used in other cameras, or used for other purposes on a computer must be formatted in the camera before use.
- Formatting the SD card in the camera optimizes it for use with that camera. Therefore, do not format it on a computer.
How to All Erase/Format
The following steps explain how to perform All Erase or Format.
Caution:
Be sure to check that there is no important data remaining on the SD card before proceeding with All Erase or Format.
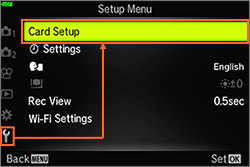
- Press the [MENU] button. In
 (Setup Menu), select Card Setup, then press the [OK] button. (Setup Menu), select Card Setup, then press the [OK] button.
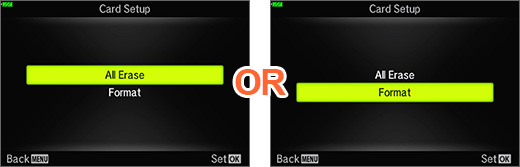
- Use the up/down buttons to select All Erase or Format, then press the [OK] button.
* Format is selected in this procedure, but the following steps are the same for All Erase.
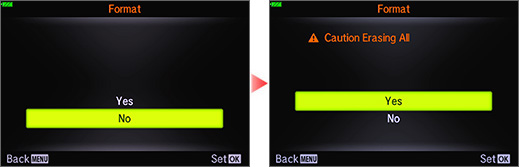
- The confirmation screen for All Erase / Format appears.
To proceed, use the up button to select Yes, then press the [OK] button to start the process.
- The screen will display 'Busy' during processing. When the process is complete, it will return to the shooting screen.

|
|