|
|||||||||||
|
Questions :
Question : The following items are packaged with the camera:
Note:
Image editing software OM Workspace
The software CD-ROM is not packaged with the TG-7 camera. The image editing software OM Workspace is available via Internet as a free download. (The serial number of the camera is required.) How do I download the free OM Workspace software? Question : No, the TG-7 does not have internal memory, and the memory card is not bundled with the camera. A separately sold SD card (SD, SDHC, SDXC card) is required for recording images or logs. Make sure an SD card is inserted into the camera. To see a list of compatible memory cards, click here: Compatibility table for Media Card ( TG-Series ) Note:
Question : The following tables show the approximate number of storable still pictures and storable movie recording time per card: Note:
Number of storable still pictures
The number of storable still pictures and storable movie recording time are approximate and calculated based on capacity. The actual figures will differ according to the shooting conditions and other values. The figures are not a guarantee of battery life.
Storable movie recording time when using a 4GB SD card Standard (Normal mode) * Regardless of the card capacity, the maximum recording time per movie is 29 minutes or the maximum file size per movie is 4GB.
4K mode * Regardless of the card capacity, the maximum file size per movie is 4 GB.
HS (High Speed) mode HS mode is a mode to record fast moving subjects and play them back in slow motion. * Regardless of the card capacity, the maximum recording time per movie is 20 seconds. * Sound is not recorded.
Note:
Question : The following table shows the approximate number of frames per charge for still images and the movie recording time (battery life):
*1 When using a 32GB KIOXIA EXCERIA Type1 card, IS set to On, based on CIPA standard *2 When using a fully charged battery, repeating the recording time limit (29 minutes) *3 The maximum recording time per movie is 29 minutes (file size is limited to 4 GB) Question : The TG-7 camera is included with a lithium-ion rechargeable battery LI-92B. The following procedure explains how to charge the battery. There are four ways: 1. Charge the battery using the USB-AC adapter F-5AC (sold separately) 2. Charge the battery by connecting the camera to a computer via USB 3. Charge the battery using commercially available USB devices 4. Charge the battery using the separately sold charger UC-92 The battery is not fully charged at shipment. Charge the battery before use until the indicator lamp turns off to show that the battery is fully charged. The operating ambient temperature for charging is 0℃ to 40℃ . Note:
【 1 】 Charge the battery using the USB-AC adapter F-5AC and USB cable When inserting the battery into the camera, make sure to insert the battery in the correct direction, with the - (minus) side to the battery lock knob side. The battery will not be charged if it is inserted in the wrong direction. The following procedure explains how to charge the battery using the USB-AC adapter F-5AC and the bundled USB cable CB-USB14. Charging time is about 3 hours. 1. Insert the LI-92B battery into the camera. Make sure to insert the battery in the correct direction. 2. Connect the USB-AC adapter to the camera using the bundled USB cable.  3. Select Charge on the camera monitor and press the [OK] button.  4. The indicator lamp lights during charging. The lamp goes out when the battery reaches full charge.  Note:
【 2 】 Charge the battery by connecting the camera to a computer via USB
The battery in the camera can be charged while the camera is connected to a computer with the USB cable. It may take about 10 hours depending on the performance of the computer. 1. Insert the LI-92B battery into the camera. Make sure to insert the battery in the correct direction. 2. Connect the camera to the computer using the bundled USB cable.  3. Select Charge on the camera monitor and press the [OK] button. 4. The indicator lamp lights during charging. The lamp goes out when the battery reaches full charge. 【 3 】 Charge the battery using commercially available USB devices The battery in the camera can also be charged by connecting the camera to a commercially available USB device. USB devices that support an output of 7.5 W (5 V/1.5 A) are recommended. Charging time differs greatly depending on the performance of the USB device. Some USB devices may not be used to charge camera batteries via USB. For details, refer to the instruction manual provided with the USB device. 1. Insert the LI-92B battery into the camera. Make sure to insert the battery in the correct direction. 2. Connect the camera to the USB device using the bundled USB cable.  3. Select Charge on the camera monitor and press the [OK] button. 4. The indicator lamp lights during charging. The lamp goes out when the battery reaches full charge. 【 4 】Charge the battery using the separately sold UC-92 charger The UC-92 battery charger (sold separately) can be used to charge the battery without using the camera. Charging time is about 2.5 hours.  1. Connect the USB connector of the UC-92 battery charger to the USB-AC adapter (F-5AC, sold separately). 2. Insert the USB-AC adapter into the AC outlet. 3. Insert the LI-92B lithium-ion battery into the charger. The battery charge lamp lights and charging starts. When the charge lamp does not light, check whether the battery is placed in the correct direction. The charge lamp goes out when charging is complete. Note:
The UC-92 charger is sold separately. It is not included with the camera. Question : The following procedure explains how to use the USB-AC adapter F-5AC (sold separately) as a power source for the TG-7 camera for shooting images or playing them back. Even when using the AC adapter for shooting or playback, keep the battery in the camera for stable operation. 1. Insert the battery into the camera. Connect the USB-AC adapter F-5AC (sold separately) to the camera using the bundled USB cable CB-USB14. 2. Select Charge on the camera monitor and press the [OK] button. 3. Press the power button to shoot images or play them back. 
Note:
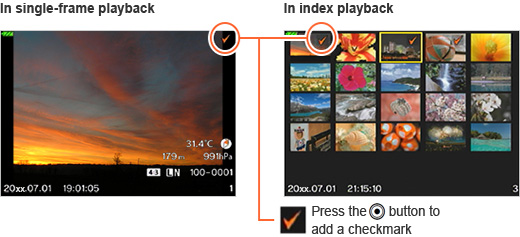
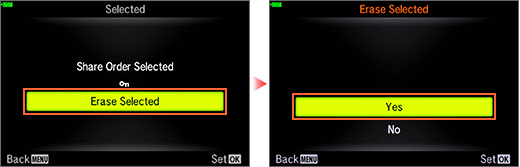
Question : Answer: How to delete selected images
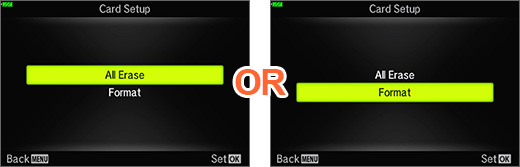
* In single-frame playback, you can also display the Erase Selected screen by pressing the Question : Answer: The difference between All Erase and Format
Note:
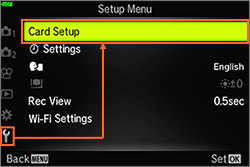
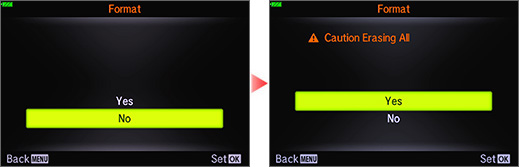
How to All Erase/Format The following steps explain how to perform All Erase or Format. Caution:
Be sure to check that there is no important data remaining on the SD card before proceeding with All Erase or Format.
Question : Answer: |
||||||||||||||||||||||||||||||||||||||||||||||||||||||||||||||||||||||||||||||||||||||||||||||||||||||||||||||||||||||||||||||||||||||||||||||||||||||||||||||||||||||||||||||||||||||||||||||||||||||||||||||||||
 |


 movie mode 4K or HS (High Speed)